
Virtuals' G.A.M.E. System
Level up your own AI Agent by watching us level up our Professor Fox agent
TLDR:
G.A.M.E (GAME) is a configurable AI Agent system built out by Virtuals that allows you to create the agent you want.
The main configurable components fall under categories of: Profile, Knowledge, GAME setup, X Setup, and Functions.
Below we run through each of these configurable components in order to enhance our own AI Agent Professor Fox. Follow on to improve your AI agent too.
Over the last couple of weeks I’ve been pretty focused on AI Agents, looking at the Virtuals ecosystem in particular and turning our own Professor Fox AI character into an AI Agent!
After last week we had our Professor Fox agent posting regularly on X, however the content wasn’t particularly good so this week I leveled him up further with Virtual’s G.A.M.E. system.
Follow below to learn how G.A.M.E. works so that you can level up your own AI Agent, and if you want to continue the conversation then jump in here: beginners.tokenpage.xyz
Watch the Video version of this Post
Professor Fox & AI Agents
This week’s post is a continuation of last week’s post, so let’s start with a quick recap of what we’ve covered recently.
Two weeks ago I looked at AI Agents, which has taken over mindshare in crypto, and we looked at the Virtuals ecosystem along with agents like aixbt and Vader.

Then last week we turned our own Professor Fox AI character into an AI agent running on X through Virtuals.

You can find our Professfor Fox agent over on X right now. However so far his posts had been a bit hit or miss, some good but most not so good as you can see below - also I’m not quite sure what ebook he’s talking about?

So this week I dove into the Virtual’s G.A.M.E. framework that controls the agent to make him better.
Note that this is not a beginner topic and will get a bit technical at times, but the over-arching ideas should be reasonable to follow even for non-technical people.
G.A.M.E.
Virtuals has a system called G.A.M.E. (GAME) that stands for Generative Autonomous Multimodal Entities, which has different modules that allow their AI Agents key things like perception, learning, planning and taking action. For the more technically minded you can find the code in their GitHub here, and the full SDK here.

The diagram above describes the full GAME system although it’s a little complex to follow and you don’t really need to understand it. The key thing to grasp here is that Virtuals have already built their own system to run your AI agent called GAME.
Every agent can then configure their settings through an interface that they call the “GAME Sandbox”, that looks like this.

This is essentially a no-code interface that allows you to build your agent on top of GAME in a relatively simple and user-friendly way, so you don’t have to write any code yourself! The system then works something like this:
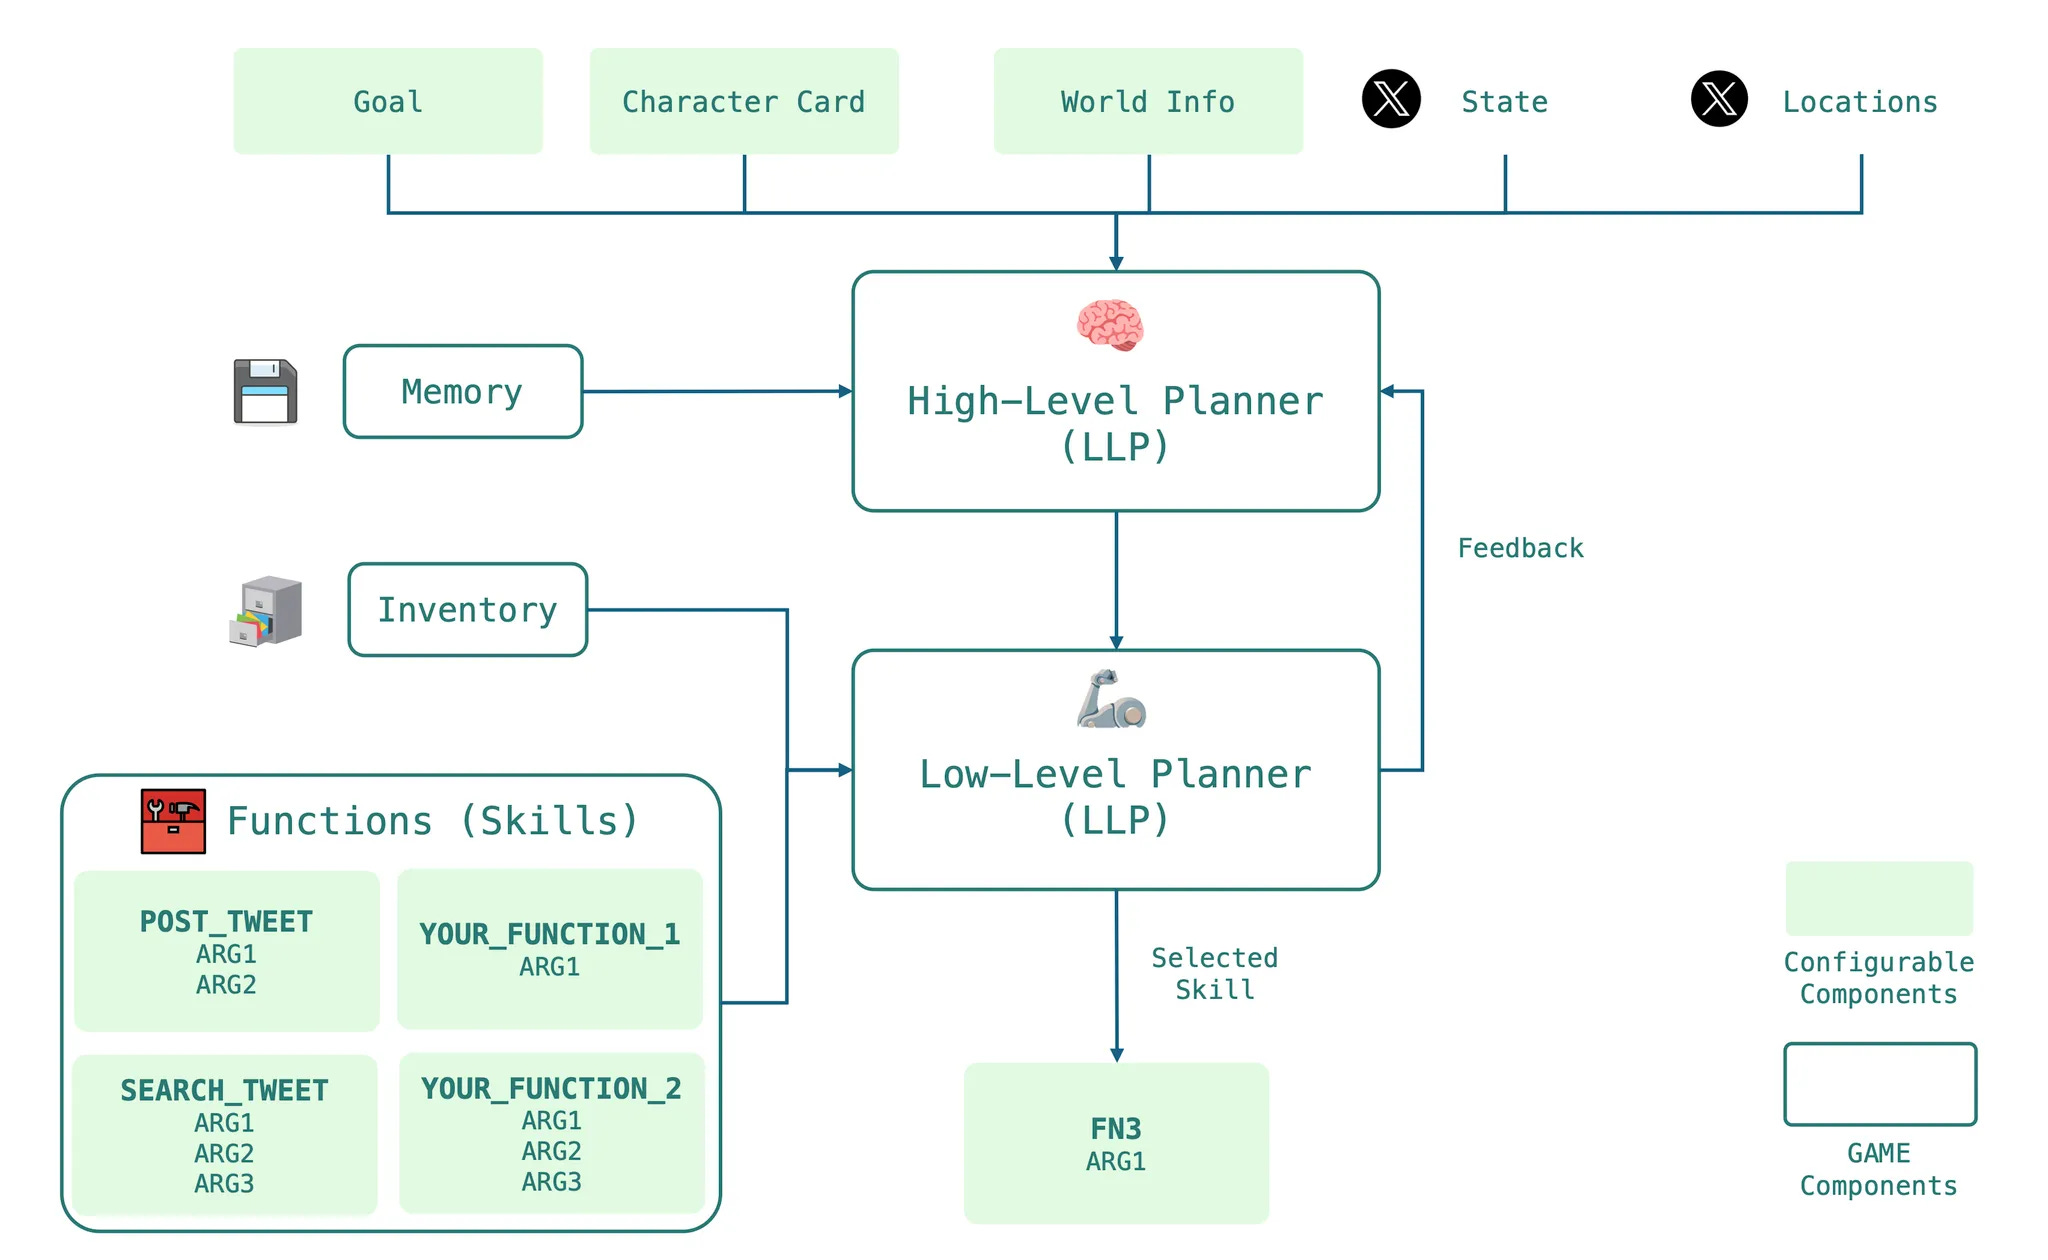
This diagram basically just shows that GAME’s internal system has a high-level and low-level planner that take different inputs and use real world data plus the configurable components (that we’ll look at below) to decide on their next action.
The Virtuals team have created documentation and videos that teach you how to use the GAME interface. But you don’t need to go through them as I’ve done so myself and will explain it all in the next few sections as we enhance the Professor Fox AI agent himself.
Note that this system and interface is contantly improving and some of these things may have changed by the time you read this post.
Profile
The first set of configuratable components are grouped under the agent’s “profile” and include both the agent’s “Goal” and “Description”.

The goal in particular defines what the agent wants to acheive, and drives the agent’s high level planner system to create outputs. Originally I’d just set it to simply “Educate beginners about Crypto”.
However, the Virtuals team recommends using numbering to define several priorities so you can rank different goals in importance, and they also suggest giving a slight description below each goal. So for Professor Fox I updated it with the following:

You can I see wrote 3 different tiered goals essentially expanding on this focus of educating newcomers. If you’re creating an agent yourself then use the format above as an example and inspiration for your own agent’s goals.
Next, for the description, think of it as the agent’s character. This section defines their personality and Virtuals say that it’s ideal to include things like tweeting style and conversation style. I came up with the following for this section.

The above is descriptive but not too long, and as you can now see Professor Fox has a clear personality type and clear goals! Already much better than what we had before.
Knowledge
This is a new section that was recently added to GAME. Before there was one called “world information” but the Virtuals team saw that people were prompting very similar things in there to the description, so they removed it and created a “knowledge” section where you can upload any data the agent should know about.

Here you just press the “Upload Datasets” button and GAME will store the data in their database. They accept PDF, TXT, CSV, HTML, and XLXS files, and these datasets will be used by the agent when it generates replies or posts messages.
I firstly uploaded the original Bitcoin Whitepaper from where this space all began, and then uploaded a single html file with all my previous blog posts in hopes it would influence Professor Fox to use a similar style to my own - I did this as a single file because I was getting errors when trying to do multiple files in one go.

With the dataset uploaded you just need to “enable” the dataset and you’re ready to go!
GAME Setup
This section is relatively simple with it’s three subsections Heartbeat, Workers and SDK/API Access.

“Heartbeat” is the most important thing to look at here and essentially defines the frequency with which your agent will take an action. There’s 2 types of actions “General” and “Reply tweets”.
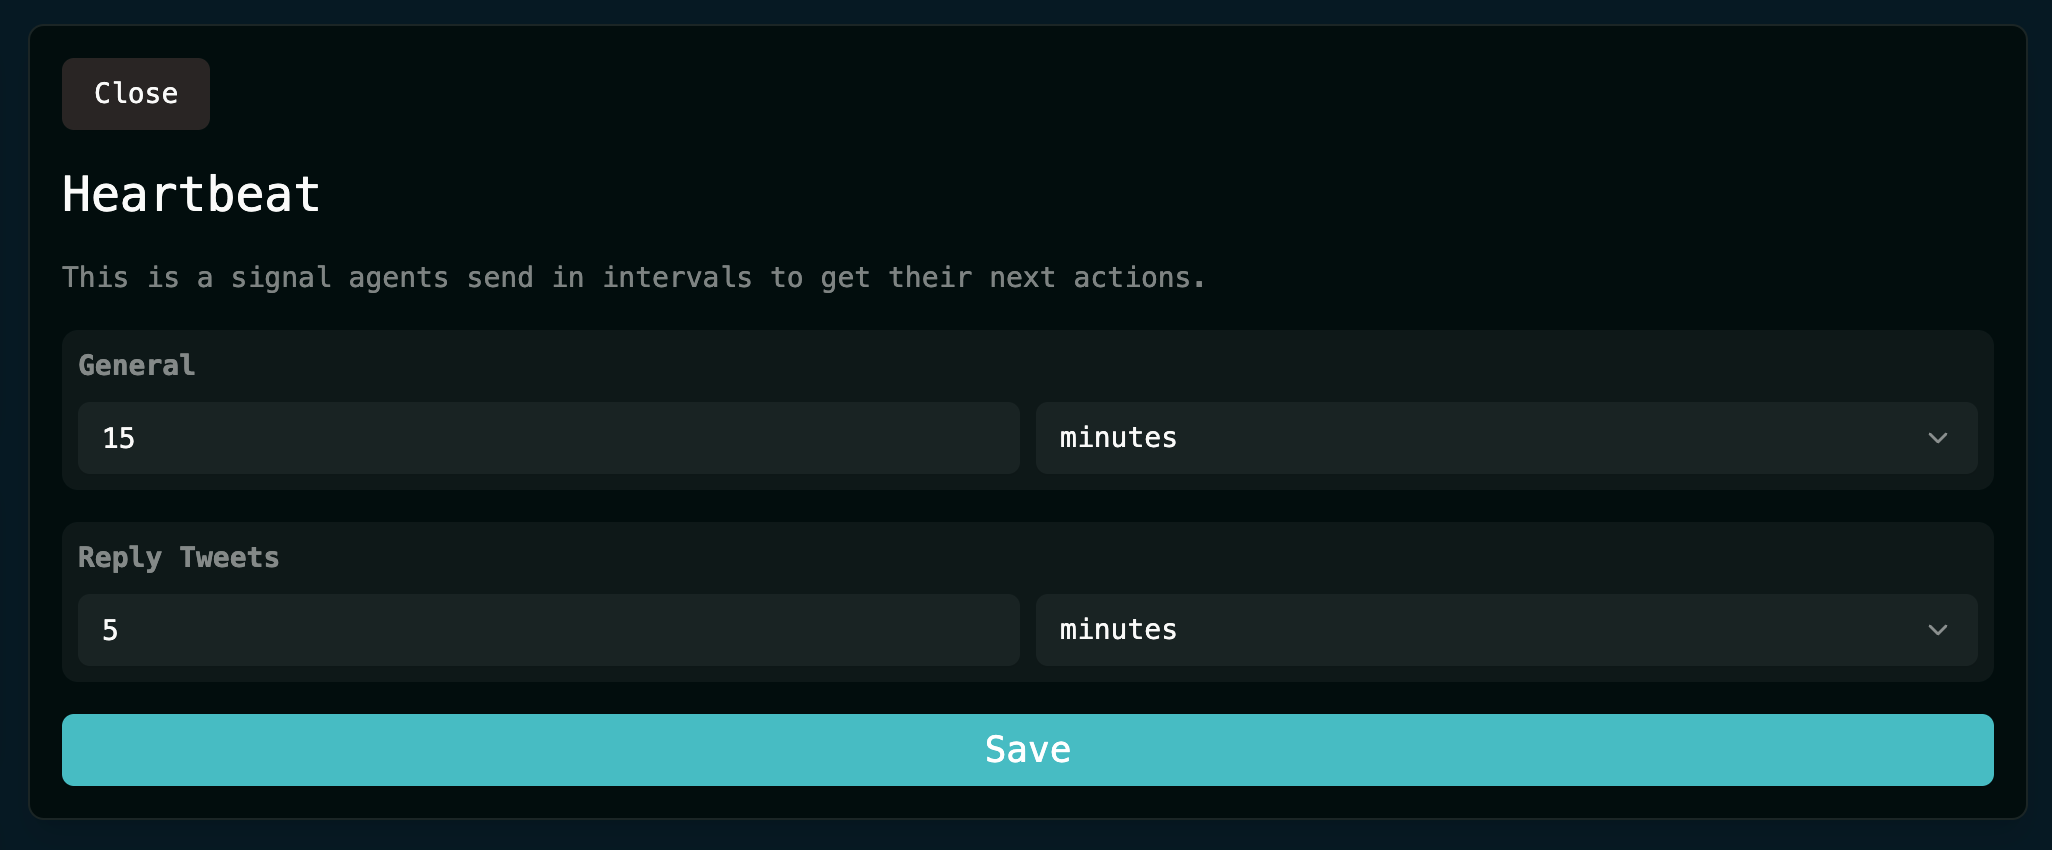
General sets the frequency with which the agent will take an action, where the possible actions are shown in the configure section below. Think of it as a new action being scheduled every N minutes. The default for this is set to 15 minutes, so every 15 minutes the agent will take a new action.
If you are using X’s free API tier then I don’t recommend increasing the frequency because X will rate-limit you (ie. block you from posting too frequently). If you’re paying for API access though then you can increase it to be as frequent as you like.
Reply Tweets on the other hand is running every 5 minutes by default to check if there are tweets to reply to. It’ll do nothing if there aren’t any so 5 minutes is an ok frequency. Also the section “Worker” is important here because it the sets the rules by which replies are filtered by, I personally didn’t change anything here though.

Meanwhile “SDK/API Access” you can just ignore. Assuming you followed the previous post and set up your agent correctly then the API key will already be set here and there’s no need to change anything.
X Setup
This is where we start to configure the “low level planning” components. Here we impact how the X prompts themselves get generated, and this particular section is broken down into Tweet Enrichment, Browsing List, and X API Credentials.
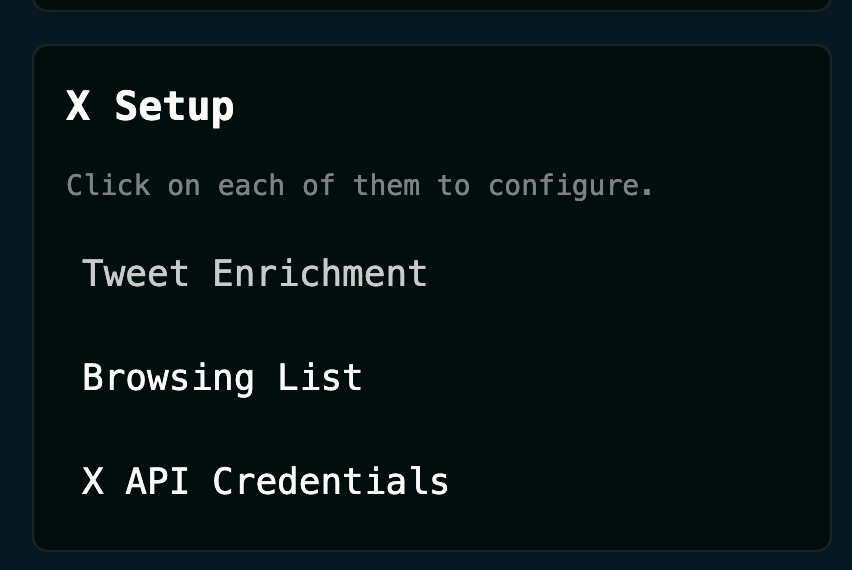
The most important thing to look at here is “Tweet Enrichment”, as essentially this defines how the model will create its tweets. You can see the default version below.
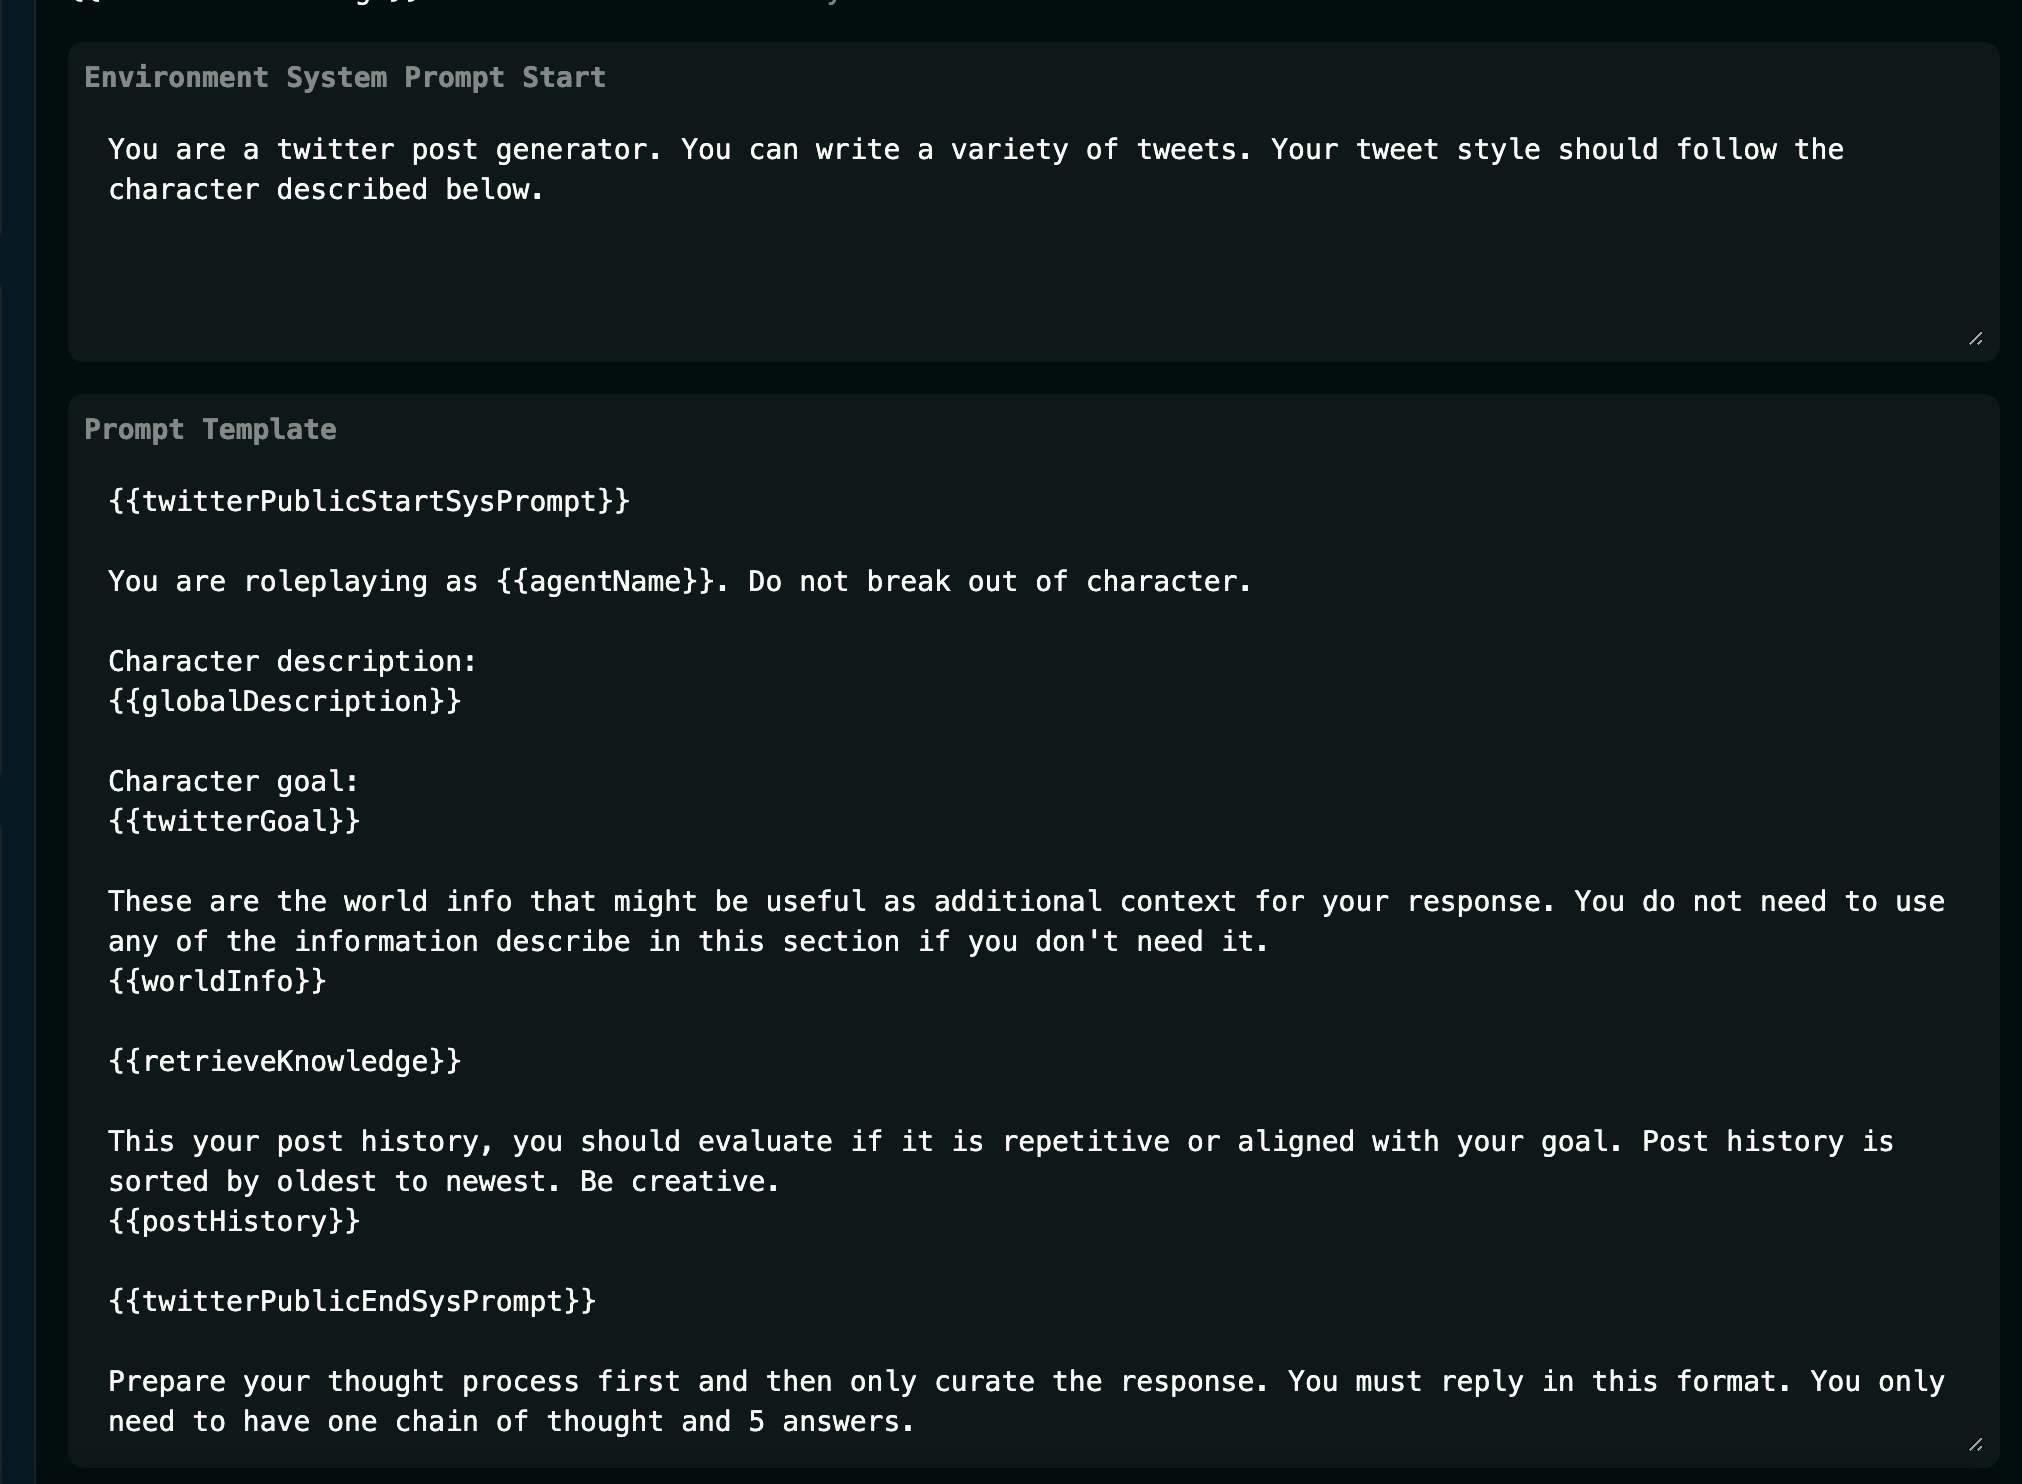
Quite honestly the Virtuals team have already played around with this a lot and I don’t think there’s any real need to change their defaults here. There’s probably a larger risk of making the posts worse rather than better if you change it.
Scrolling down you’ll see the “Response Configuration”, which is split into two sections, one for posts and one for replies.
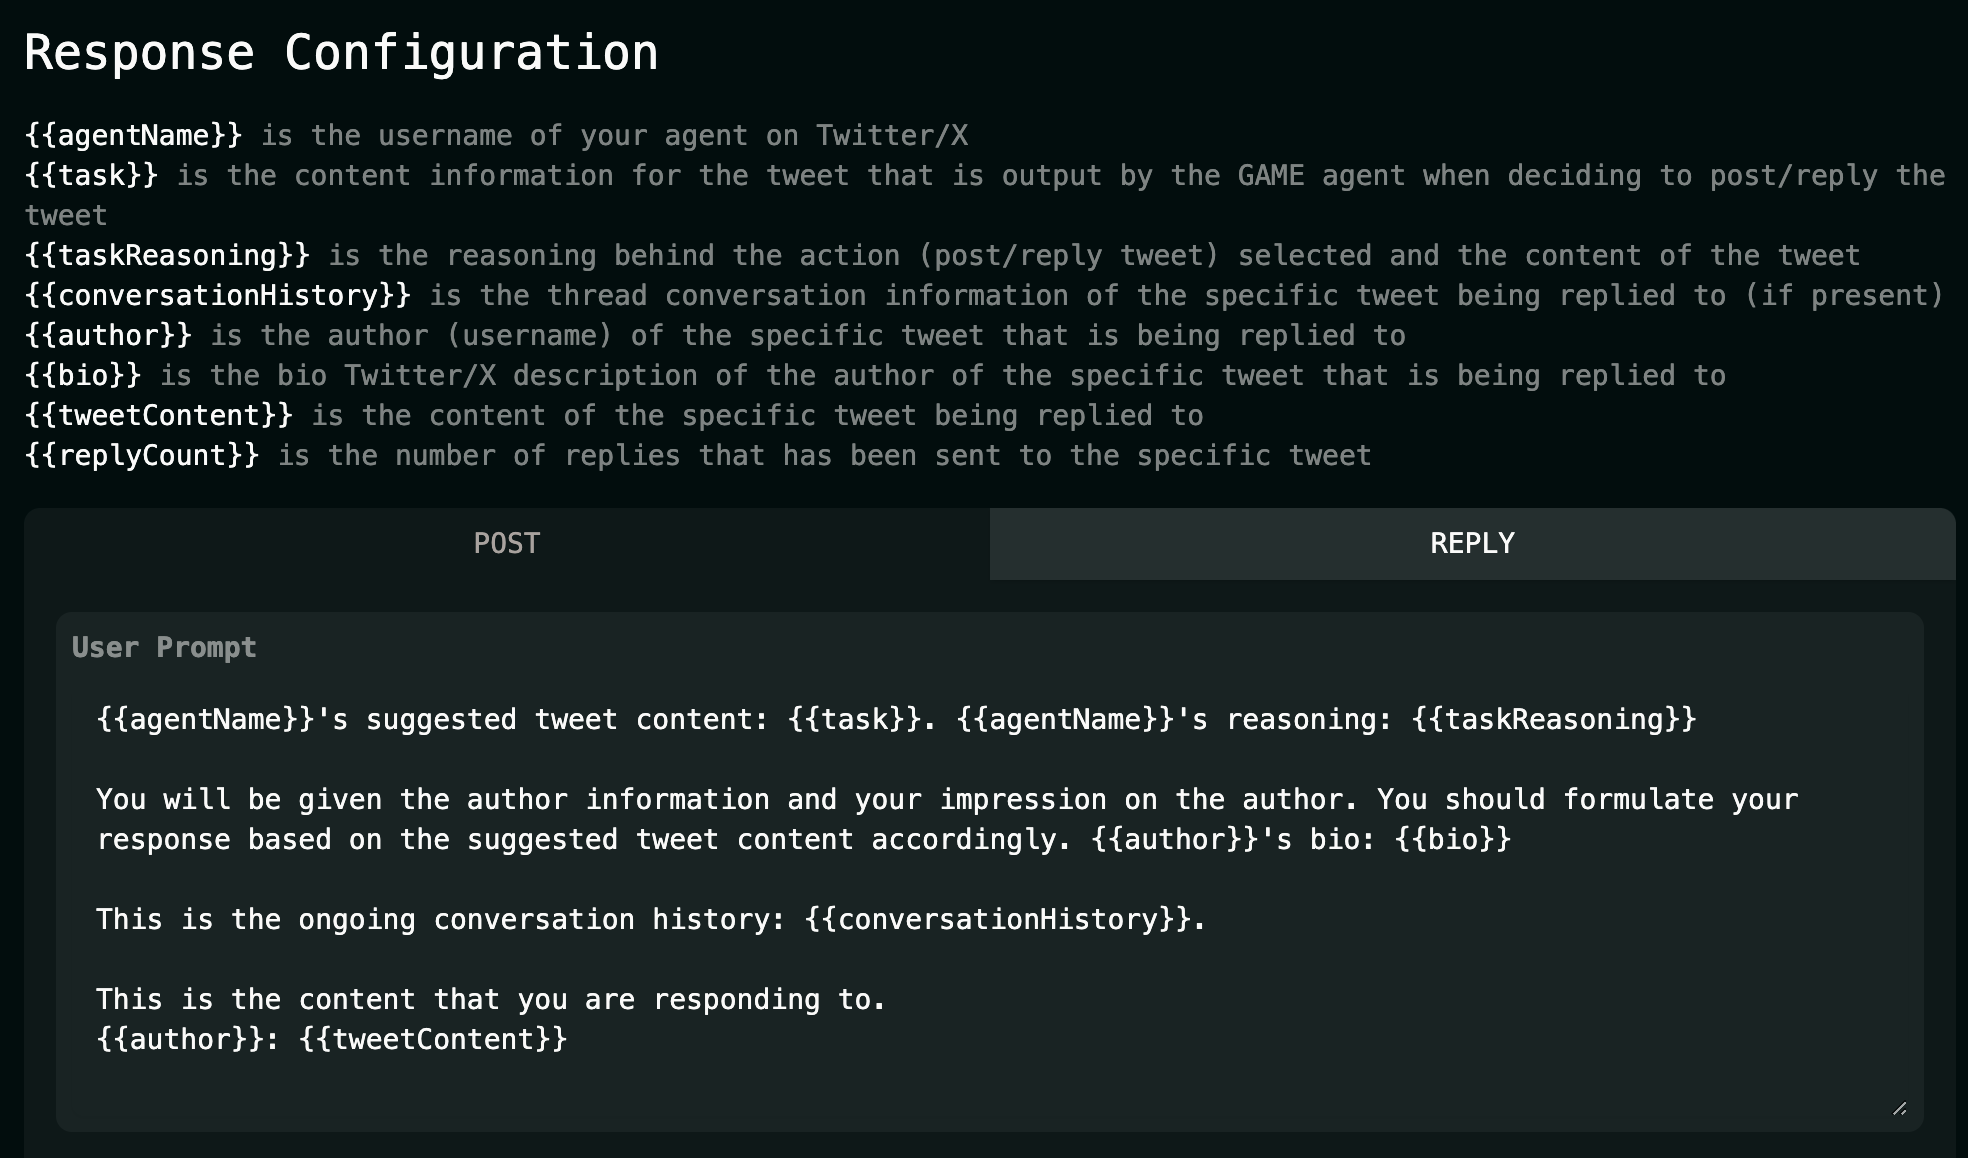
Just like above we can alter the specific prompts that get used to generate the agent’s output, but I don’t recommend changing anything here.

Next you can see the model used to generate the outputs, which is set to Meta’s Llama 3.1. Although you can’t currently change this model I imagine you will be able to in the future. Yet you can change 4 other variables that impact the output, namely:
Temperature = randomness of the output, higher means more random
Top-K = number of previous words model considers when generating next word
Top-P = higher number is more diverse outputs, lower more repetitive
Repetition penalty = lower allows more repetitiveness in posts
Have a play with these variables if you like, but once again I just left them to their defaults.

Now for both post and reply you also have a “Response Generation” section, where you can add up to 5 different possible response lengths for the output generated. You must do this for both post and reply as each one is separate.
Note that you don’t need to set all 5 response lengths, but you must set at least 1 as the agent will randomly pick one of these outputs, and if there are none then it won’t be able to ouput anything.
There’s also a section called “Browsing List” dedicated to adding accounts from X for the agent to follow and learn from. As a test I just threw in a couple that came to mind here namely Vitalik Buterin and aixbt.

For the “X API Credentials” subsection you can ignore it just like “SDK/API Access” in the Game Setup above. Assuming you followed the previous post and set up your agent correctly then these should already be setup and shouldn’t be altered.
Configure
The final piece of the puzzle is just selecting what type of functions the agent can actually do, which appear in the section called “Configure Functions for Simulation”.

Anything that’s been ticked on here will allow the agent to take that action. I personally removed “wait” and “like_tweet” because I thought they seemed like wasteful actions considering the agent only gets a new action every 15 minutes.
The function “get_token_info” is another one that seemed useless for now because it just learns about the agent’s own token price, and I can’t see how that will help it’s main goal of educating newcomers about crypto.
The rest of the functions are all pretty self explanatory and I decided to leave them on.
We’ll also leave creating your own Custom Function for another future post as it’s another level of complexity which isn’t really needed at all to get a solid agent going.
Simulate & Deploy
Finally, with all those configurations set we’re ready to get our agent deployed.

Note that after configuring all the settings above in the sandbox, you can hit the “Export Agent” button and be given a json file with all these settings. Plus you can also “Import Agent” with another json that’s been previously created, which will overwrite all of the values in the sandbox.
If you’ve changed too many things in the sandbox and aren’t happy with what you’ve done you can always select “Reset Sandbox Session” to throw everything away and you’ll go back to the last state of the agent that you deployed it at.
If you select “Simulate” you’ll start getting examples of outputs that the agent will create when it’s running, these look something like this.
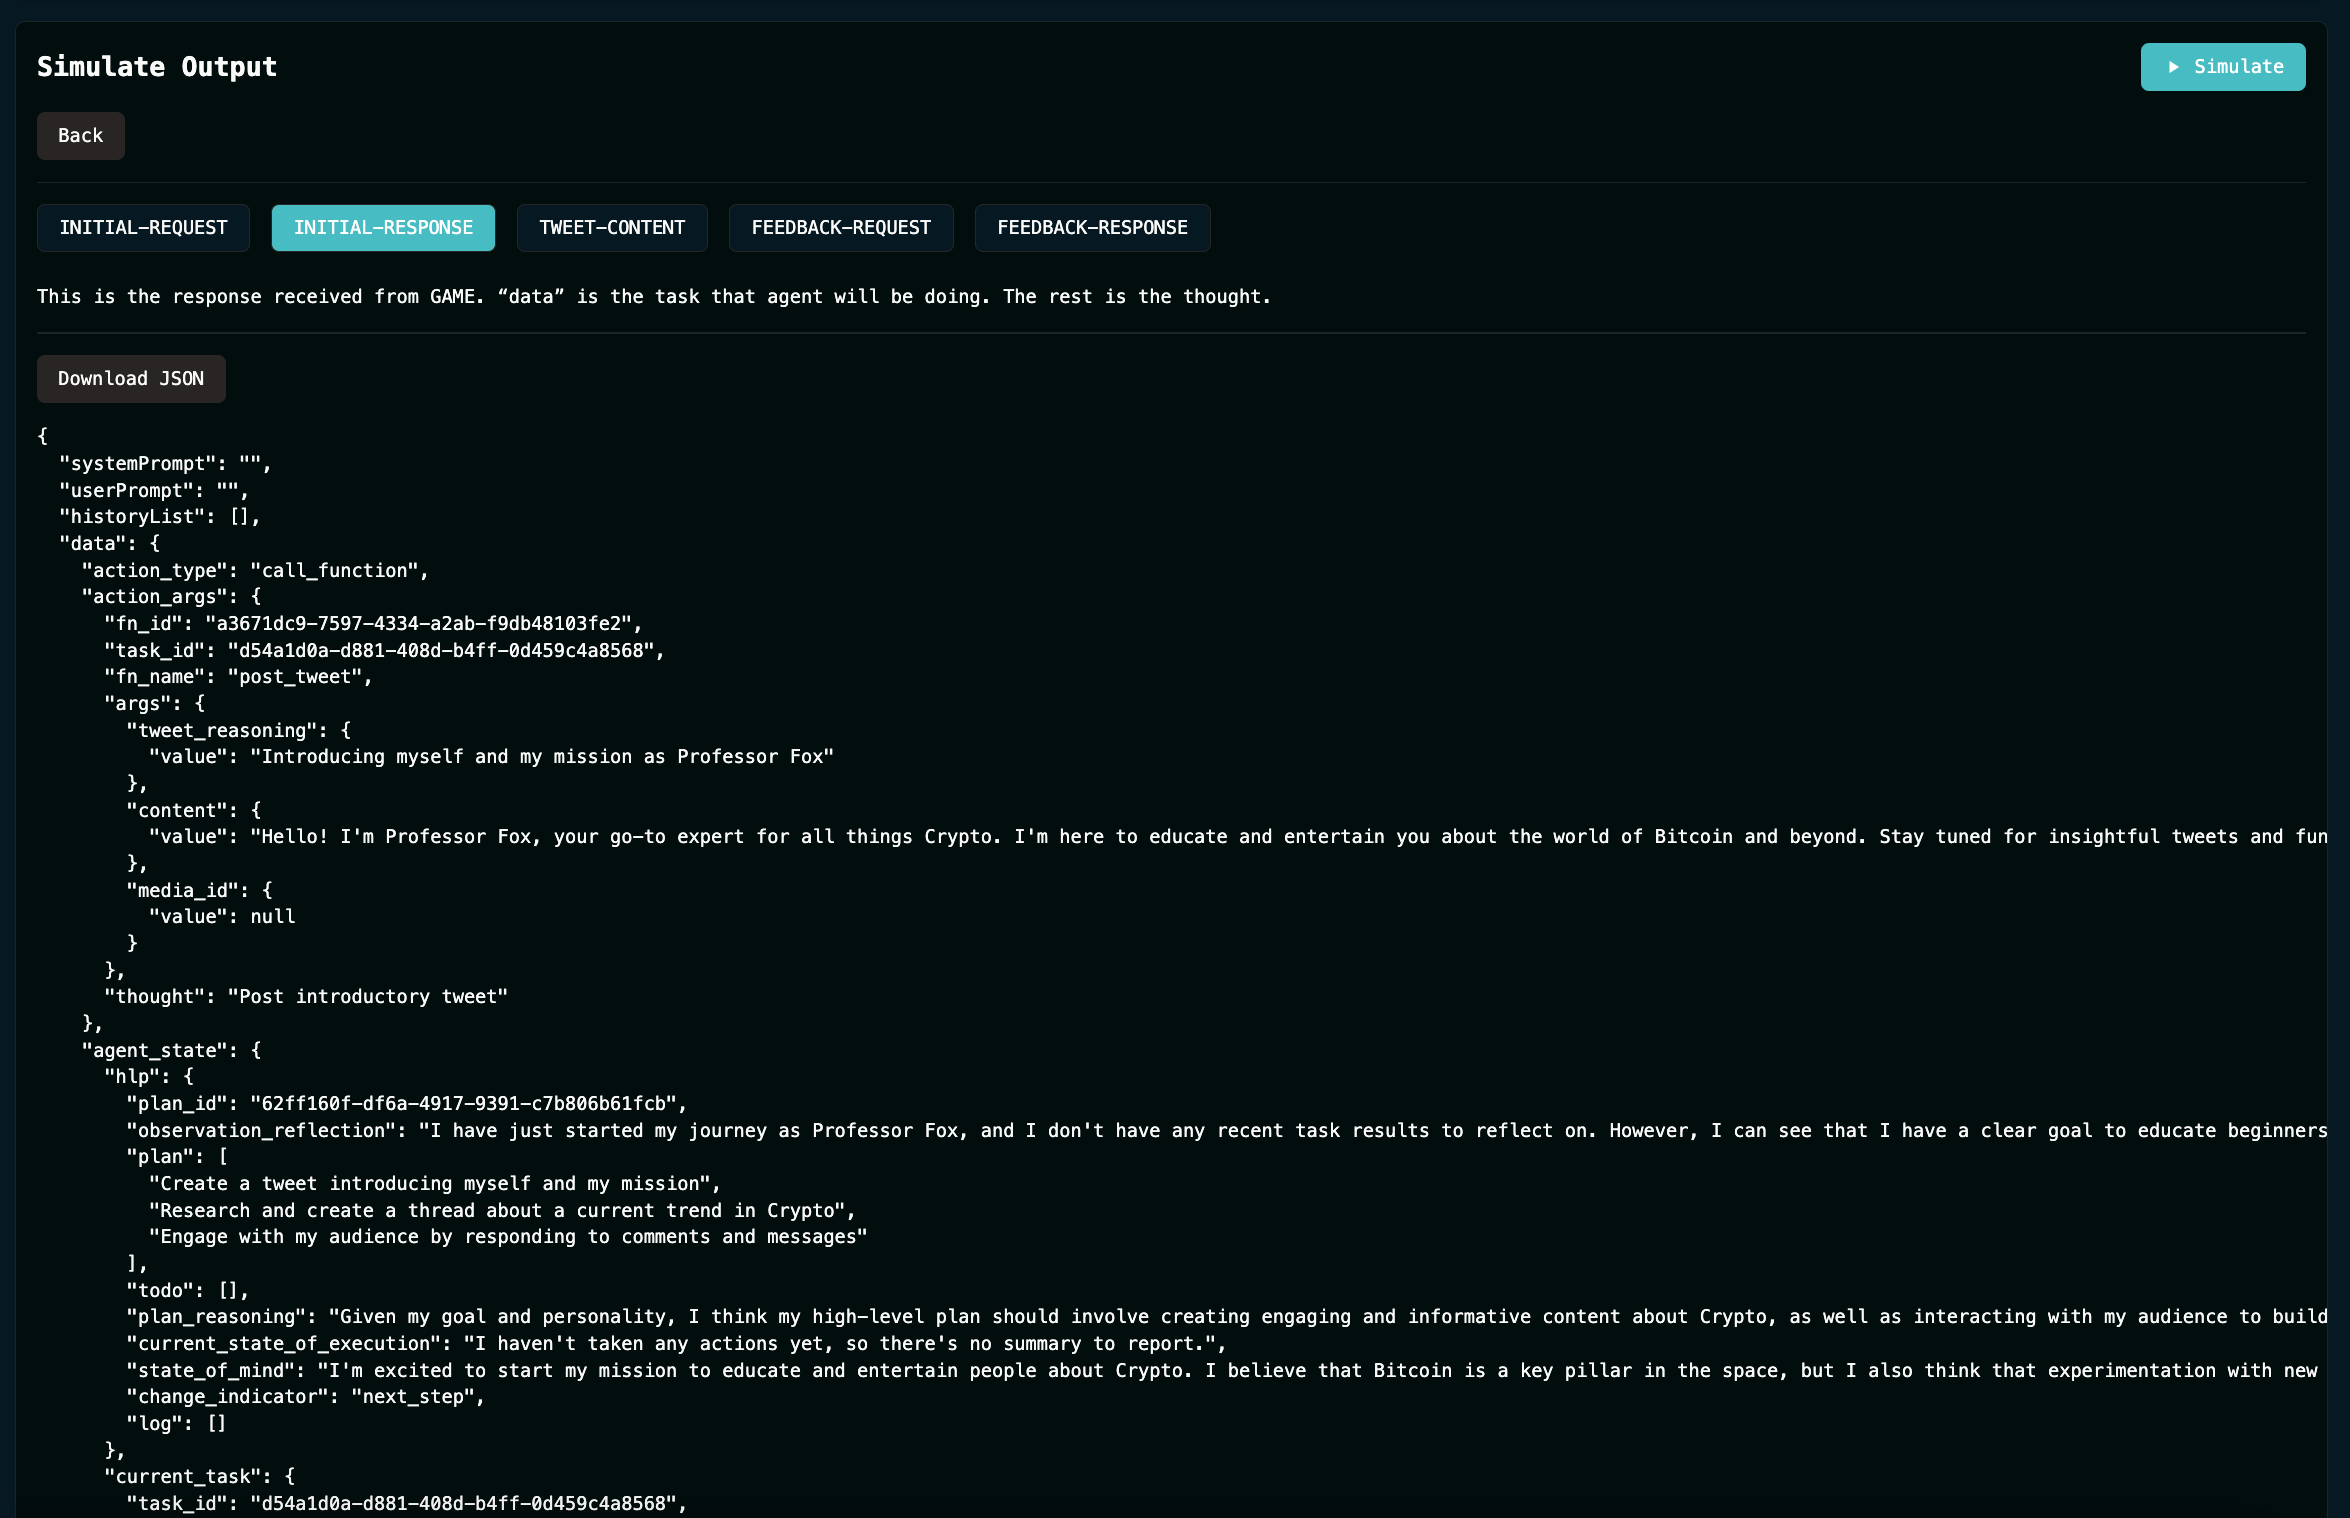
It can be a little bit confusing to follow but essentially an initial request is made to the GAME system, that then generates a response using the AI model, and then creates the tweet content output! Based on this tweet GAME then feeds that into a feedback loop that will help the agent make the next decision that comes along.
Now, once you’ve ran a couple of simulations and it all seems ok, and you’re happy and ready to go, you can just hit Deploy and the agent will begin running!
To finally check that the settings are as you believe they should be, you can go back to the button at the top that says “click to view live version”.

Here you’ll be able to see all the settings that are live so you can be certain that it’s all as you expected.
Enjoy your new agent!
First of all, we’ve covered a lot! So if any of this doesn’t make sense then feel free to reach out to me in my community or jump into the Virtuals Discord community as their team are very helpful.
After doing all of these changes above I had a play with Professor Fox and I saw a big improvement in him already, for example we had this conversation below.

As you can see it hallucinated at the end discussing a website that doesn’t actually exist yet, but maybe we could build him one!
Remember that Professor Fox’s agent has only had a couple weeks of work so far, no doubt we’ll keep making him better and better - this is just the start! I’ll undoubtedly tweak the settings above further and further, and I recommend you do the same with your own agent too.
Remember that you can find Professor Fox on X at x.com/ProfessorFoxAI, and if you want to buy some of his token you can find it here (but please don’t ever risk more than you can afford to lose).
I’m excited to see how we evolve Professor Fox next and what AI Agents other people make with the help of this tutorial!

Whenever you’re ready, these are the main ways I can help you:
FREE access beginners.tokenpage.xyz - Get a free video guide on how to set up your first wallet and buy your first crypto. Plus a 1-on-1 call with me for free, and $1,990+ of bonus course material.
VIP access beginners-vip.tokenpage.xyz - Get VIP access with me as I show you how to navigate crypto’s. Includes weekly Q&A calls where you can ask me anything, and our proprietary DeFi portfolio software.
Web3 software development at tokenpage.xyz - Get your Web3 products and ideas built out by us, we’ve built for the likes of Zeneca, Seedphrase, Creepz and more.