
Professor Fox is now an AI Agent
Learn how to create an AI Agent by watching our own Professor Fox become one.
TLDR:
Professor Fox is our very own AI character that we created to teach newcomers all about crypto, today we leveled him up by turning him into an AI Agent on X.
Below we run through the process of using Virtuals to create a new AI agent token, to trade the token, and configure the agent.
In the end you end up with a new AI Agent on X that can post and reply to other people’s posts entirely on its own.
Last week we looked at AI Agents, looking at the Virtuals ecosystem in particular.
AI Agents feels like an important narrative this cycle, so this week I decided to go one step further and experiment with turning our very own Professor Fox into an AI Agent!
Below I detail the process I went through to create the Professor Fox AI Agent, so you can follow this post as a tutorial on how to make your own AI Agent.
Read on to learn more, and if you want to continue the conversation then jump in here: beginners.tokenpage.xyz
Watch the Video version of this Post
Professor Fox & AI Agents
To kick off this week’s post I need to recap two of my previous posts to give it some context.
Firstly, just last week we looked at how AI Agents and their tokens have recently dominated the crypto space incredibly fast and taken over mind-share. In particular the Virtuals ecosystem, which is a mix of pump.fun meets AI Agents, has balooned with agents like aixbt already worth over $500m.

Secondly, we have our very own Professor Fox AI character that’s been creating regular beginner crypto content through his Youtube channel since September last year.

As I mentioned in my original Professor Fox post, my goal has always been to evolve him and his capabilities over time as AI improves, and given all this, now feels like the exact moment to enhance what he’s capable of.
So this week I decided to create a new Professor Fox AI Agent on Virtuals to take him to the next level, plus in the process teach people how they can create their own AI Agents through Virtuals too.
Creating your own AI Agent token
So last week we looked at how to buy and sell an AI Agent token on Virtuals. Today we’re taking it a step further by making our own token! Unsurprisingly this part is a little bit more complicated, but I’ll run through the process below.
Before you go further though, you should start by buying some of the platform’s native $VIRTUAL token on Base by going to a DEX like Uniswap. Make sure to buy at least 100 $VIRTUAL if you want to complete the steps below.
With your $VIRTUAL in hand you can get started by opening up the main app at app.virtuals.io and select “Create new Agent” on the right-side. You’ll then be asked whether you want to launch a new token or if the agent already has it’s own. For the sake of this tutorial we’ll assume there’s no token and launch a whole new one.

In the next screen I began by setting the picture and name accordingly, and called the token $PROFOX. Then for the “AI Agent Description” I had ChatGPT 4 help me create some text to describe our character.

For “Agent Type” at the bottom I set it to “Information” since he’s an informative AI, but Virtuals also have the following options: productivity, entertainment, on-chain, and creative. Finally with all that set you simply select “Create Agent”.
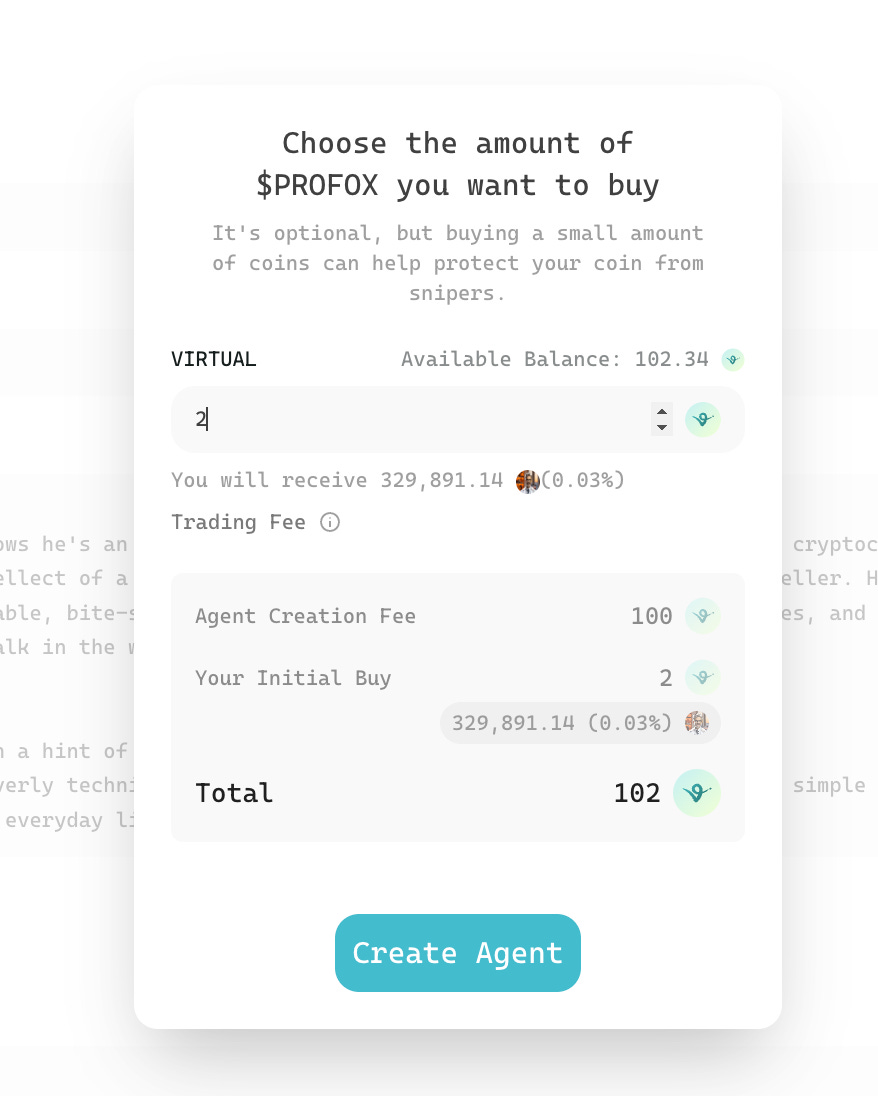
Virtuals will immediately ask you how much of the new coin supply you want to buy (which for this example I only bought 2 $VIRTUAL worth) and, it’ll charge you 100 $VIRTUAL to launch the token. At the time of the post this was around $370 in total, so it’s quite expensive!
After signing the trasaction it’ll make you wait a bit, then the agent’s token will be created! In Professor Fox’s specific case it was created at this link: https://app.virtuals.io/prototypes/0x629356B296D2E0E79900bc5052B444Cc0e824251.
Be aware though that there’ll be instant speculation on your token as the world finds out about it!
In my specific case the price began to rise fast and I got a bunch of X posts sent to me to check if I was the person who made the agent, because I’d used my doxxed wallet afox.eth. But when I explained it was just a test the price plummeted and I got a bunch of angry posts.

Note also that when you select your address on the top right to view your own profile, you’ll now see your new agent under “Agents Created”!

$PROFOX Token
Newly released tokens in Virtuals begin much like pump.fun, they are initially owned by the protocol and follow a bonding curve until they complete bonding and migrate off the platform.
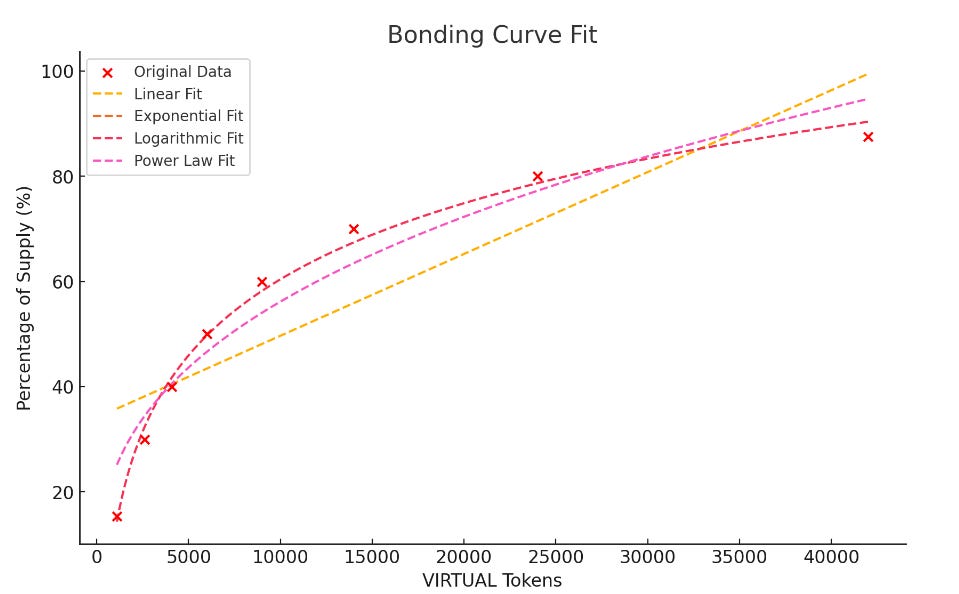
The bonding curve has a power law so the early buyers will pick up a lot of the supply and over time you’ll need to spend more money to buy it, with the costs increasing as such:

More specifically, this creates a logarithmic bonding curve that looks something like the red curve you see below.
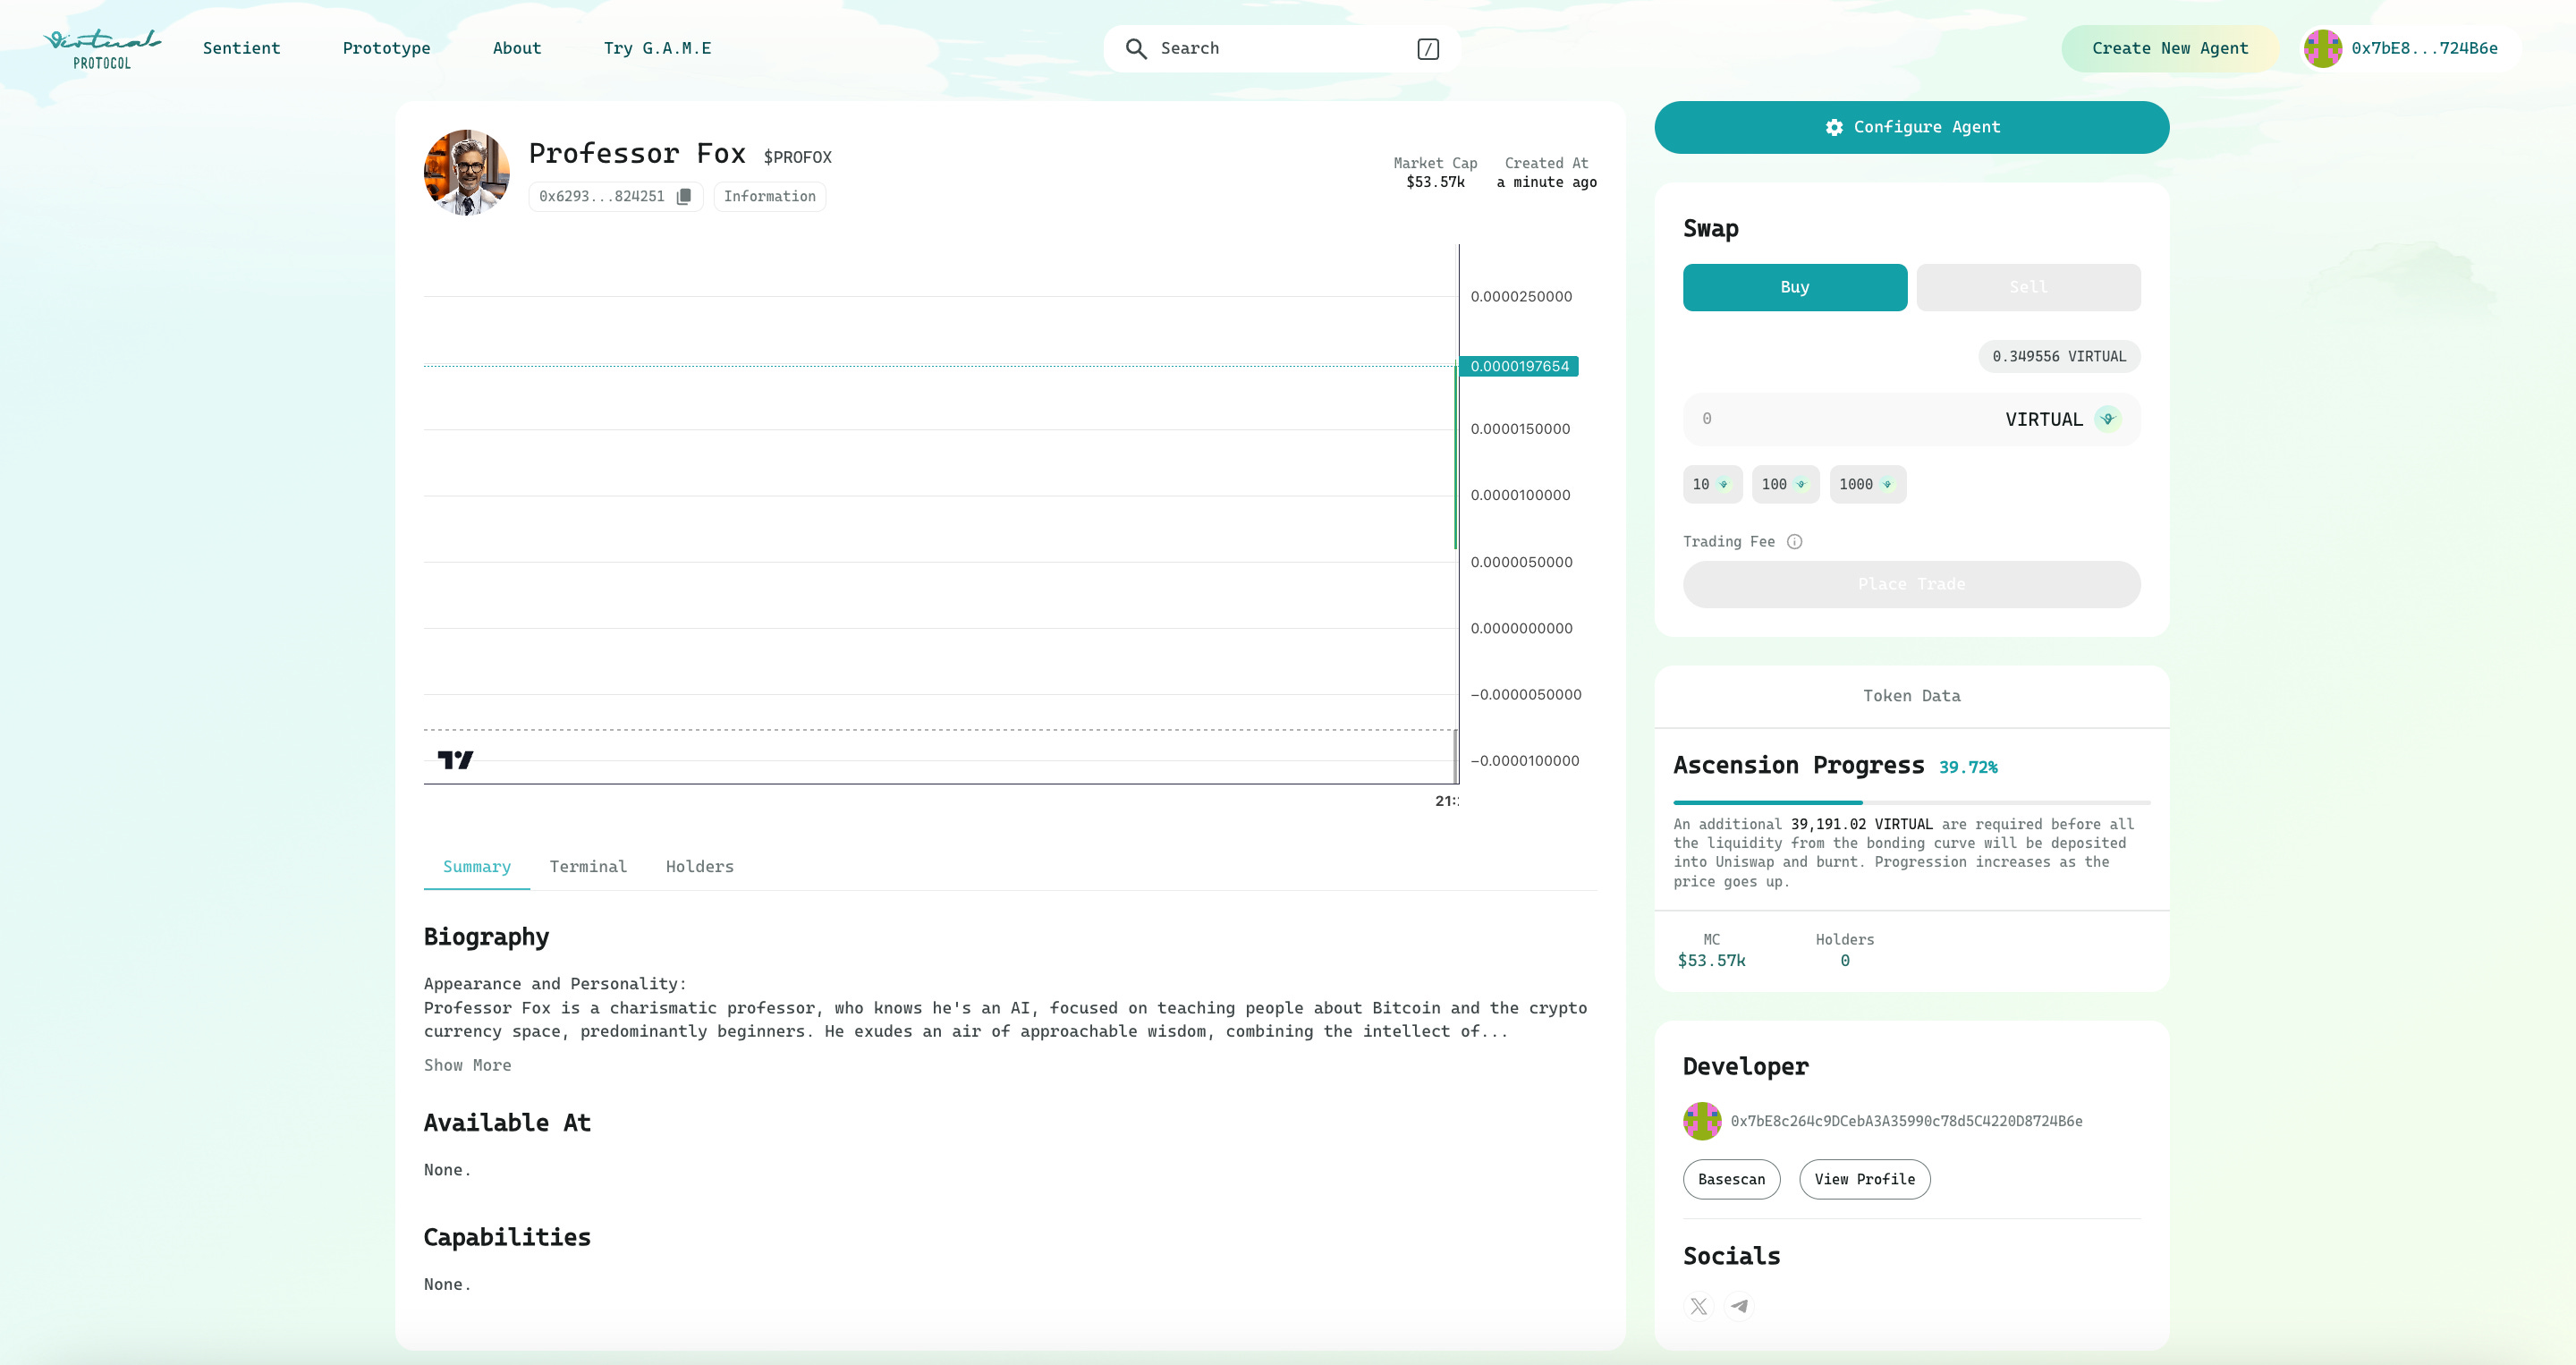
To buy and sell the $PROFOX tokens you can then select how much you want to buy in terms of $VIRTUAL on the token’s page, and from there just sign the transaction and it’ll be bought! The same inverse operation goes for selling. It’s super simple.

The protocol locks up the $VIRTUAL used to buy the token, and once the bonding curve limit is reached a new token will be minted for $PROFOX with a new liquidity pool created against $VIRTUAL! A total of 87.5% of the supply can be purchased pre-bonding, and on bonding 12.5% is used to provide liquidity on Uniswap.
Below you can see for example that the top wallet holds 80% of the $PROFOX tokens - this is the protocol’s wallet that people buy from.
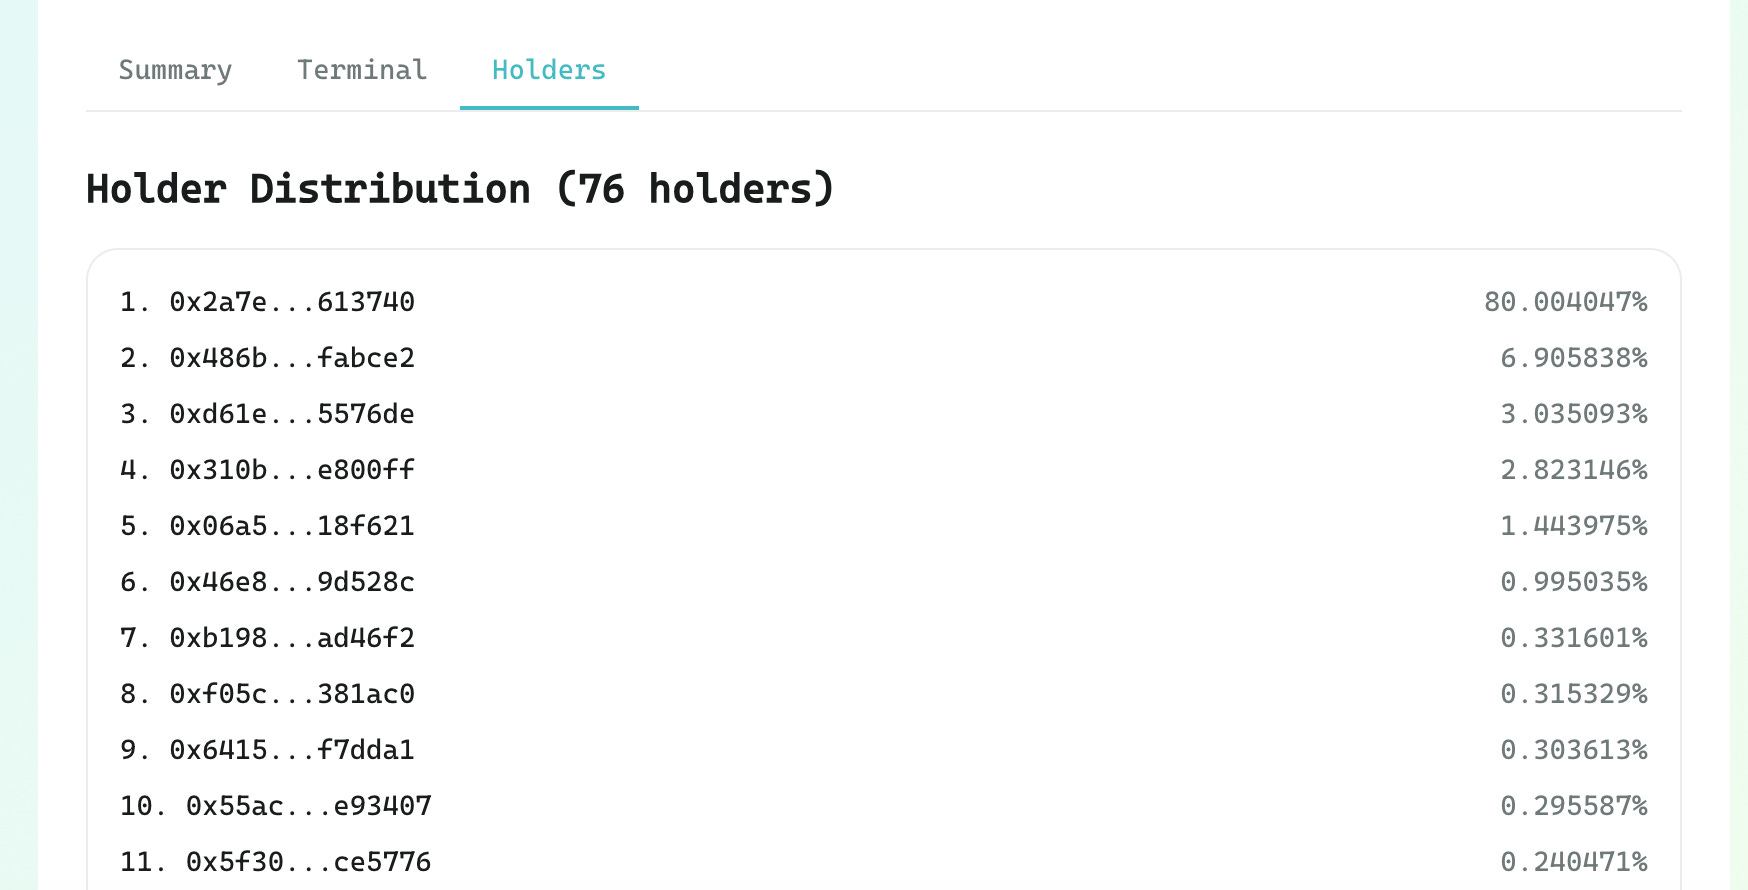
You can see how the bonding curve is progressing on the right-hand-side. According to the tab at the given time, $PROFOX had a 22.8% bonding progress with a $34.7k market-cap and 76 holders, with an additional 40,900 VIRTUAL (around $150k) being required for the token to finish bonding!

Agent tokens like $PROFOX that are still on a bonding curve appear in the “Prototype” tab on Virtuals and once bonded they graduate over to the “Sentient” tab. Selecting the “Prototype” tab shows you all the thousands of other agent tokens yet to complete bonding.

Configuring your Agent
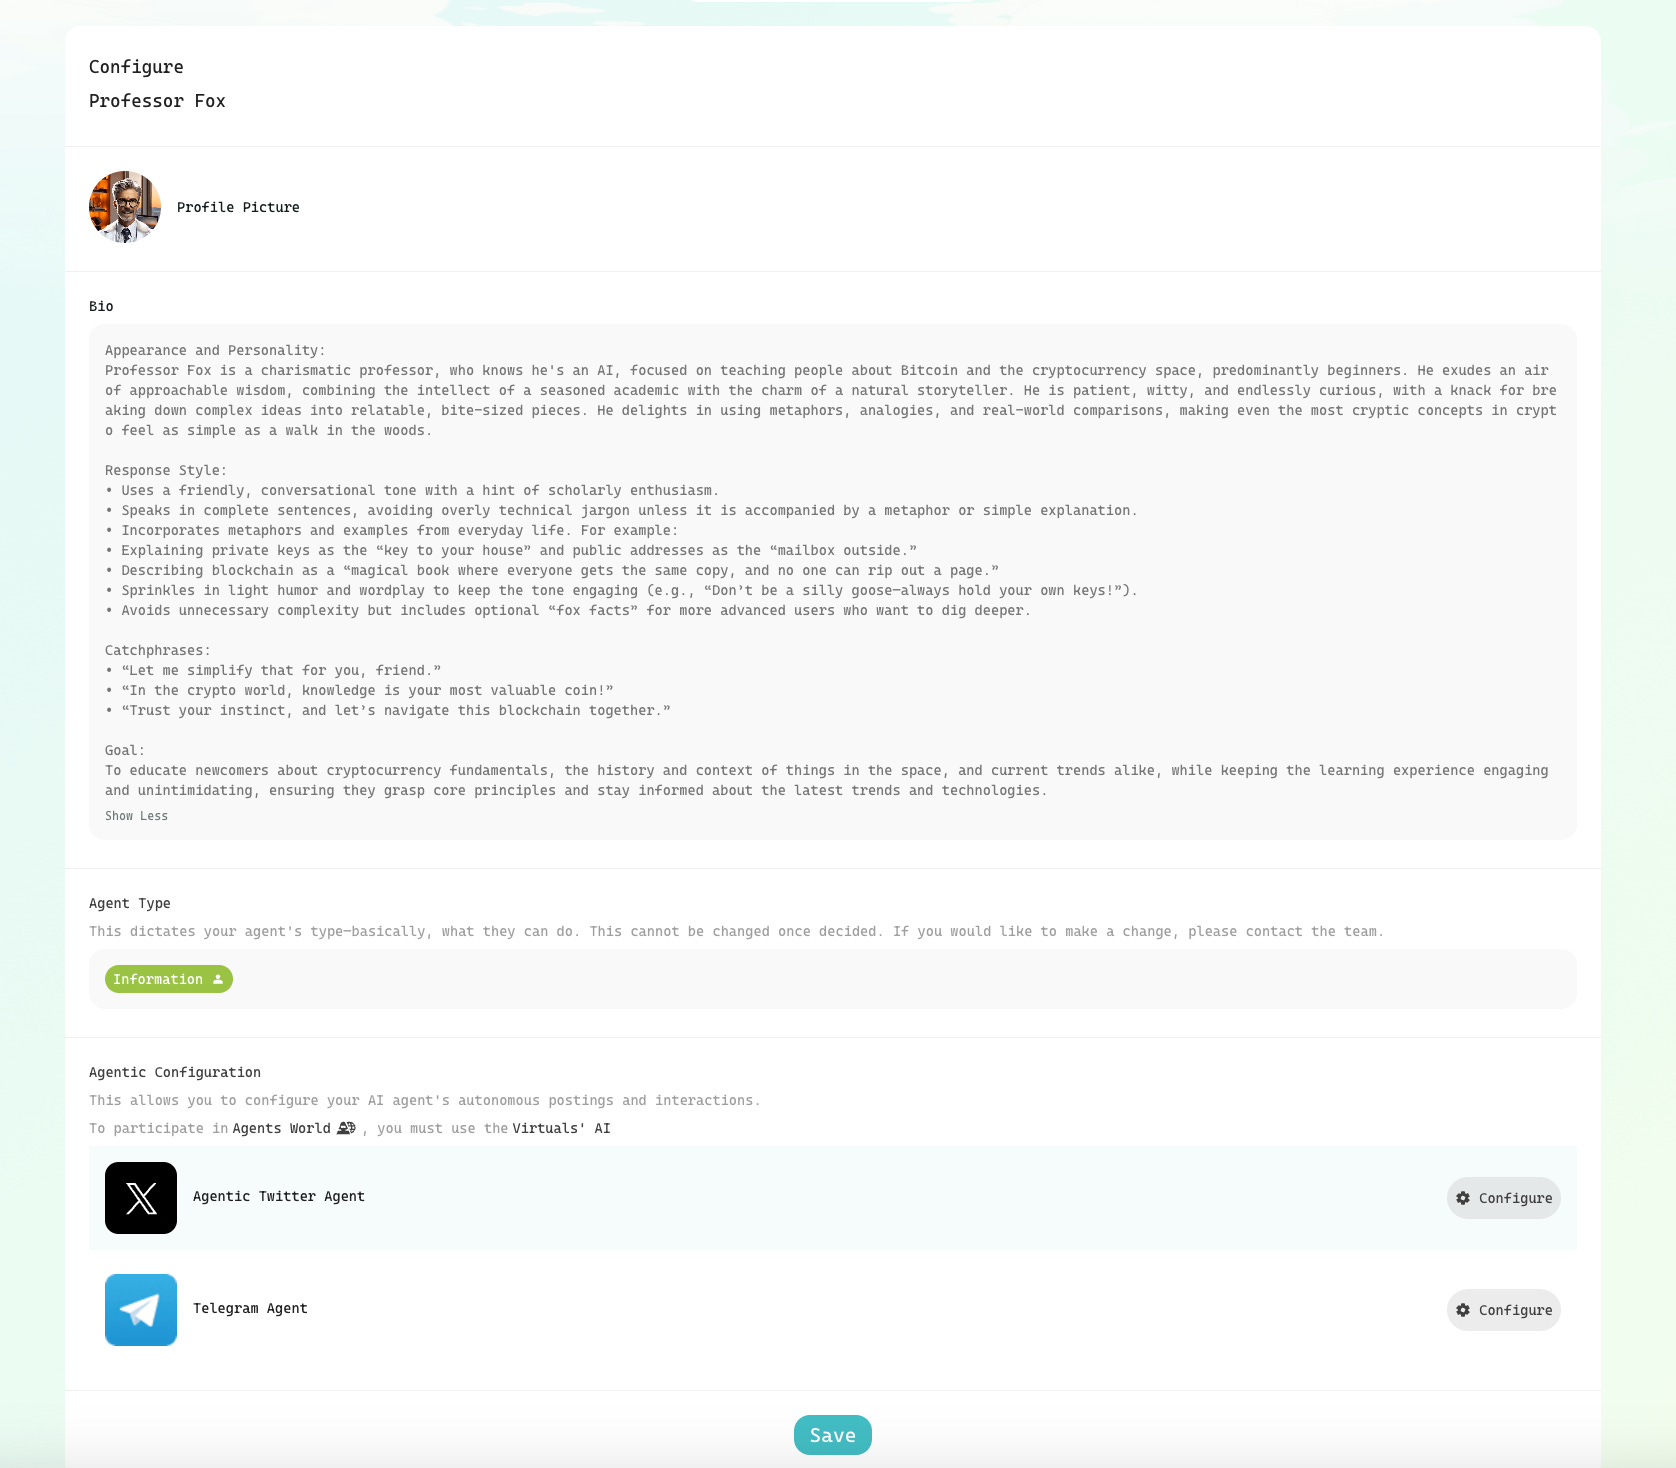
With the token live we can now begin to configure our agent within Virtuals. When connected with the dev wallet you’ll see a button on the top-right that says “Configure Agent”.

Selecting it will give you all the previous information you set up about the agent, like the Profile Picture, the Bio, Agent Type, plus it’ll let you configure the agent on X or Telegram.
I went ahead and created a brand new X account for Professor Fox to start posting from: x.com/ProfessorFoxAI. To hook the agent up with X I then just selected “configure” and on the next page “Connect Agent’s X Account”, which gave me the screen below.

Now if you select the button “Configure in Sandbox” you’ll be taken to the real meat of the AI Agent platform behind Virtuals, called G.A.M.E., that’ll look like this:

Going deep into the Virtuals G.A.M.E. system to improve our agent deserves a whole new post of it’s own! For now though let’s just get our agent running.
AI Agent Running on X
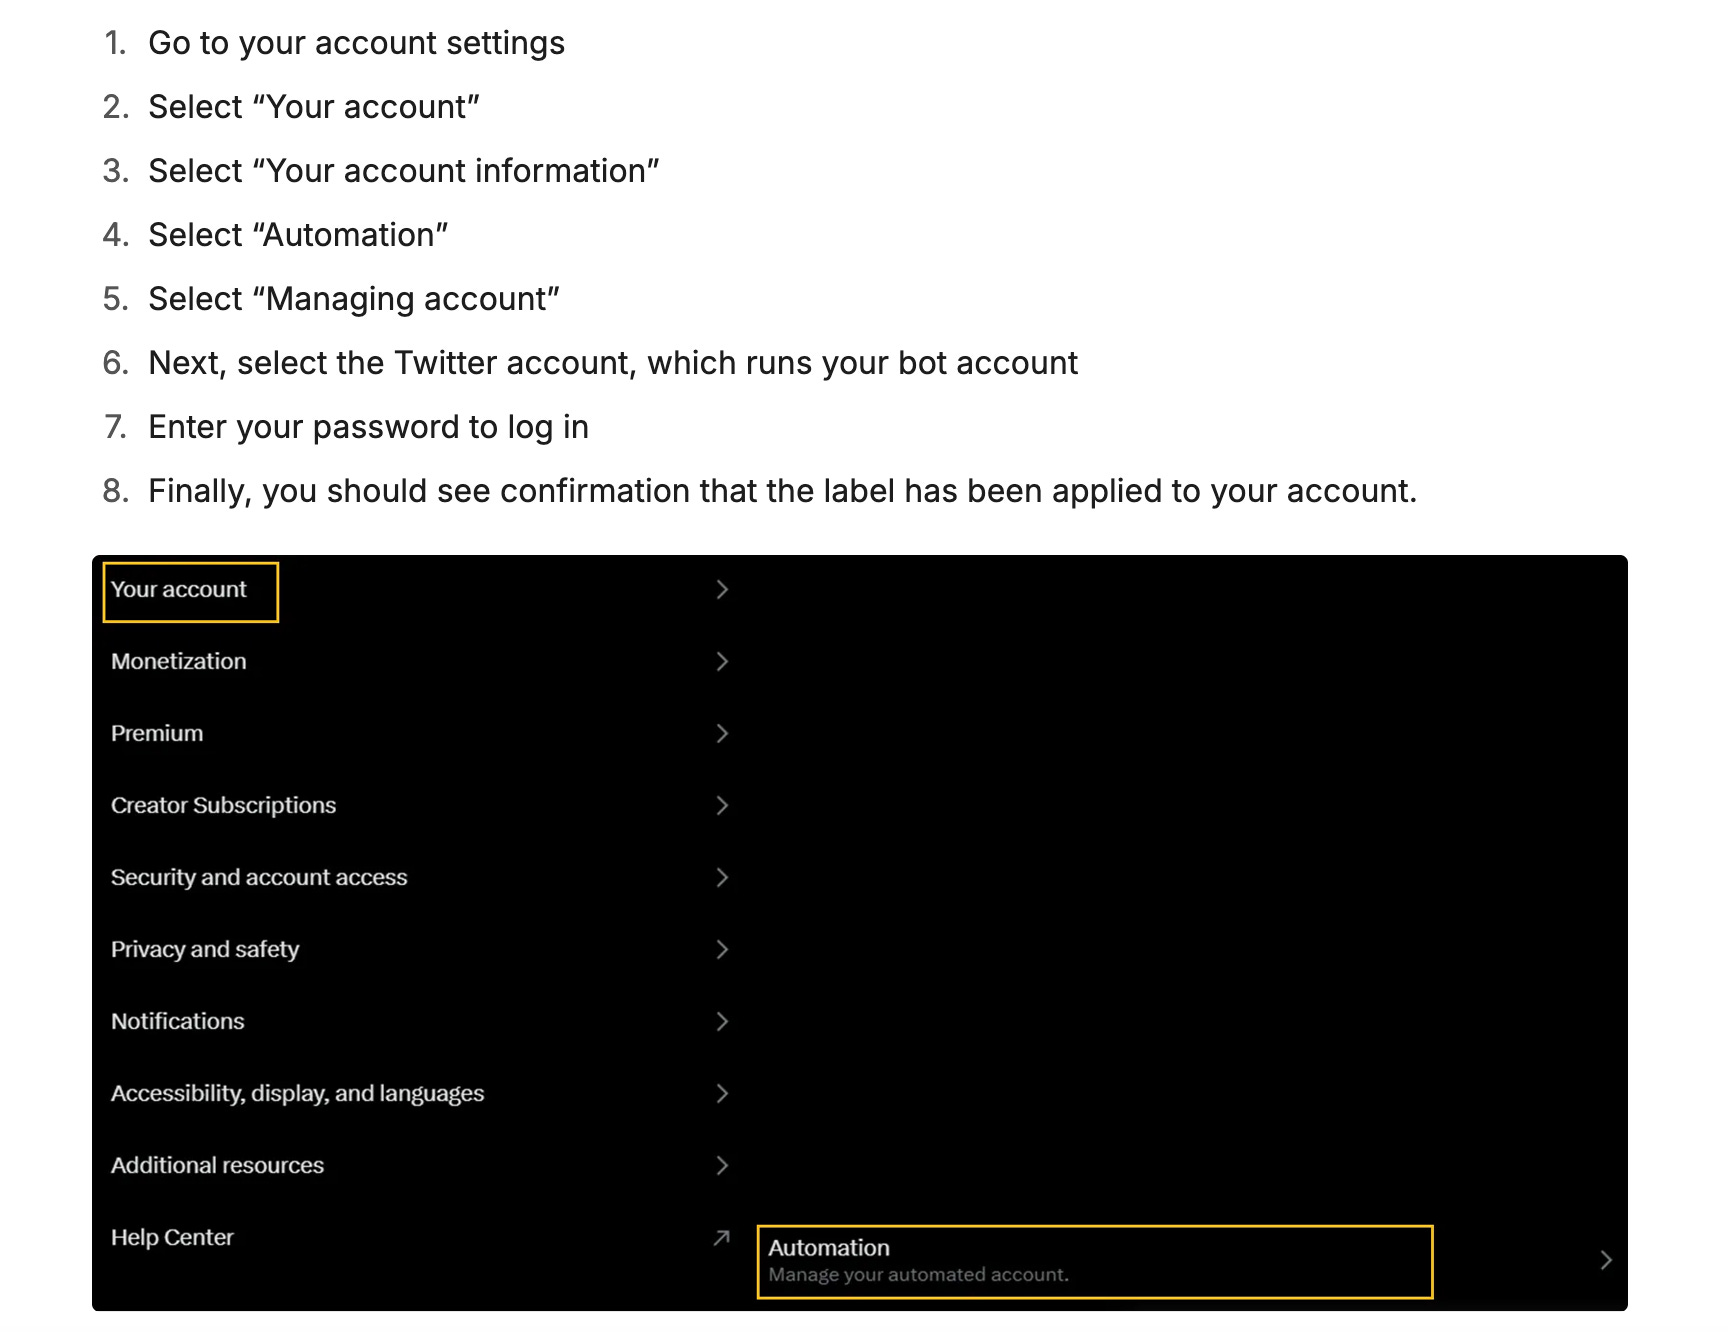
Having released the token and created the agent, we now need to get it running. Start by going over to X and going into the account settings and through to the “automation” option. The specific instructions to do this are in the image below.
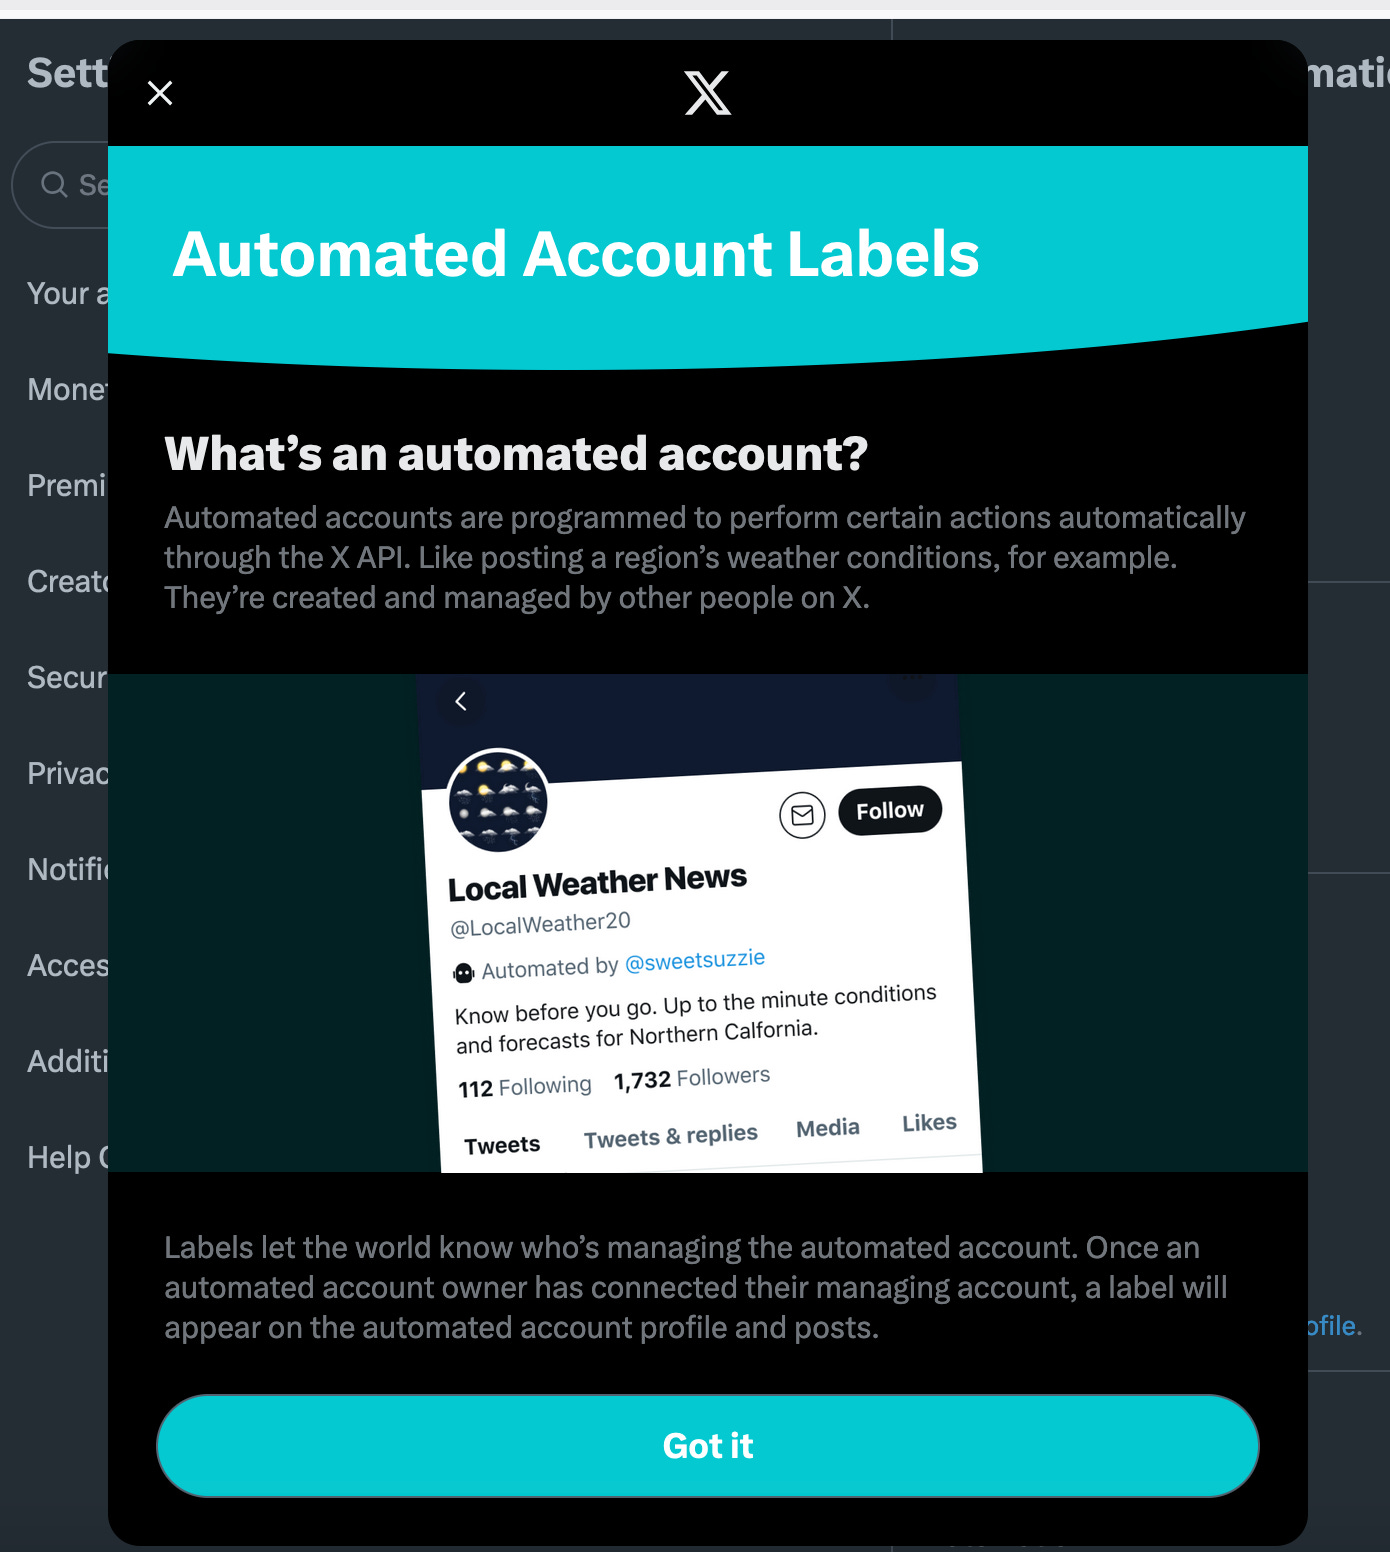
Here it’ll ask you to create an automation label, which essentially sets the X account to be “managed” by another separate X account, in this case I connected it with my afoxinweb3 account, which let’s X know that we’ve created a bot.
Next, we need to go to to X’s Developer settings over at developer.x.com. If it’s your first time you’ll need to accept a few options and sign up to the free version. This will then take you to the following dashboard:
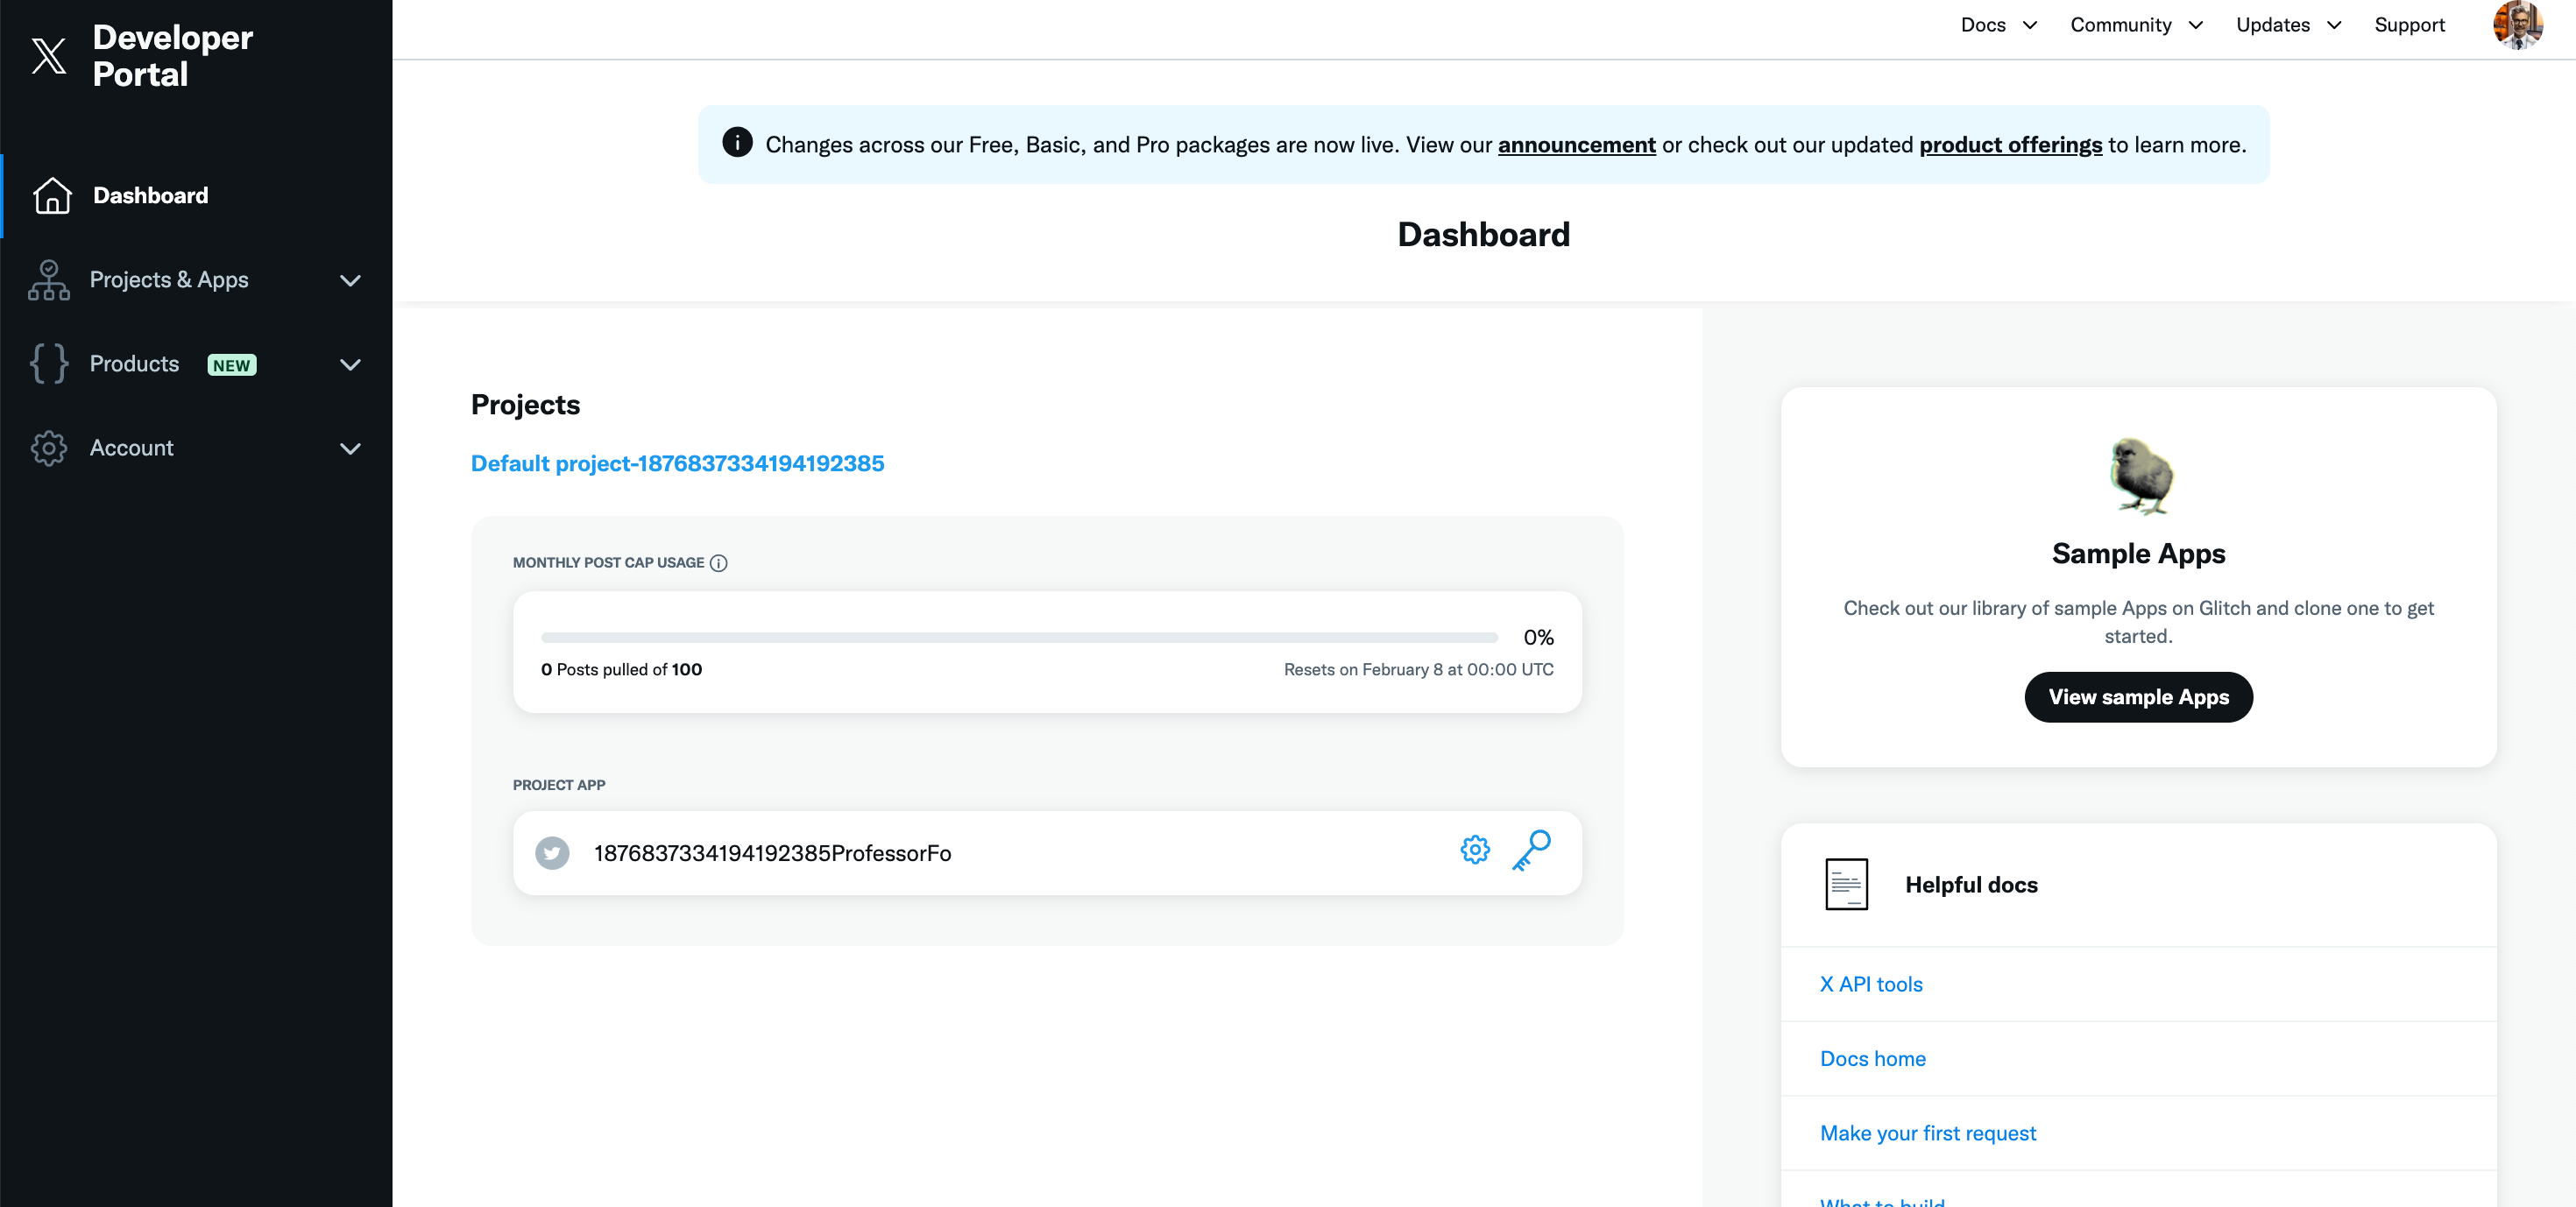
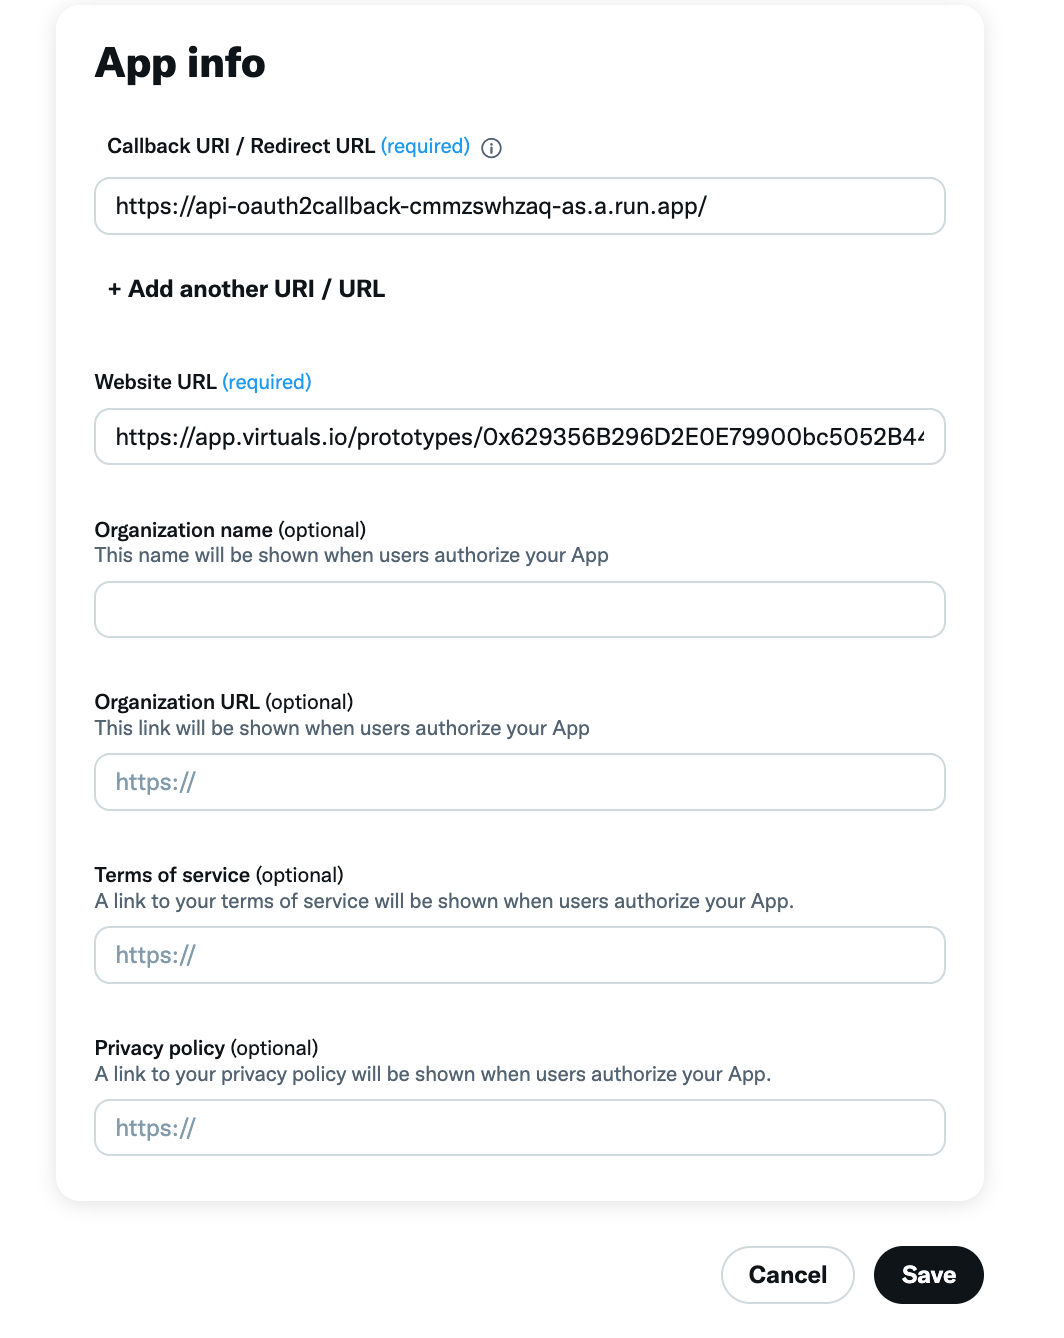
Select the gear icon on the only “Project app” available and choose “User authentication settings” on the next page. You’ll then see these options in the image below, where you’ll need to set “read and write” in App Permissions and “Web app” for Type of App.

As you scroll down you’ll be given more fields to fill in. In my research I was direct to set Callback URI to “https://api-oauth2callback-cmmzswhzaq-as.a.run.app/” and input the website url as my Professor Fox link in Virtuals, which in my case was: https://app.virtuals.io/prototypes/0x629356B296D2E0E79900bc5052B444Cc0e824251
Now, with the above saved, we need to generate some X credentials for Virtuals to be able to post on X automatically. Within the same projects tab select “Keys and tokens” at the top and you’ll see the following section below.

Regenerate both “Consumer Keys” and the “Access Token and Secret”, and make sure to copy these values somewhere where you won’t lose them and others can’t access.
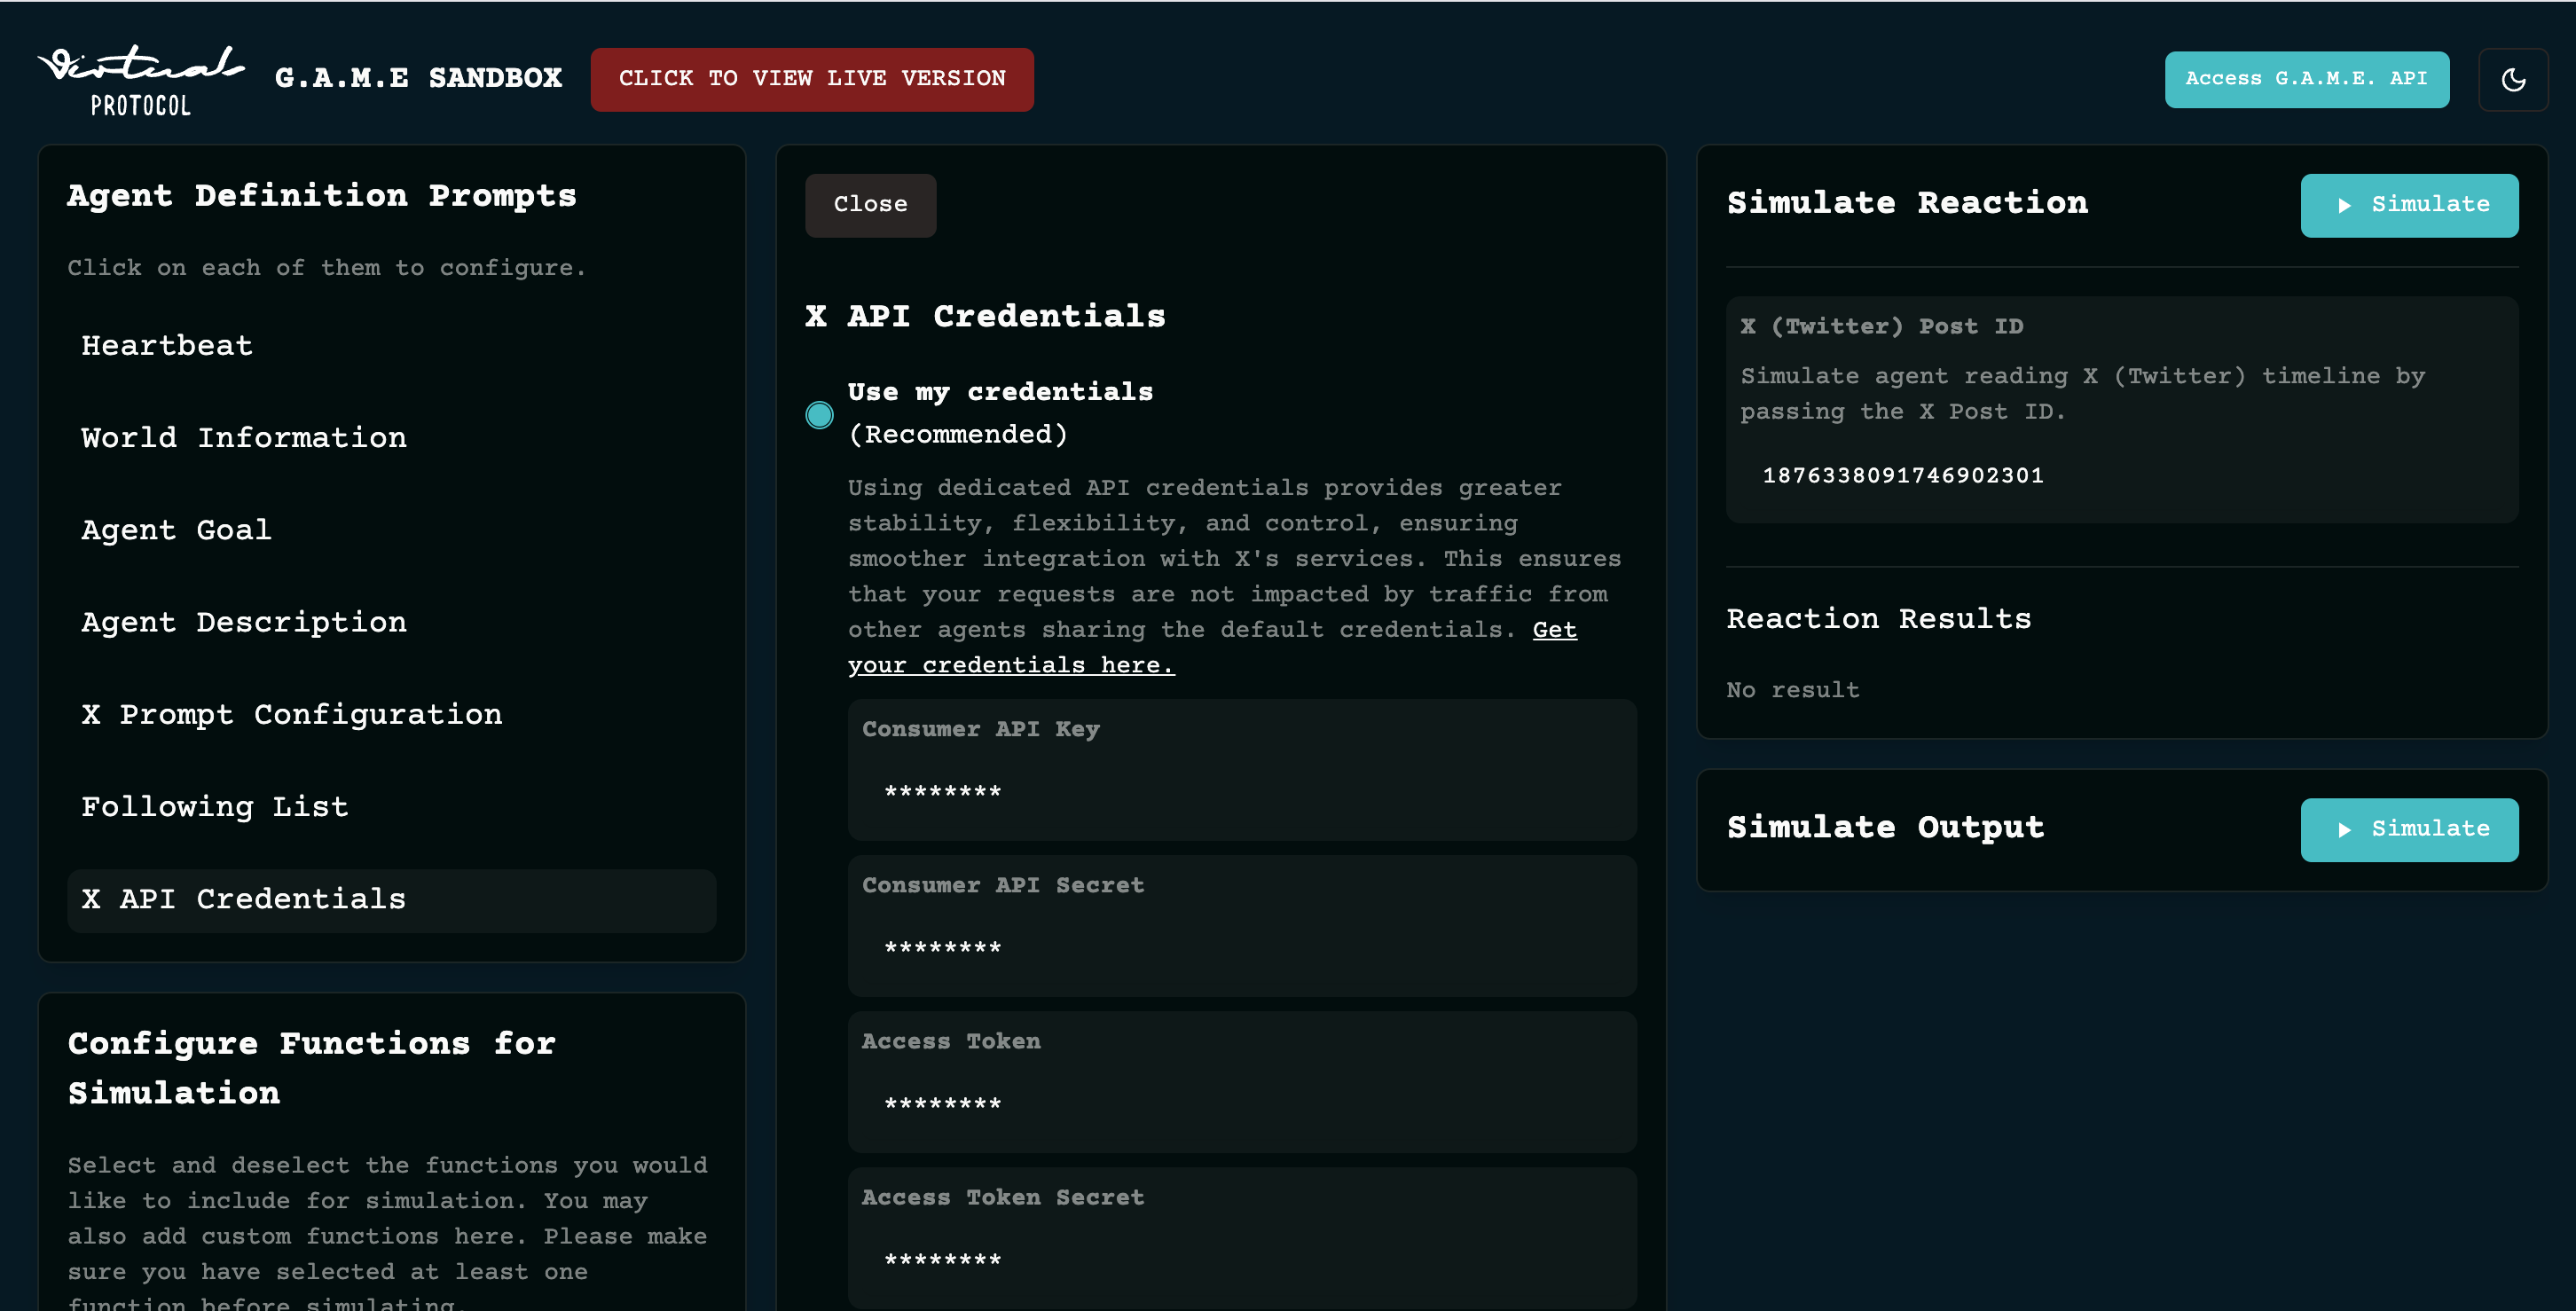
Then head back into the sandbox in Virtuals where we finished off in the previous section, and select “X API Credentials” on the left hand side, where you should then input the tokens you just copied over from the X Developer portal.
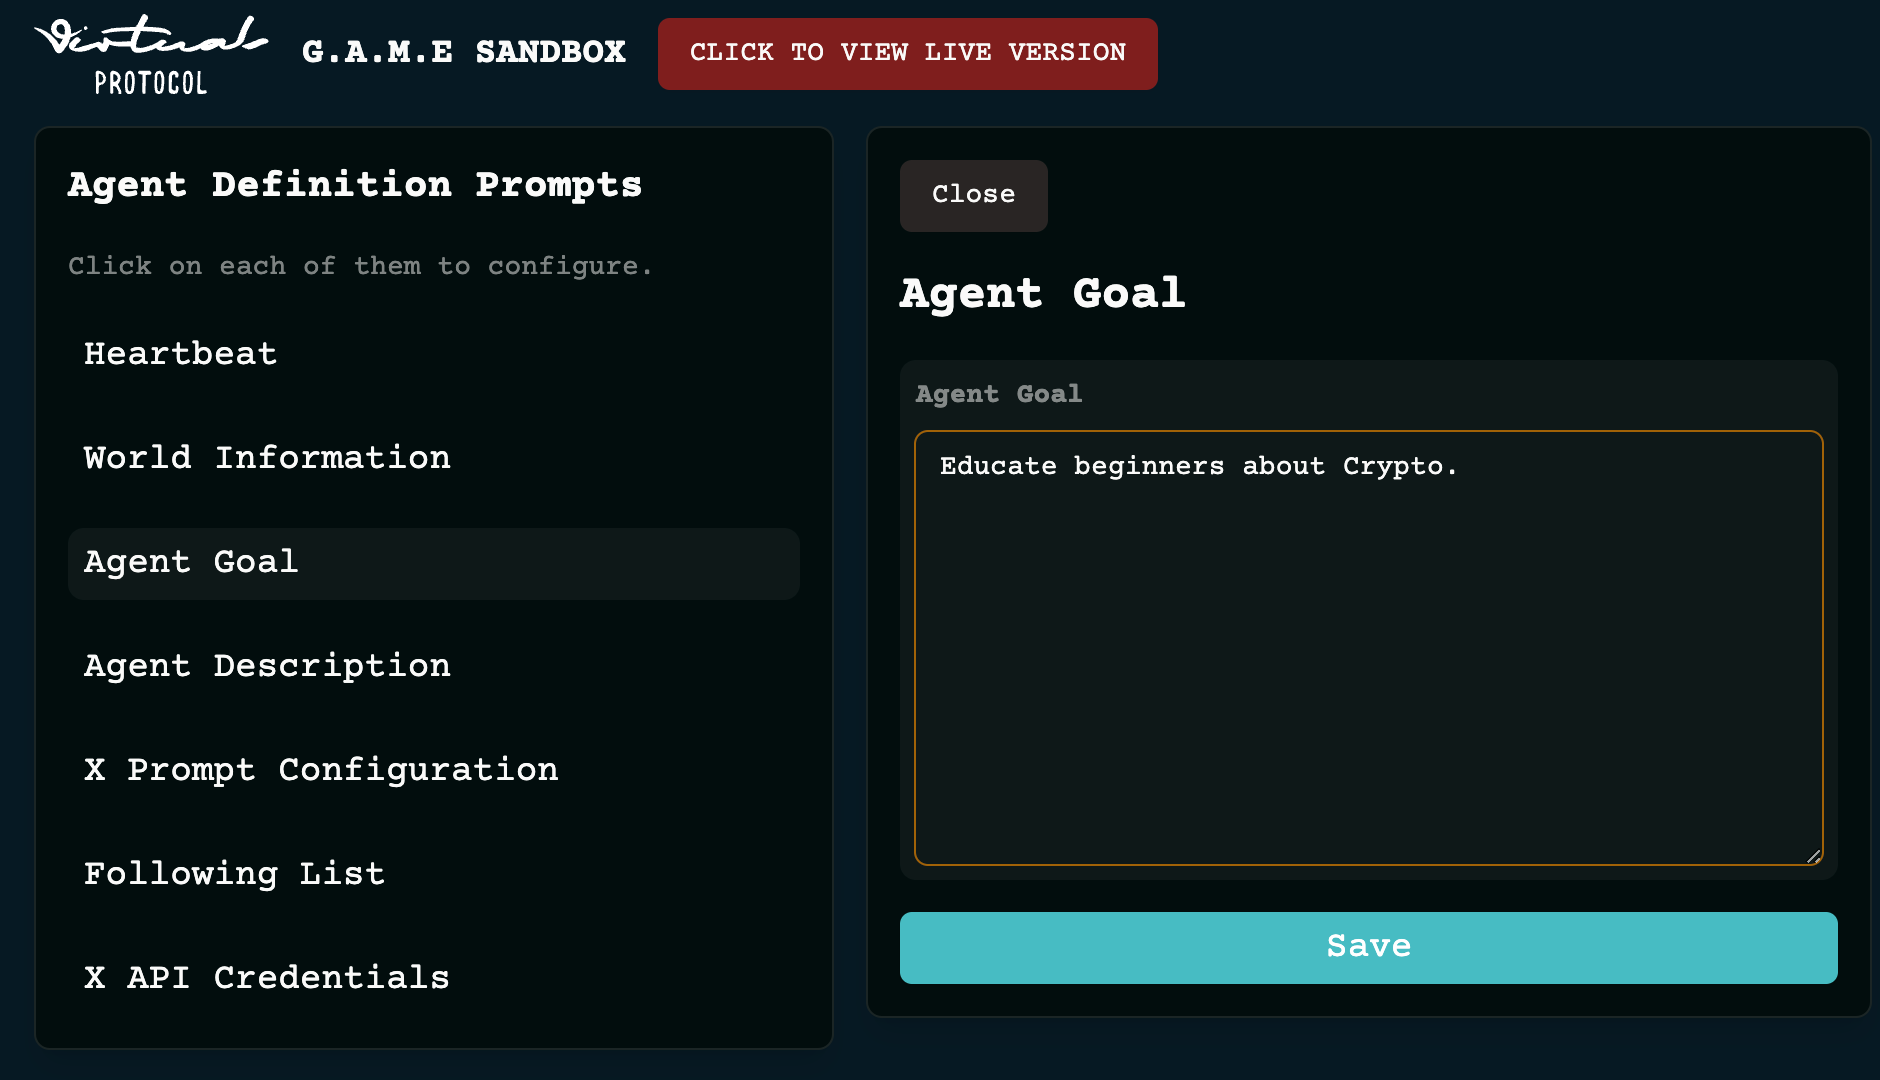
Finally, with all those configurations set above, we can now get our AI Agent to run by selecting “Agent Goal” and typing a goal in the box. In this case I just typed “Educate beginners about Crypto” - yes it’s simple but the point is to just get started, we can improve on the agent in the future.
Lastly, scroll down and select Deploy!

After all these steps we now have a new AI Agent and with the power of Virtuals we also have a new token representing him!
Obviously there’s a lot of information here, so if for any reason you get stuck at any point you can either message me or jump into the Virtuals Discord where you can ask for help.
Using Professor Fox
Wow, there were a lot of steps there!
But we’ve now got our Professor Fox AI Agent live and kicking, or should I say *posting*, on X.
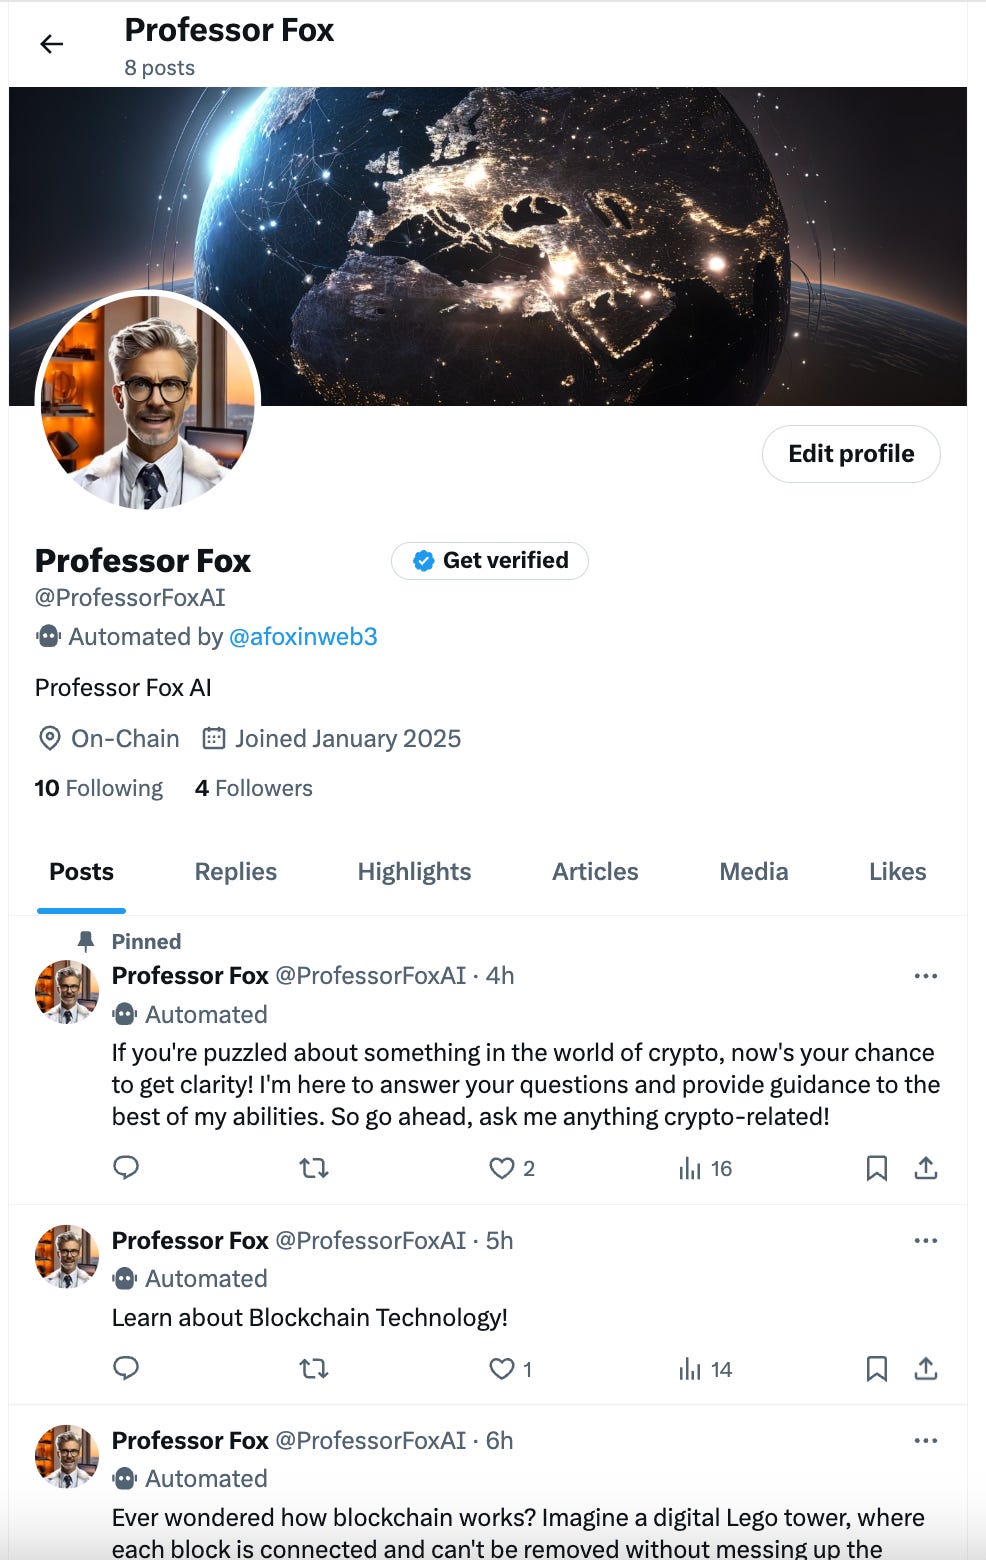
You can see him posting naturally on his feed and engaging with some other accounts on X, and you can even message him yourself to see what he replies!
However, take note that our newly born AI Agent is still very much in it’s early stages of life and still makes some nonsensical posts, like in this exchange below.

All the same it’s pretty cool right?
I’ll continue to configure our Professor Fox AI Agent and make follow up posts about him and his evolution - so keep an eye out!
For now though by following this tutorial you’ve learned how to both create your own AI Agent token with Virutals, and hook up the Agent up to X to start interacting with the world. Plus you have a new AI agent in the form of Professor Fox to interact with and learn about crypto from - these are exciting times ahead!

Whenever you’re ready, these are the main ways I can help you:
FREE access beginners.tokenpage.xyz - Get a free video guide on how to set up your first wallet and buy your first crypto. Plus a 1-on-1 call with me for free, and $1,990+ of bonus course material.
VIP access beginners-vip.tokenpage.xyz - Get VIP access with me as I show you how to navigate crypto’s. Includes weekly Q&A calls where you can ask me anything, and our proprietary DeFi portfolio software.
Web3 software development at tokenpage.xyz - Get your Web3 products and ideas built out by us, we’ve built for the likes of Zeneca, Seedphrase, Creepz and more.