
Creating an Agentic Loop
The "Hello World" of AI
TLDR:
The Agentic loop is the core loop that transforms an LLM prompt system into a AI Agent and is the foundation for agentic frameworks like OpenClaw.
Below we code up our own basic Agentic Loop to show how simple it fundamentally is, and explain how it’s likened to the “Hello world” of agents.
To then test the code you can use Google Collab so that you don’t even need to install anything locally. Just follow along below to create your own basic agent.
I recently heard Peter Steinberg the creator of OpenClaw say that the “Agentic Loop” is like the “Hello World” of AI Agents.
Now If you’re a non-coder that may all sound like gibberish. So today I decided to make a post showing how simple it is to create an Agentic Loop and explain why it can be viewed as the “Hello World” of AI Agents!
If this post resonates with you and you enjoy the content then please share it with a friend and get rewarded for doing so!

This blog goes out weekly to over 20,000 subscribers. Please message me if you’re interested in sponsorships or partnerships.
Agentic Loop
AI Agent frameworks for general-purpose agents are on the rise. I wrote about OpenClaw a few weeks back and we’re already seeing other alternatives appearing, with the likes of Hermes being a stand-out example.

Fundamentally the core concept that differentiates an Agent from a standard LLM prompt is the “Agentic Loop”. These agent frameworks then add in a lot of other pieces like memory, personality, and skills to build on top of this.
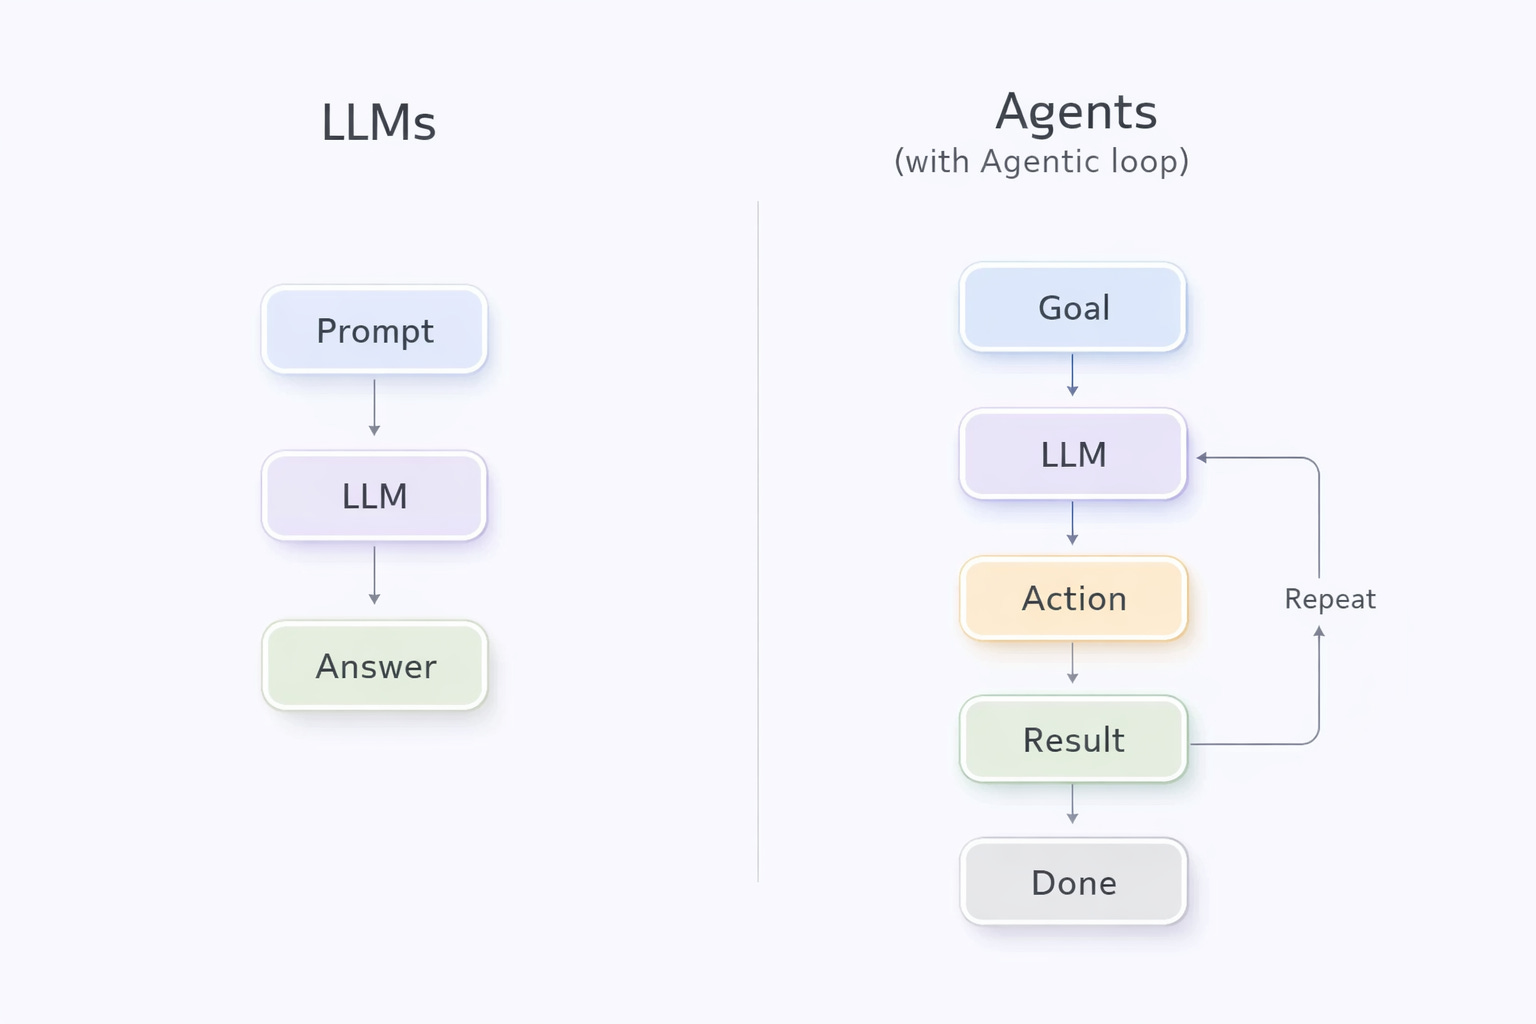
To compare, you can view a standard LLM prompt working as such:
Prompt → LLM → Answer
Whereas Agents have this “Agentic Loop” where the result of a prompt gets fed into the LLM repeatedly until it acheives its goal.
Goal → LLM → Action → Result → (Repeat LLM step) → Done
This is is fundamentally how all AI Agents work, for example if you’re interacting with OpenClaw, Claude Cowork/Code, Loveable, Replit, or any other agentic system, it ultimately just does some more complex version of the above.
And I recently heard Peter Steinberg, the creator of OpenClaw, describe the Agentic Loop as the “Hello, World!” of agents and that everyone should implement one. So I decided that we’d do this today!
With the above explanation you already understand what an agentic loop is, now let’s explain the second part of Peter’s sentence.
Hello, World!
In the software development world “Hello, World!” is known as the simplest program you can make with a language or framework to get it setup and running.
The idea is to literally get the code to repeat back to you “Hello, World!” - or any permutation like “hello world”, “Hello World”, “hello! world!”, you get the idea.
With coding languages like Python creating this program is as simple as writing:
print(“Hello, World!”)
In some slightly more complicated languages like C++ you might need to do:
#include <iostream>;
int main() {
  std::cout << "Hello, World!" << std::endl;
  return 0;
}
main();
Either way, as you can see this is generally a very simple piece of code that gets you to set up the coding environment and print some text to the screen!
So when Peter Steinberg says that the “Agentic Loop” is the “Hello world” of agents, you can understand that it’s the smallest amount of work you need to do to get an LLM to behave like an agent.
So now let’s do just that and create our own agentic loop so that you can say that you’ve implemented one yourself.
Creating an Agentic Loop
To create an Agentic Loop we just want to wrap the LLM within a loop as we discussed above.
The logic is therefore ultimately something like:
generate a goal
ask AI what to do next - keep repeating (ie. looping)
stop when done
So let’s now try to write this in code.
Python is one of the easiest languages to read and understand what’s going on, so let’s write the loop above in Python.
def ask_ai(goal):
    response = client.responses.create(
        model="gpt-5",
        input=f"Goal: {goal}. What should happen next?"
    )
    return response.output_text
def run_agentic_loop(goal):
    for step in range(20):
        decision = ask_ai(goal + decision)
        if "DONE" in decision:
            break
Here we define a simple function called “ask_ai” that gets given a goal and uses GPT5 (could be another LLM here) to ask the AI what to do next given the goal.
Then we define a function called “run_agentic_loop” that does a maximum of 20 steps, and at each step just asks the AI to make a decision based on the goal plus it’s last decision, and when it decides that it’s done it stops running.
The code above is a basic agentic loop!
Testing it
Now let’s test the loop we wrote.
First of all we need to take into consideration that the code we had above doesn’t fully function without an API key and we’ll need to make a few other alterations to make it work in practice.
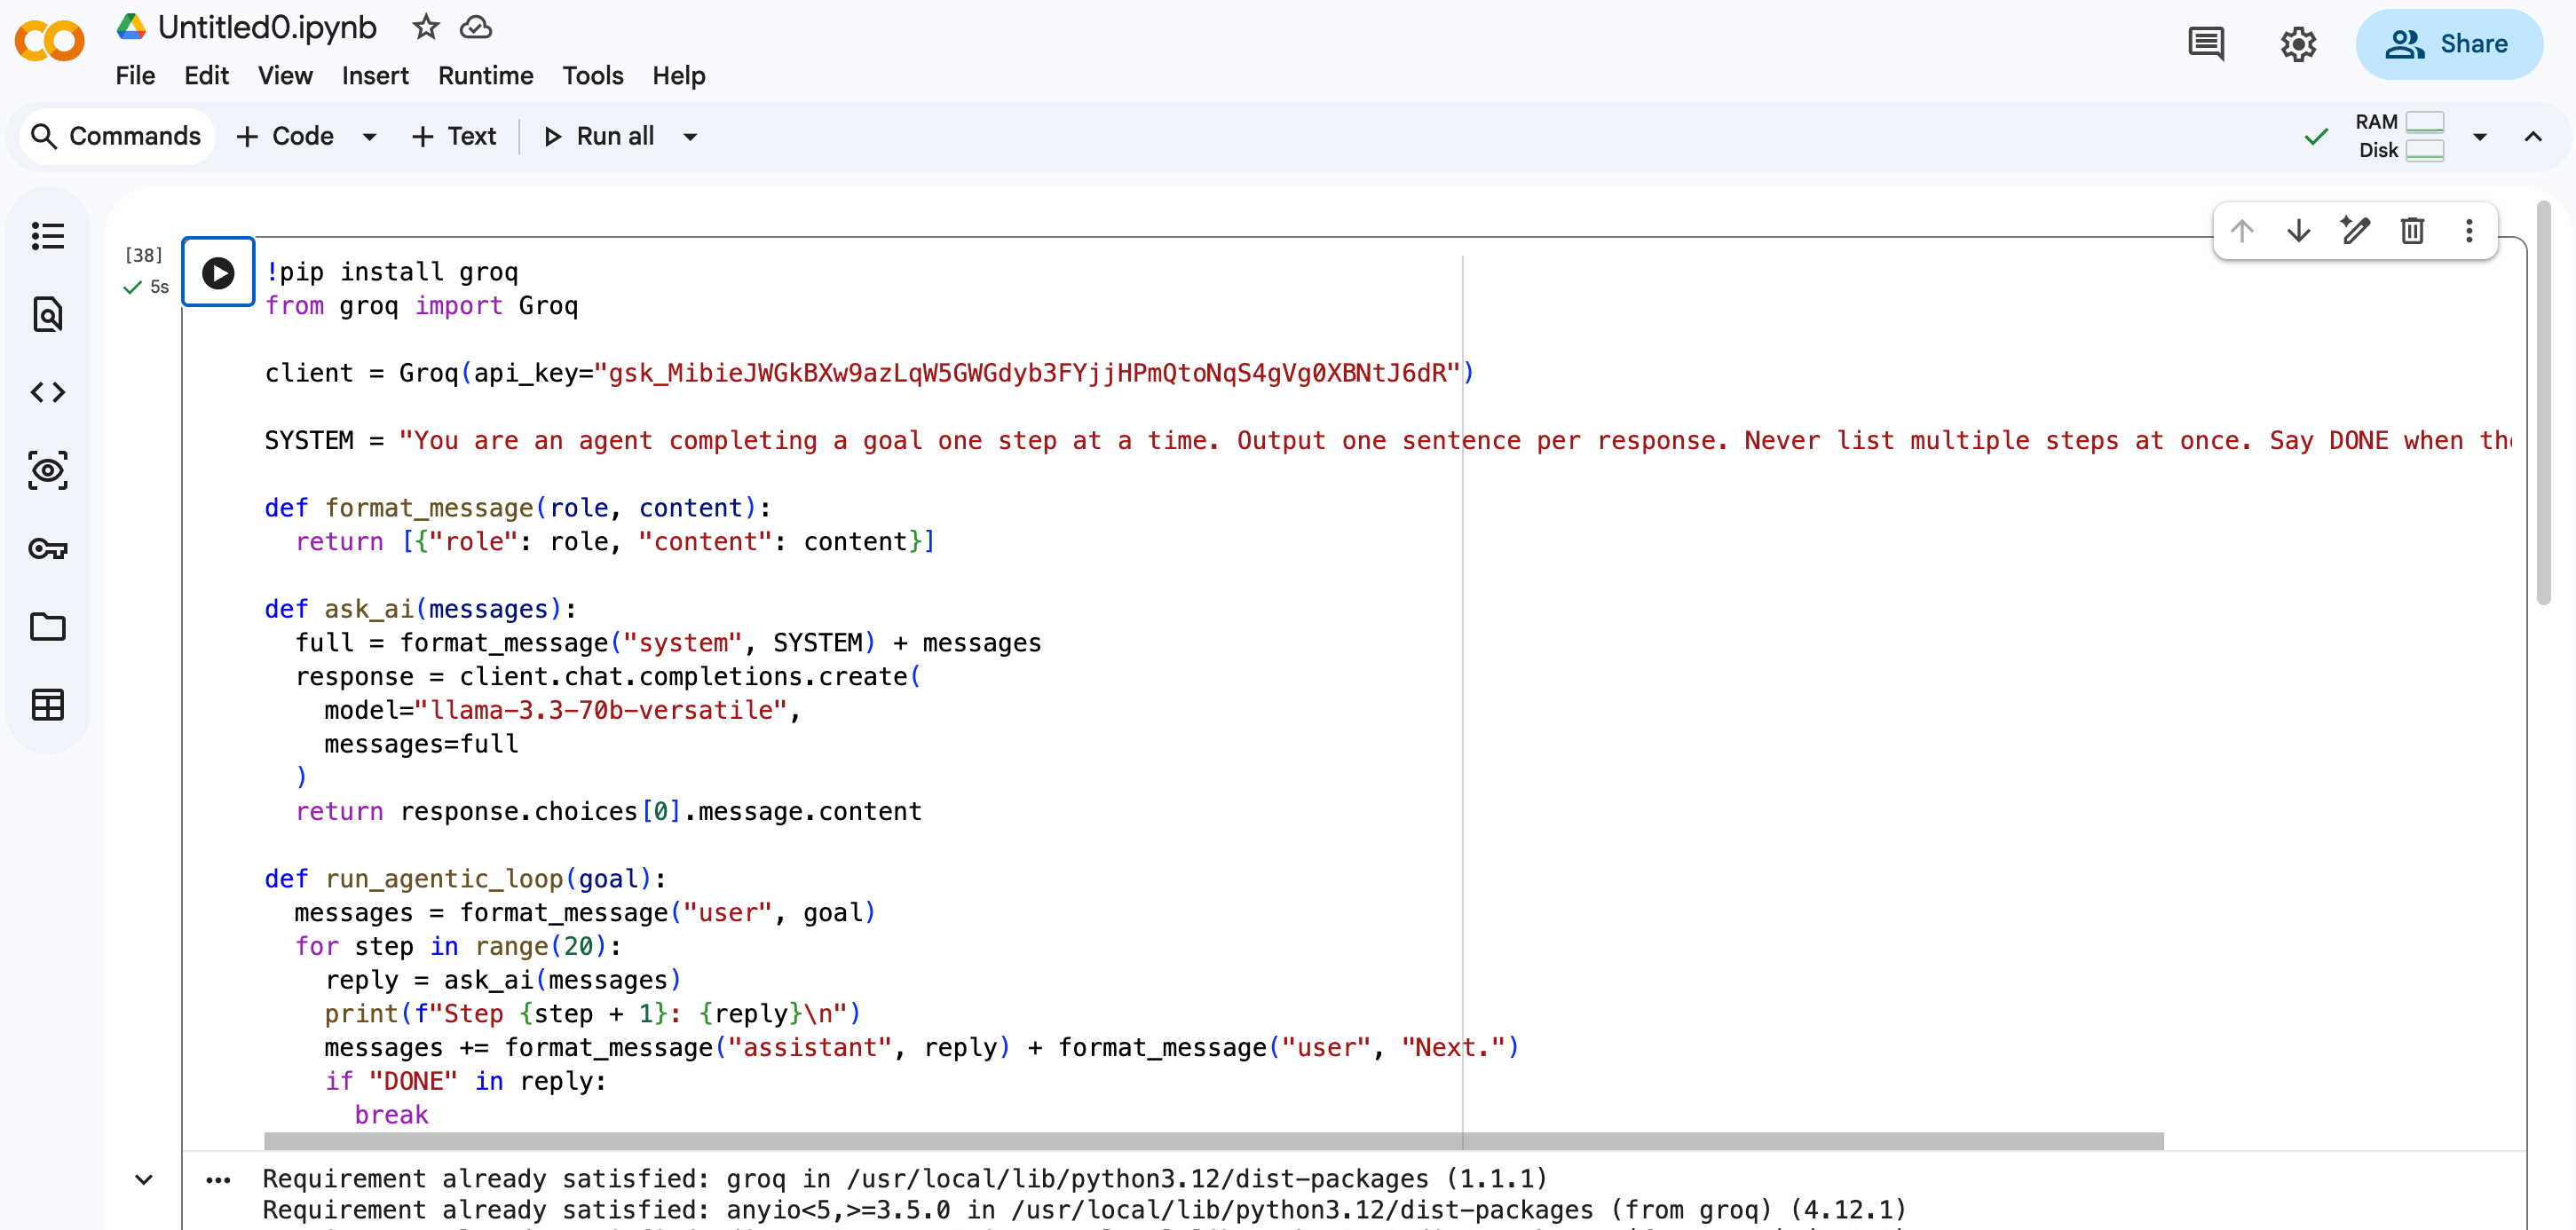
So I’ve added a few more things below including an API Key I grabbed from a free service called Groq (owned by Nvidia). Note that if the API Key isn’t working for any reason you can generate a new one yourself for free by creating a new Groq account.
!pip install groq
from groq import Groq
client = Groq(api_key="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")
SYSTEM = "You are an agent completing a goal one step at a time. Output one sentence per response. Never list multiple steps at once. Say DONE when the goal is complete."
def format_message(role, content):
  return [{"role": role, "content": content}]
def ask_ai(messages):
  full = format_message("system", SYSTEM) + messages
  response = client.chat.completions.create(
    model="llama-3.3-70b-versatile",
    messages=full
  )
  return response.choices[0].message.content
def run_agentic_loop(goal):
  messages = format_message("user", goal)
  for step in range(20):
    reply = ask_ai(messages)
    print(f"Step {step + 1}: {reply}\n")
    messages += format_message("assistant", reply) + format_message("user", "Next.")
    if "DONE" in reply:
      break
This code looks a lot more complicated than the original code we wrote above, but fundamentally it’s the same code but with a few additions, it has:
Imports at the top so that it correctly installs Groq
The creation of the Groq client with an API Key
System message so that the LLM understands that it’s an agent
Helper function to format messages correctly with Groq’s formatting
Prints to show us the each step the agent takes
Now we’ve got this code written we can run it in just 3 basic steps:
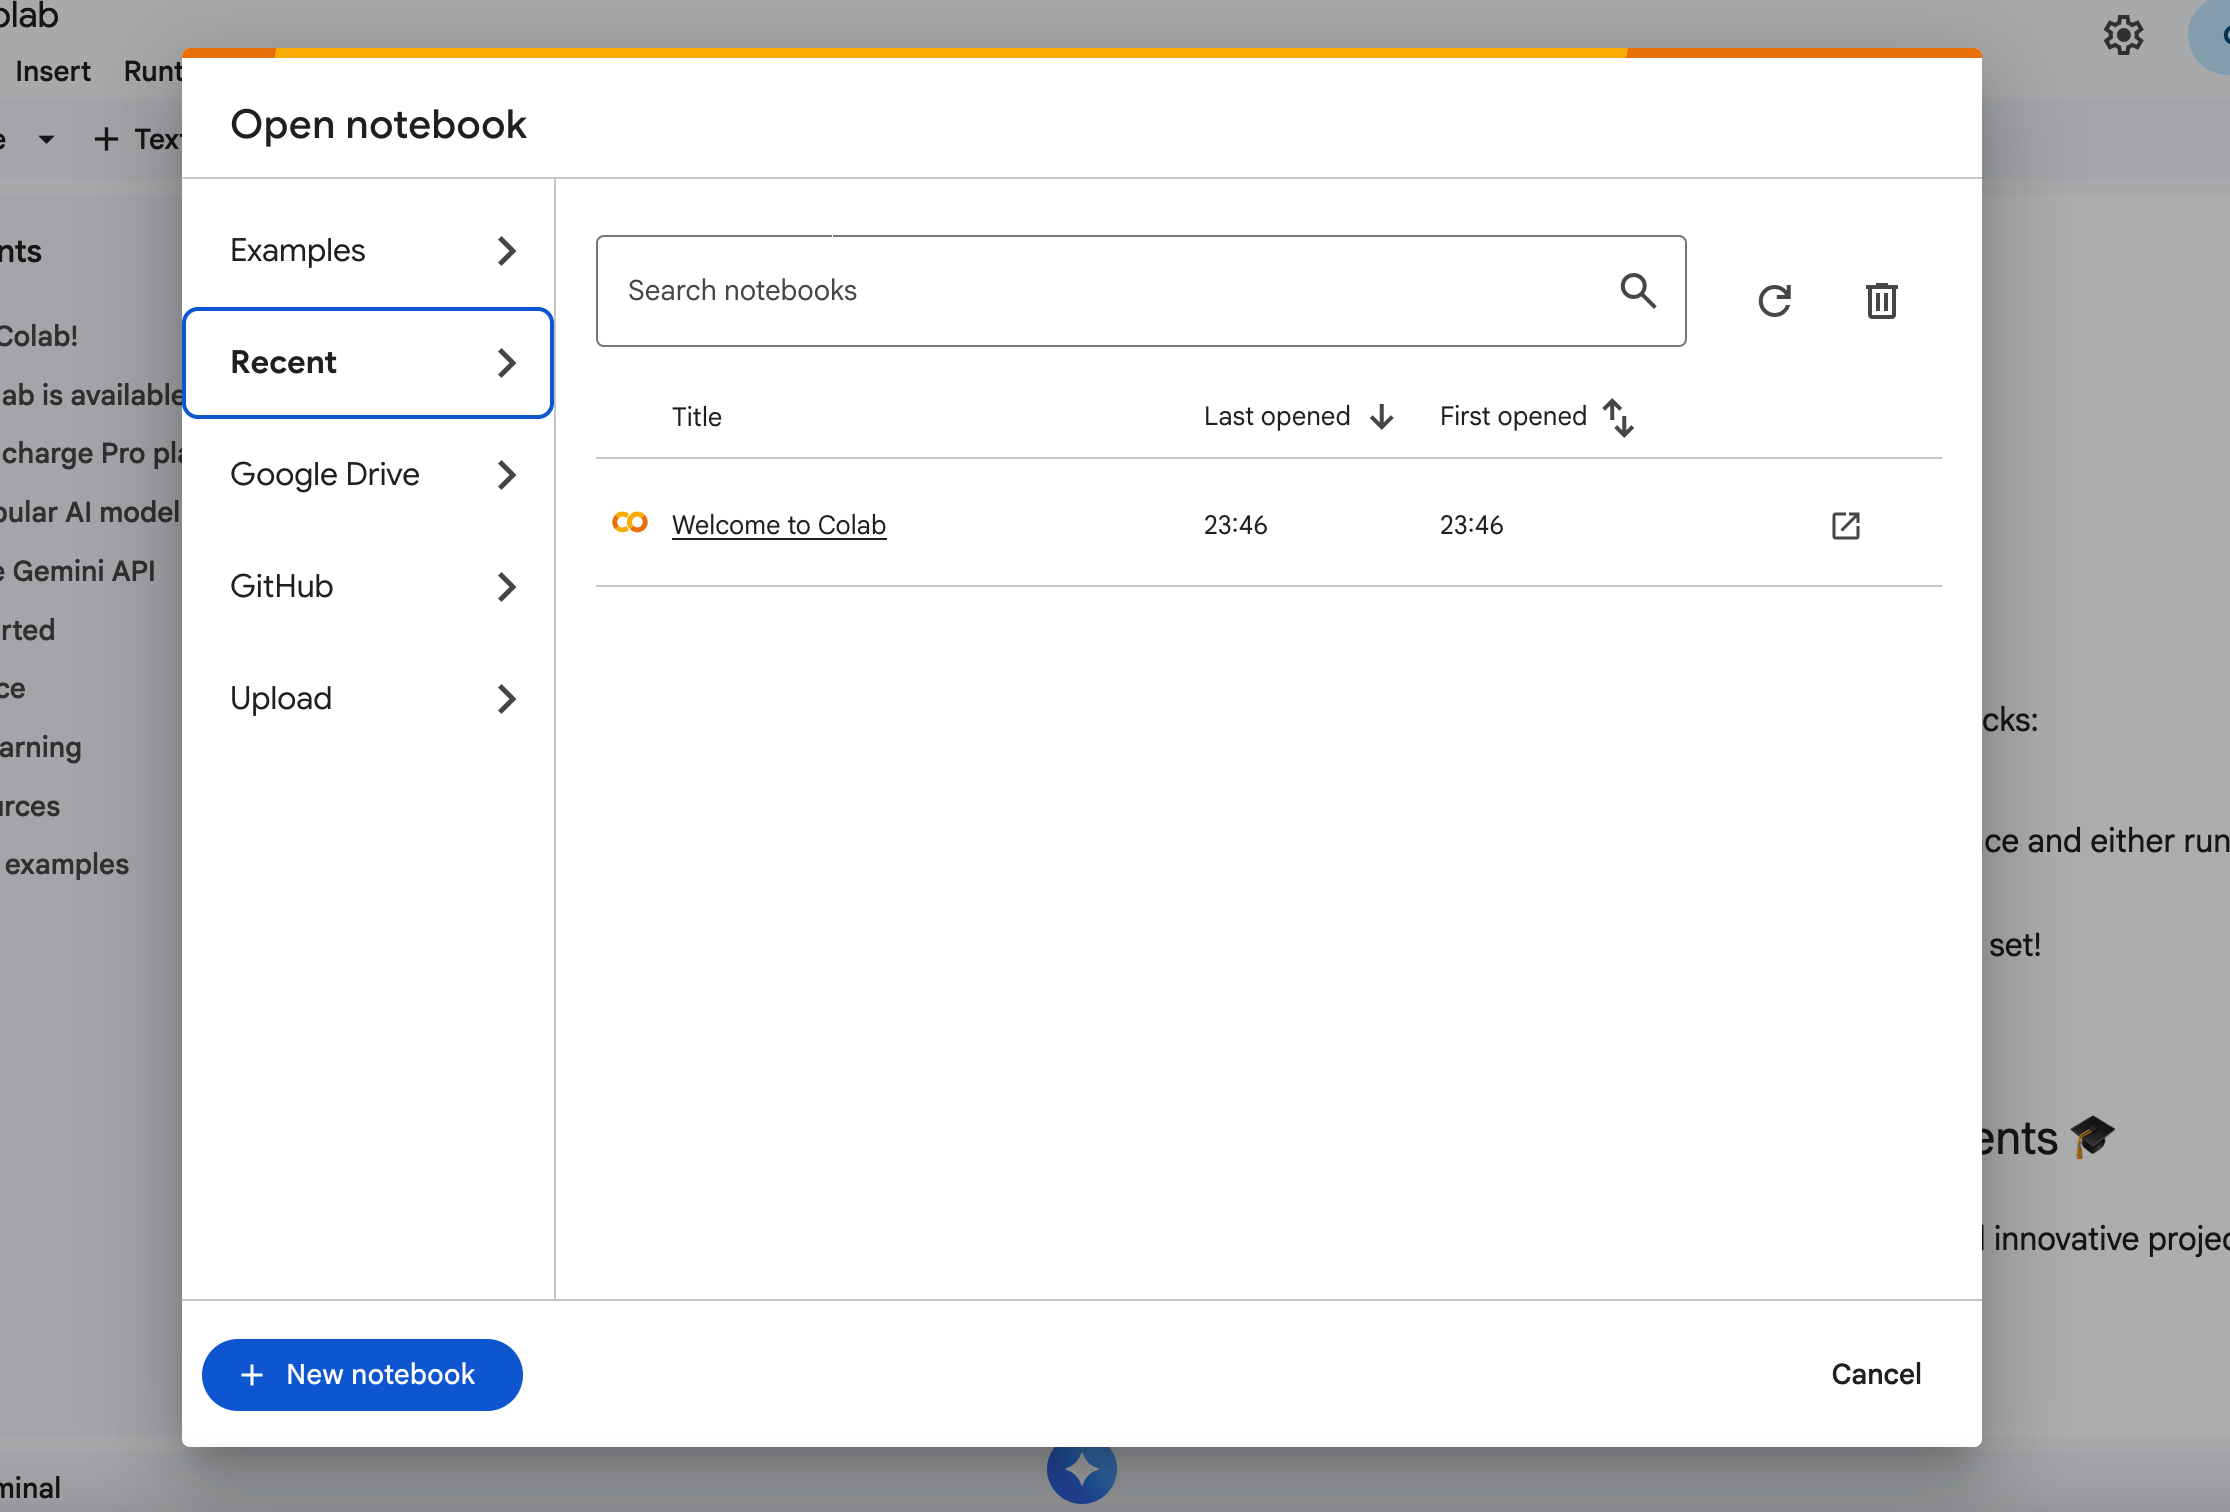
First go to Google Collab and click “New Notebook”, this will give us an environment to write code in without us needing to download or install anything locally.
Next copy all the code above into the notebook we just created.
Then finally let’s run our agentic loop by calling it with a simple query in our notebook, for example we can do:
run_agentic_loop("You are a personal assistant. Plan a dinner party for 6 people, one task at a time. One setence per step. Say done when everything is planned.")
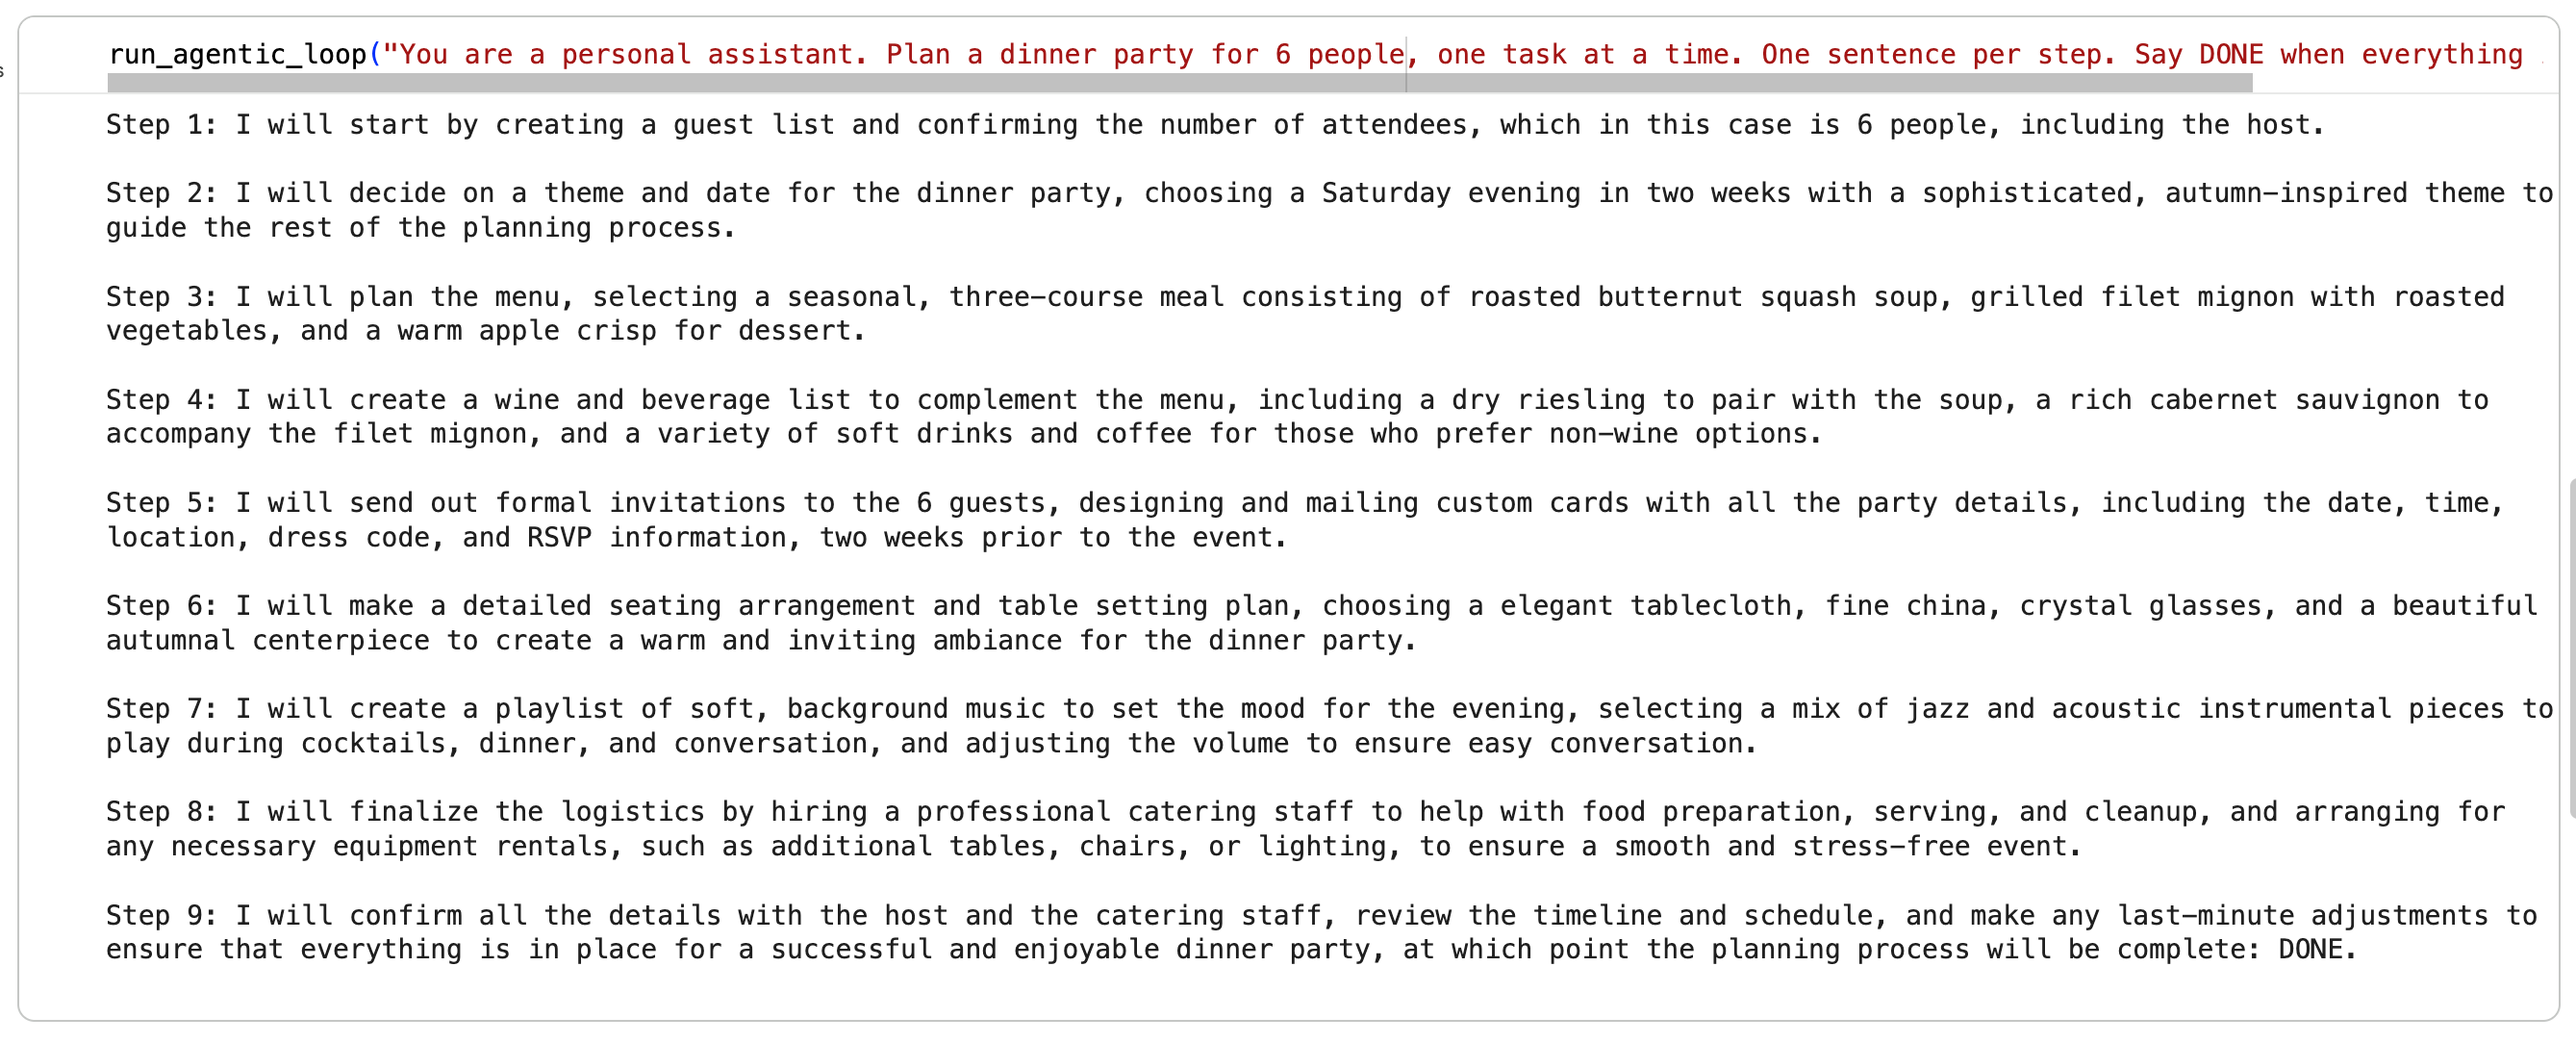
You should now see the output, where each step’s decision impacts the decision in the step after.
Pretty awesome right! We’ve got our first simple agentic loop going and you can literally see your little agent figuring things out on the fly.
Congrats
You’ve now literally learned how to take any LLM and wrap it in an Agentic Loop to turn it into a general-purpose AI Agent!
If you wanted to create your own OpenClaw-like framework for example, then this would be the first step to take, pretty cool right?
In the example above we kept it really simple as we didn’t include any concepts like memory, skills, or anything else. If we wanted to though we could extend this further and start adding more files and functions for the agent to act in more interesting and complex ways.
The beauty of it is that you can use something like Claude Code or OpenAI’s Codex to keep adding these extensions to your agent without writing a single line of code yourself. OpenClaw was essentially built like this with Peter saying that code was written almost entirely with AI!
I hope you’ve enjoyed this and my other AI related posts these last few weeks. I’ve been working on an AI focused community with a couple other people from the Web3 space that we’ll be announcing in the coming weeks, so keep your eyes peeled for more information on it soon!

Whenever you’re ready, these are the main ways I can help you:
Want high returns? Earn up to 14% APY with Yieldseeker!
Love Web3 & AI insights? Follow @afoxinweb3 on X!
New to crypto? Join our beginners community to master crypto fast!
Building a Web3 app? Get our expert product development support!