
Swap ETH to BTC with Thorswap
Use Thorswap to bridge and swap from Ethereum to Bitcoin without using a CEX!

TLDR:
Thorswap is a decentralised cross-chain exchange that connects up liquidity across 7 different chains, as of today, that are otherwise not interoperable.
Thorswap acts as both a bridge and a DEX all in one. It makes use of an intermediary chain called Thorchain powered by its native RUNE token.
The tutorial below shows the simplicity of swapping ETH to BTC with Thorswap. The elegance and simplicity of this solution shows how powerful Web3 can be.
Over the past few weeks I’ve covered several foundational concepts such as CEXs vs DEXs, AMMs, and bridges.
The power of Web3 is that we can stack these technologies on top of each other and do some pretty impressive things in a fully decentralised manner!
Today we’ll cover how Thorswap does exactly this by creating a DEX that’s also a bridge, which can be used to swap directly from native ETH to native BTC in an entirely automated and decentralised way.
What is Thorswap
Thorswap in its own words is a “decentralised cross-chain exchange” that currently works with 7 different chains including Bitcoin, Ethereum, Dogecoin, Cosmos and more. This means it acts as a cross-chain DEX aggregator allowing you to swap coins directly between these chains.
It acheives this by connecting with other DEXs and aggregators from different chains like Uniswap and 1inch, both of which I discussed a couple weeks ago.

Thorswap much like any other bridge has smart contracts on different networks and validators that own and monitor these contracts. It also has its own intermediary chain known as Thorchain that validators use to register swaps between chains.
The Thorchain itself is powered by its own native token called RUNE. You can buy RUNE on several exchanges and on staking it you earn a % of swap fees. So in principle if Thorswap gets used more over time then the fees will grow and so will demand for RUNE, likely raising the price of RUNE.
Most importantly though, Thorswap is one of the most elegant and powerful pieces of software today in Web3 in how it connects up liquidity across entirely separate chains that aren’t otherwise interoperable. You’ll often see bridges that work with even more chains, but usually they are all EVM compatible and hence quite interoperable by nature, yet Thorswap connects up chains with entirely different architectures.
Today I’ll run though swapping between ETH and BTC natively, in other words selling real ETH to buy real BTC on their own respective chains. I personally did this before to buy some Bitcoin NFTs with my ETH, but you can exchange between these two coins for any other reason you may have.
Thorswap have also recently introduced a lending feature that’s in beta that I may cover in a future post, but for today we’ll look just at their swap feature.
Before Starting
In this quick tutorial I will swap ETH on the Ethereum mainnet to BTC on the Bitcoin network. To follow along I suggest having both Ethereum and Bitcoin wallets to transfer between.
The easiest way to do this is to use browser wallet extensions. For Ethereum I recommend Metamask, which I generally assume most people reading this will already have installed. While for Bitcoin I’m going to be using the Xverse wallet but you could just as easily use Unisat wallet or any of the hundreds of other Bitcoin wallets out there.
Either way just make sure to have an Ethereum compatible wallet and another Bitcoin compatible one!
Connect to Thorswap
First open up Thorswap and connect your Ethereum wallet with the top-right button.
As you can see there are a lot of options for connecting since Thorswap caters to several different chains! For now connect up to your Metamask loaded with ETH.

You can use any of the ways available to connect. The only thing I definitely don’t recommend is importing a passphrase directly, as you never know who may be snooping on your Internet connection and could steal your passphrase!
Prepare Swap
Next select the amount you want to swap and the currency you want to swap with. In this case we’re going from the Ethereum mainnet to Bitcoin so its native ETH to native BTC.
Type the amount to be swapped, I did 0.03 ETH for this tutorial, and copy in the recipient address from your Bitcoin wallet.

You can see that there’s a gas fee involved, but otherwise the swap offers a competitive market rate.
Confirm Swap
Once you’re ready just hit the Swap button and confirm the amount you’re going to receive on the other side!
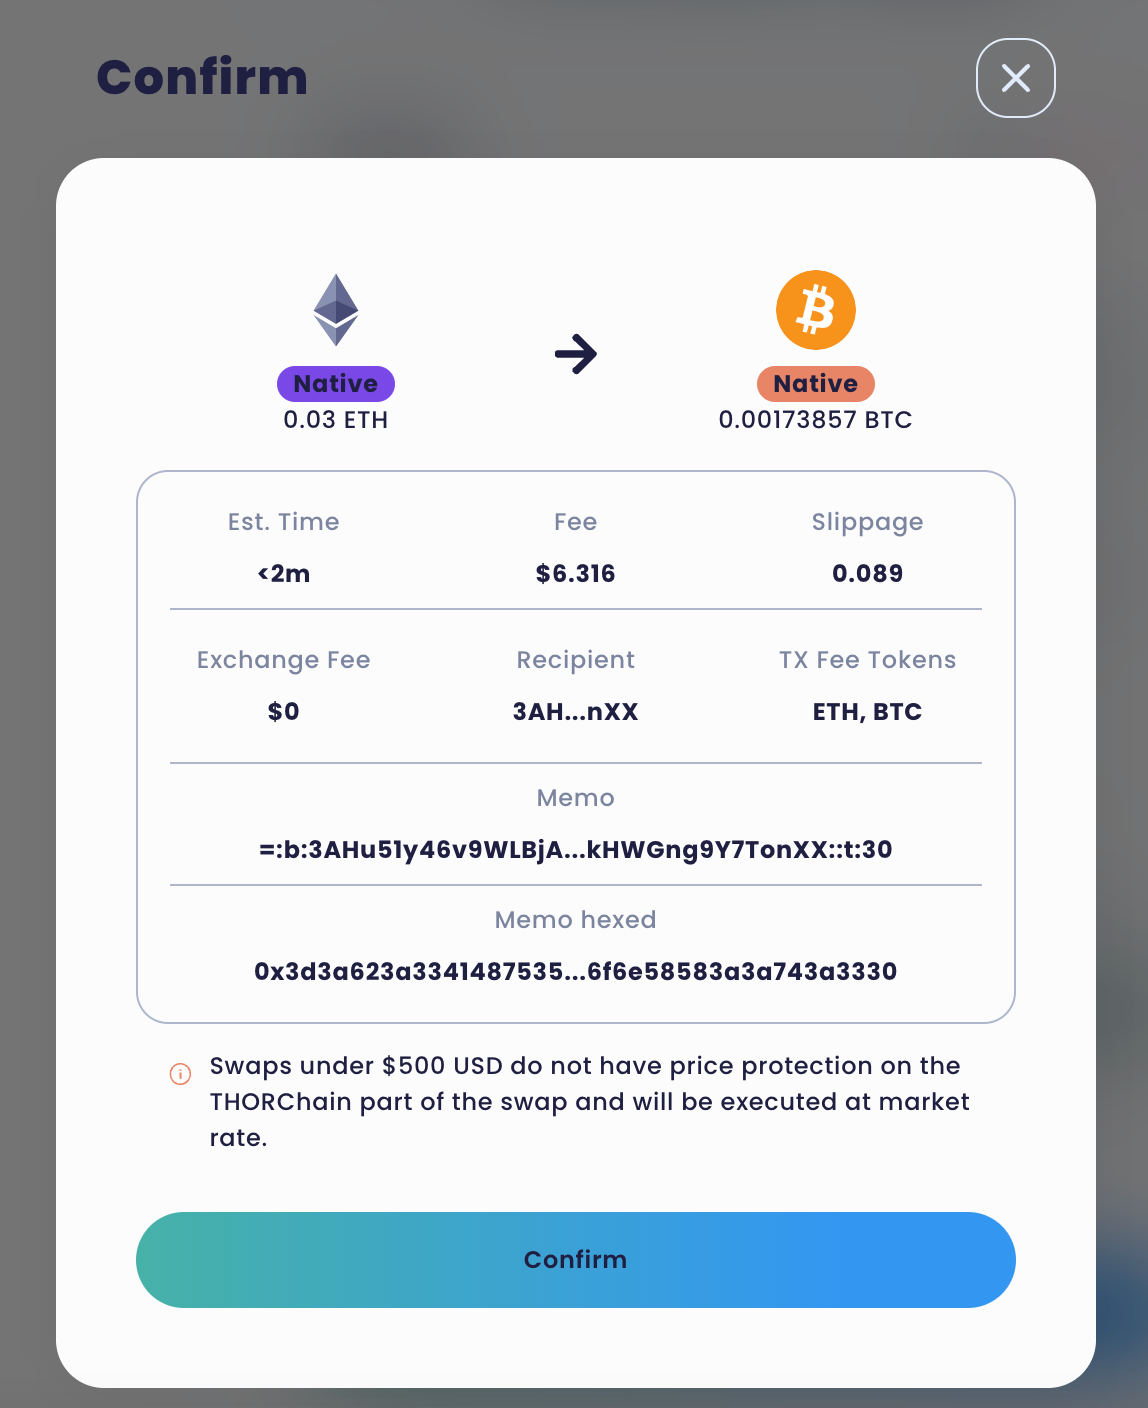
You’ll be asked to sign the transaction with Metamask, and once the ETH is sent, a new transaction will show up on Thorwsap’s “Transaction History” on the top-right.

In the above example you can see a there’s a pending transaction and another transaction I also did from this wallet that completed in the past.
Receive BTC
You’ll now have to wait a while for the transaction to go through. If you click on the transaction within “Transaction History” you can see what stage its at.
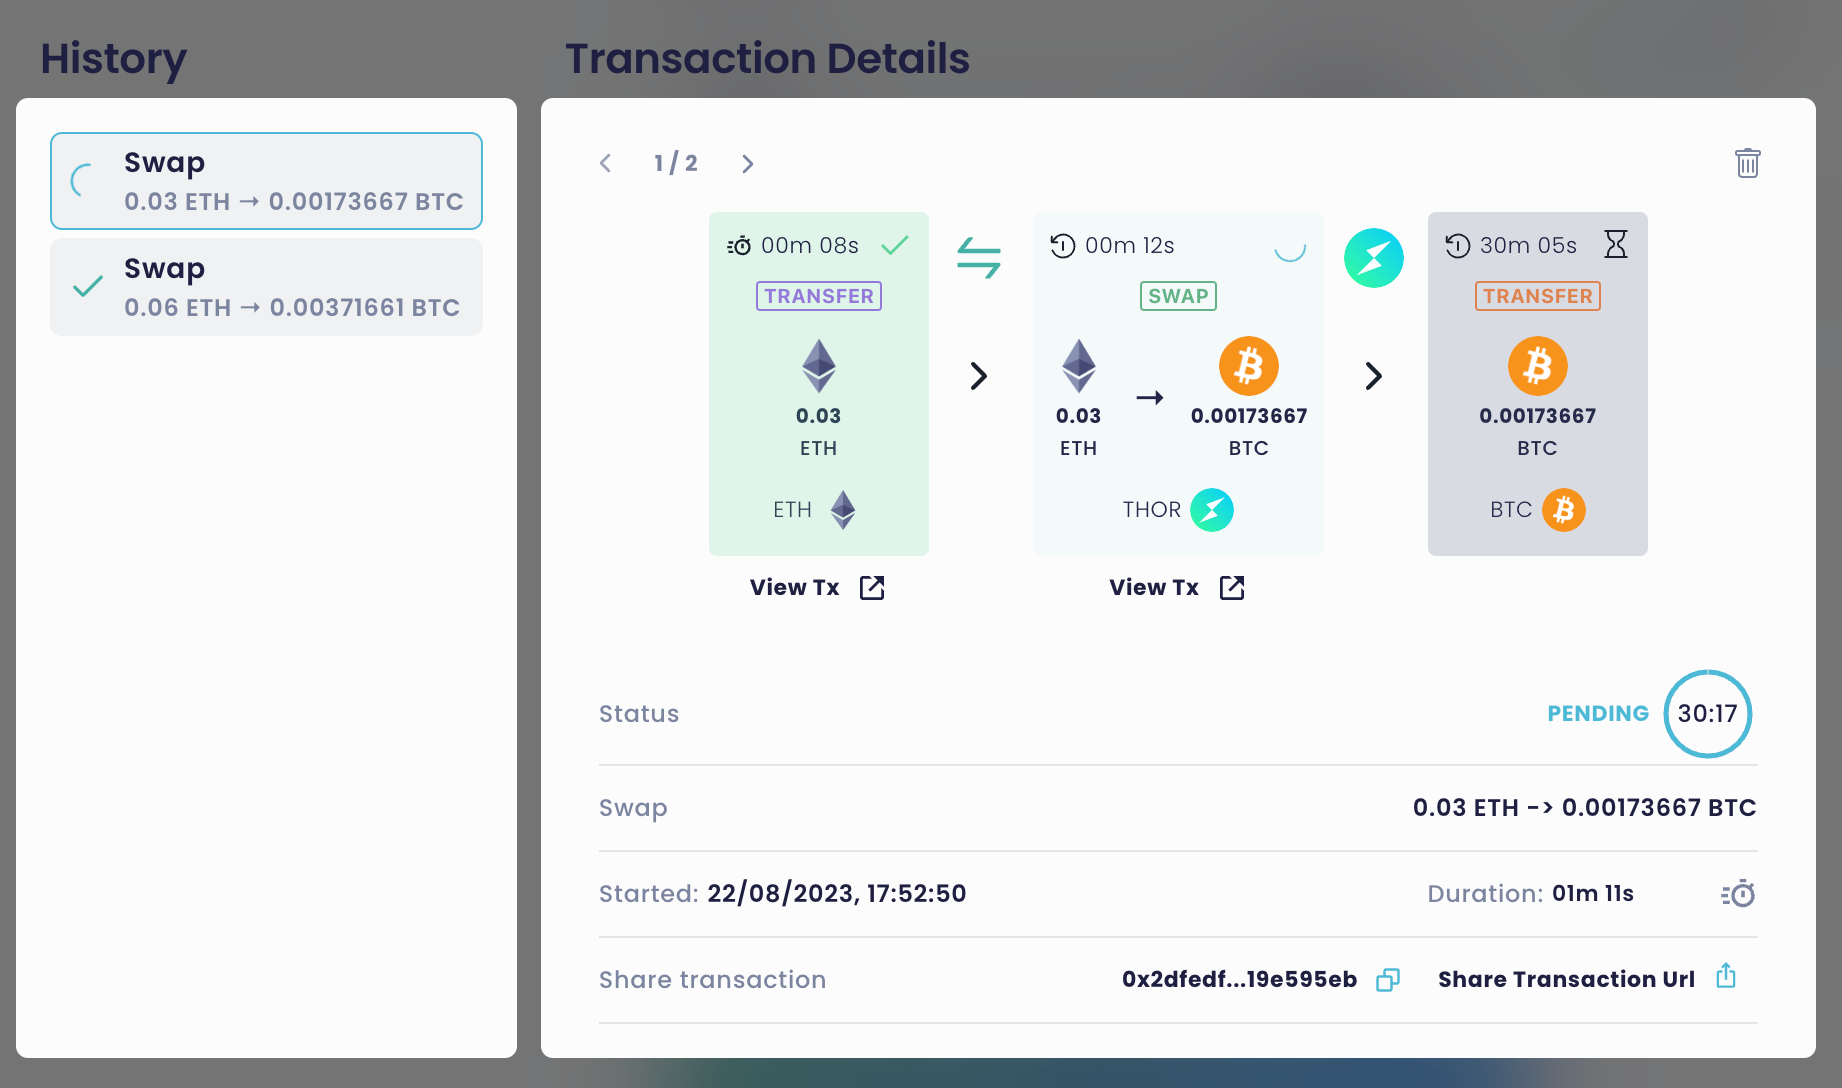
To receive your BTC it can be as quick as 10 minutes or it can take a few hours to go through, I’ve seen both ends of the spectrum before.

Be patient though as Thorswap is very reliable, and if for any reason you haven’t received your coins you can always create a ticket on their Discord as they are very active and responsive there.
Congrats!
You’ve transferred over ETH to BTC without making use of a CEX!
While its not as fast as it could be, its still incredibly easy to use and doesn’t require you to have an account like a CEX would or even to do anything particularly complex only a few straight-forward clicks.
By stacking both bridging and AMM technology together Thorswap creates this elegant experience that really showcases what’s possible with the tech, allowing you to traverse coins and chains in a decentralised way.
Thorswap gives a great glimpse into the true power and future of Web3!