
GitHub for Beginners
Learn how to use version control for your vibecoding
TLDR:
GitHub is a cloud-based platform for creating, hosting, managing and sharing code, it is the most popular version control system in the world.
Version control is an essential piece of software development. Developers store their code in repositories that facilitate versioning and collaboration.
Follow below to learn how to create, clone, and modify a repository, plus how to get your project running online automatically with GitHub Actions.
This post shows how to use GitHub’s visual UI to so that readers understand what’s truly happening when you use your favourite AI to do all the work for you.
We’re seeing a lot of growth in software development by non-technical people, also known as vibecoding. But as soon as you start vibecoding you find yourself needing to learn and understand about version control and code repositories.
So today I decided to give a beginners introduction on GitHub, which is by far the most popular version control solution out there and I believe will become even more popular as more and more people take to vibecoding their ideas with AI.
If this post resonates with you and you enjoy the content then please share it with a friend and get rewarded for doing so!

This blog goes out weekly to over 20,000 subscribers. Please message me if you’re interested in sponsorships or partnerships.
GitHub
GitHub is a cloud-based platform for creating, hosting, managing and sharing code. It's the most popular platform of its type in the world, with over 150 million users worldwide spanning both individual developers and companies!
GitHub’s core offering is also know as “version control” or “source control”, which is a key concept in the world of software engineering.
When software developers work on a project’s code it’s important to be able to track the history of changes and determine what version certain changes happened, plus it makes collaboration much easier, since code can be reverted back to an old version or merged with another version.
Version control is orchestrated through code repositories where the code lives, along with the metadata related to version history, and any additional settings and configurations.
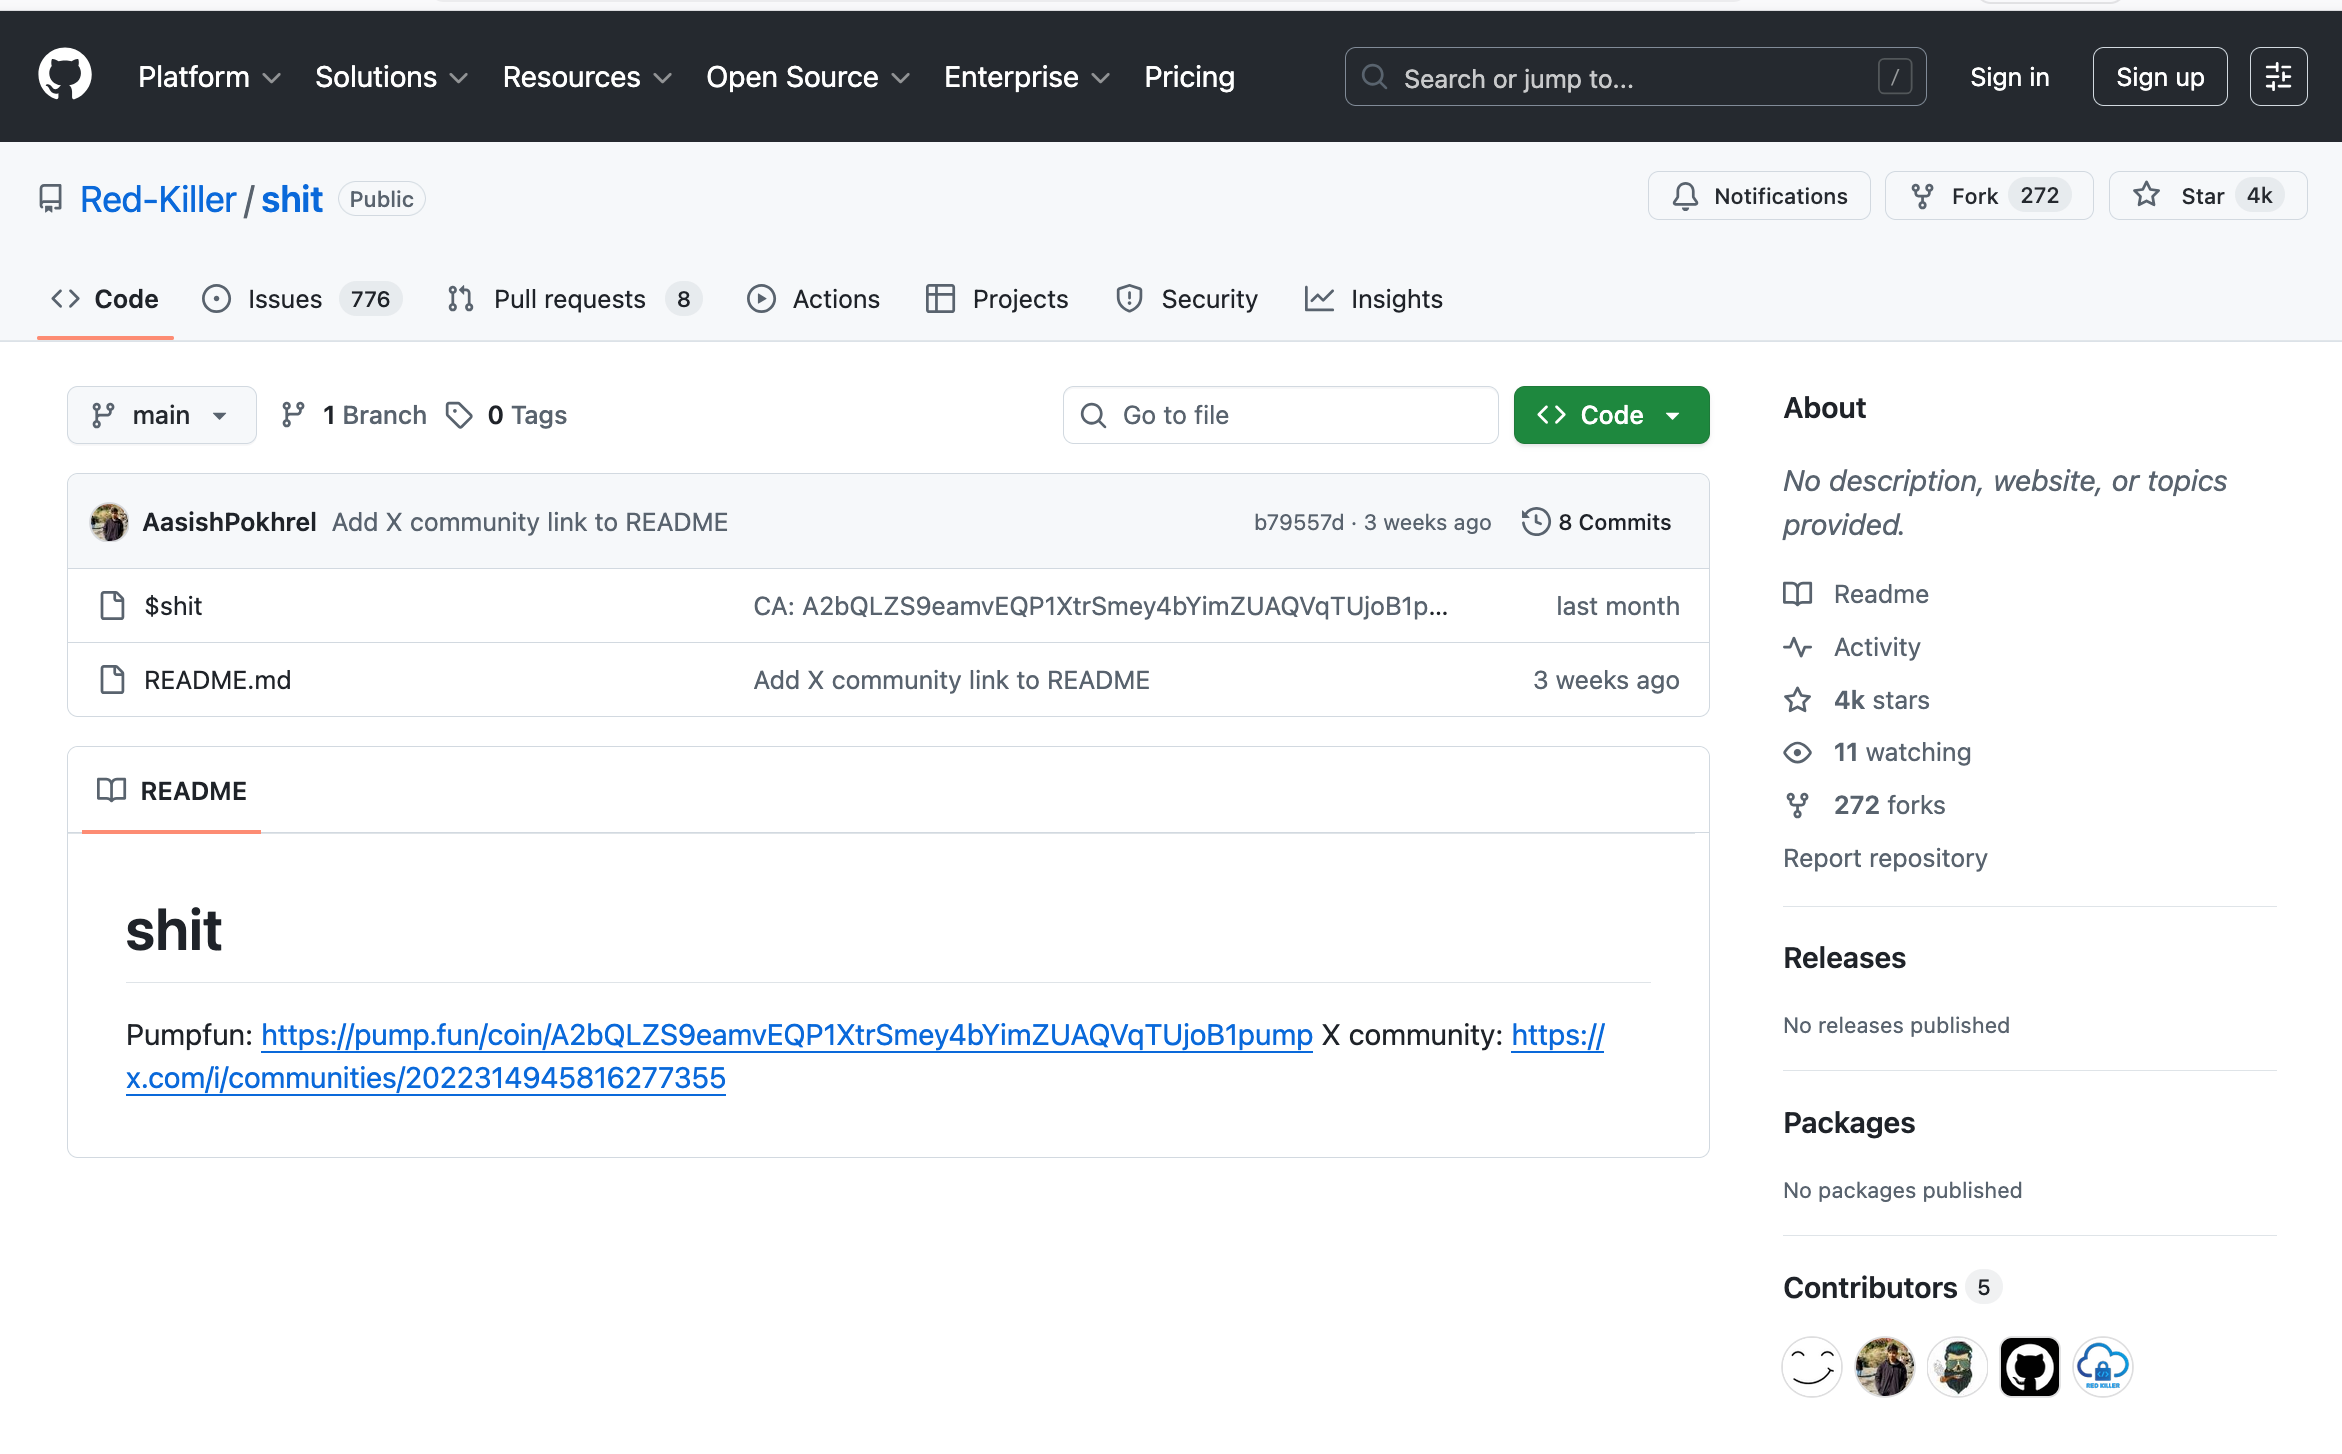
Back in 2018 Microsoft acquired GitHub for $7.5bn and poured billions of dollars into growing it, and in June 2025 GitHub surpassed over 1 billion code repositories! Pretty amusingly the billionth repository simply has a file saying “shit” with a pump.fun link to a token.
The word “Git” in GitHub comes from it being built on top of an open-source version control system called Git created by Linus Torvalds back in 2005 to manage his work on the Linux operating system!
A simple way to think about it is that Git is the tool that allows you to track changes locally on a set of files, while GitHub is the service that allows you to store it online and search through millions of other repositories and users.
Due to this layer of connectivity between users and repos GitHub also acts as a social network for developers! It plays into this social networking side with systems like stars for favouriting repos and user profile pages, but we’re going to gloss over this aspect for today.
The most important thing to understand here is that using version control is a crucial practice within the software development world as it ensures you never lose important code, can easily go back to old versions, plus it facilitates collaboration, and GitHub is the outright leading solution here and allows you to get started for free!
Getting Started
A quick note before we get started is that GitHub can be used almost entirely through its CLI (Command line interface) in your computer terminal, and so your AI may prefer to work like this. But for the sake of this tutorial we will always prefer the visual interface because it’s easier to use and interpret as a human!
So we’ll start by just creating an account on GitHub, head over to the sign up page where you can sign up entirely for free.

You’ll then see your dashboard page and be able to click on your profile page, settings page and beyond.
Our focus today is not viewing the vast world of code repos and other profiles on GitHub, we’re interested in getting you to use GitHub with your own personal projects.
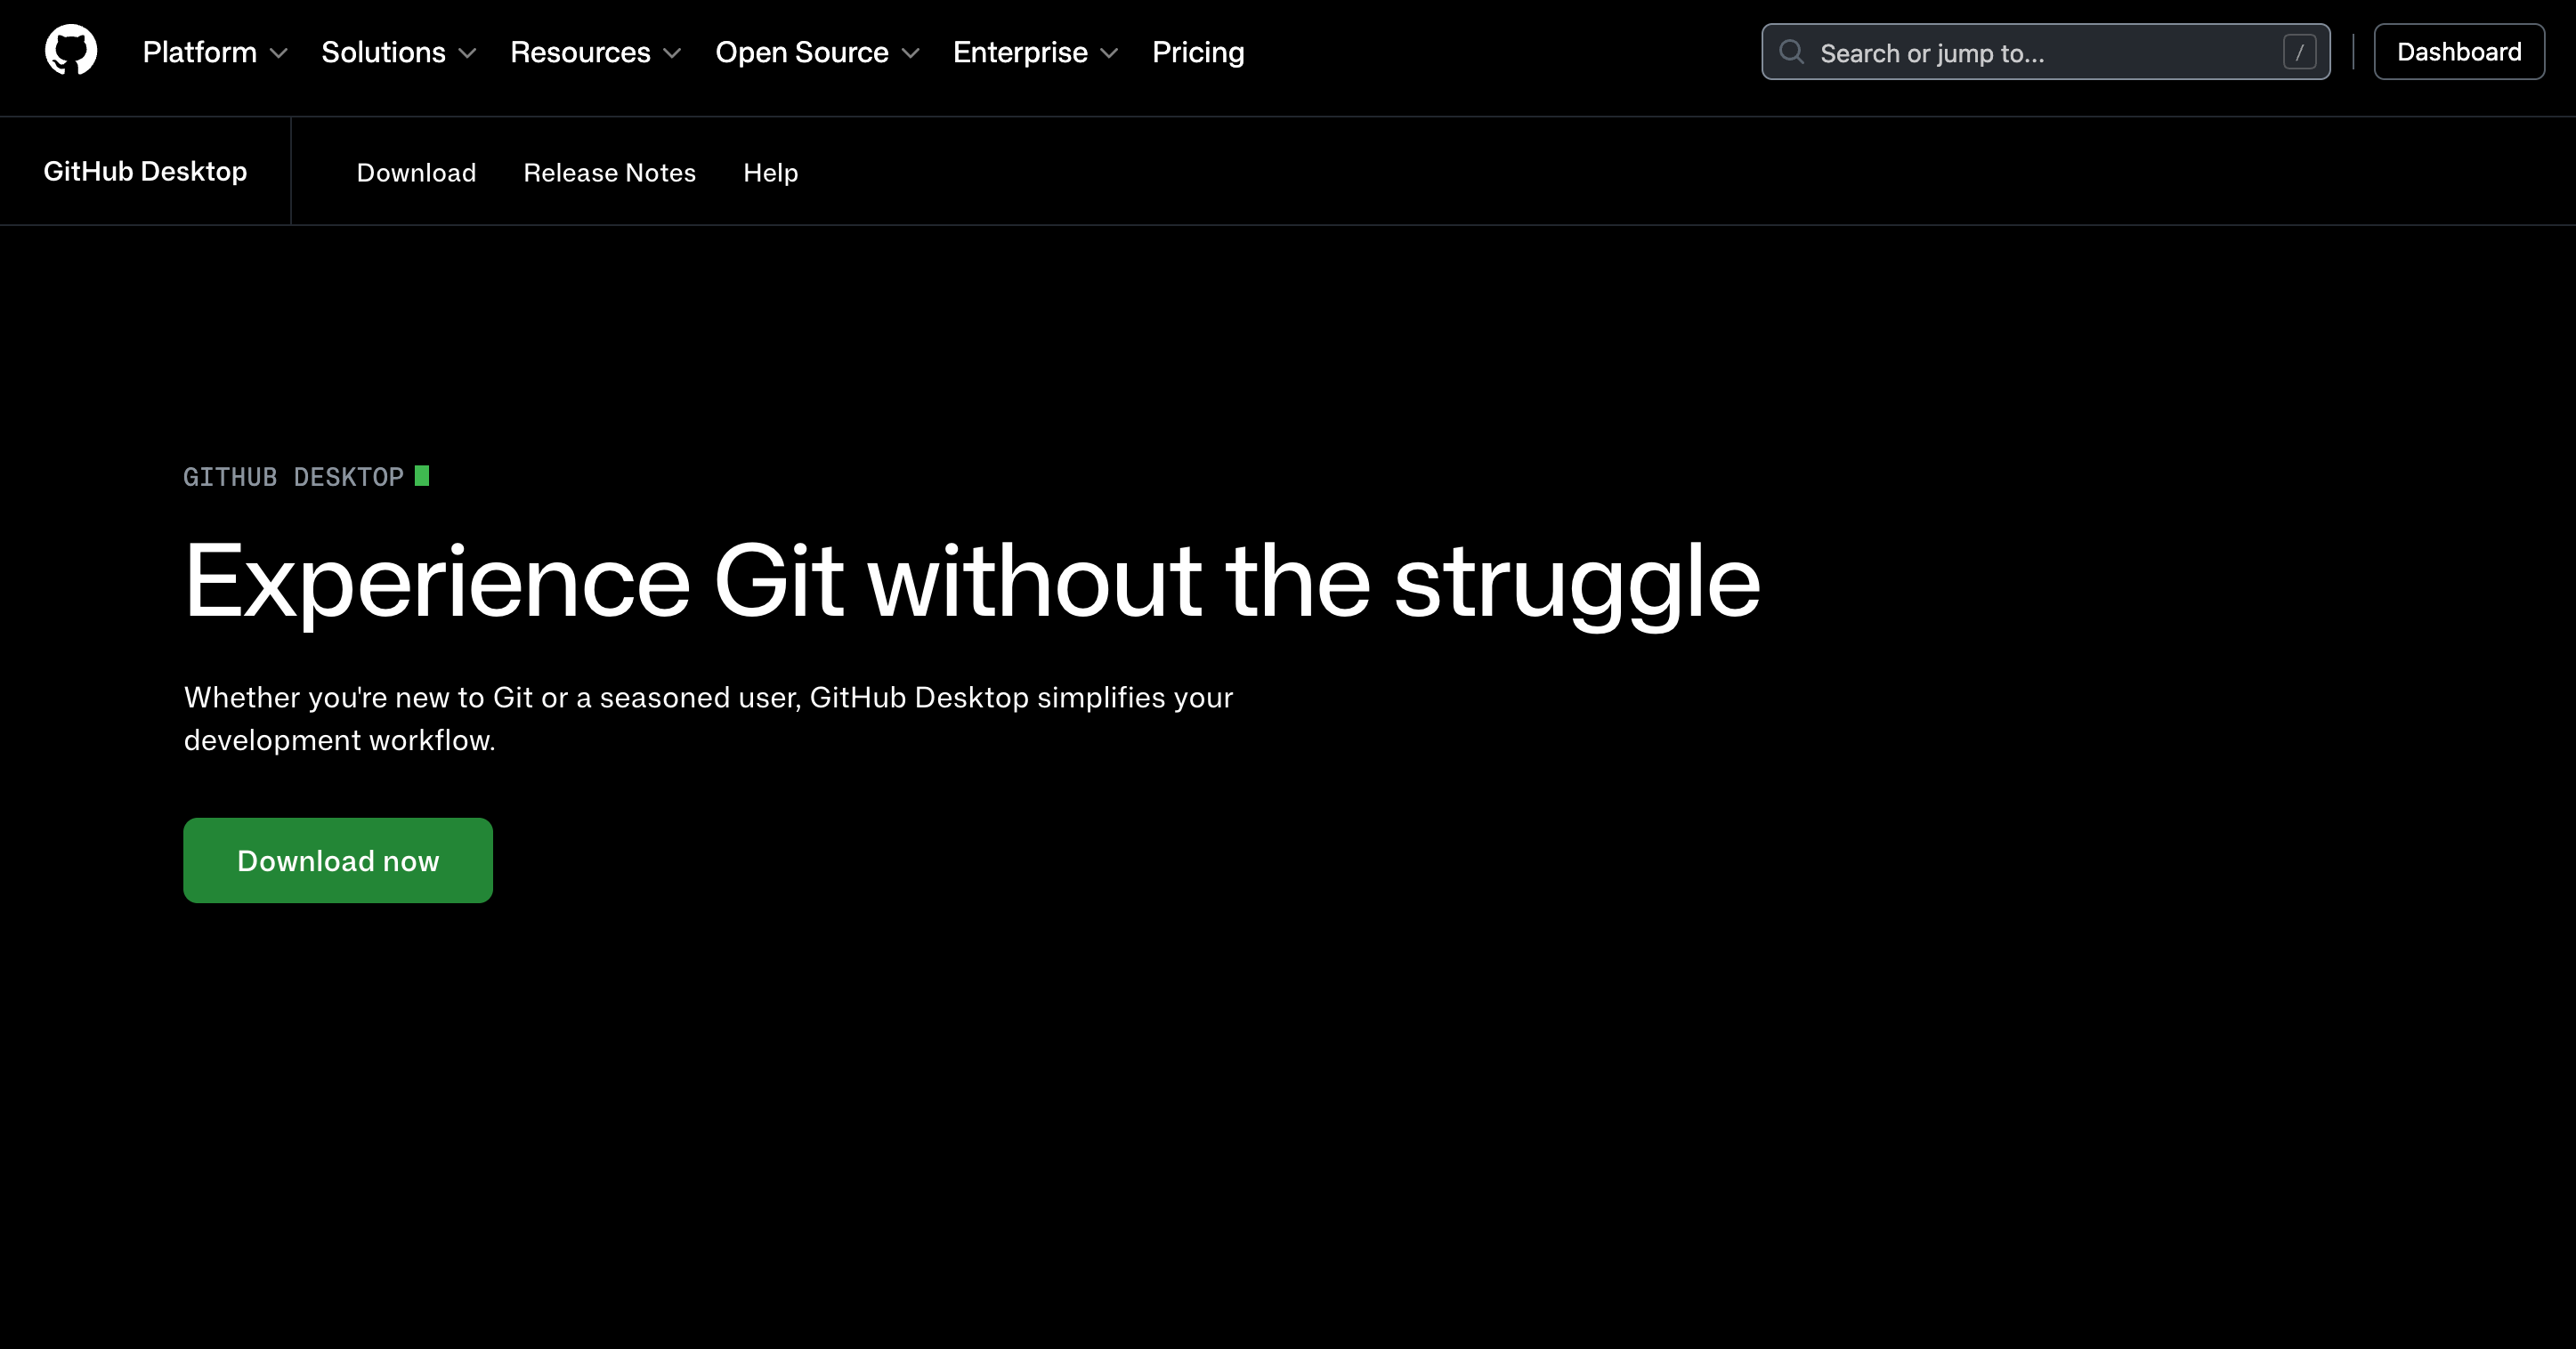
Now once again we could do the next steps with the CLI, but for this tutorial we’re going to stick here with visual interfaces, so let’s now download something called GitHub desktop to your computer that’s a very visual way to interface with GitHub.
You can find it at github.com/apps/desktop, just hit download to get started.
You’ll then be required to sign in on GitHub desktop, which will open up the browser for you to log in with your recently created account and once you’ve logged in you’ll see something like this.

So far we’ve created a GitHub account and downloaded GitHub Desktop, let’s now create our first code repository.
Create and Clone a repository
Code repositories (repos) are where we house our projects, as we mentioned at the start. We could create our first repo either on the website, or on GitHub desktop, or once again through the CLI, but we’re sticking to the UI here and let’s go with the website for now.
So open up github.com to view the dashboard and select the green “new” button, which will take you to create a new repository. Here you’ll want to give it a name, description, and then I recommend adding a README file, and you can choose between making your project public or private.
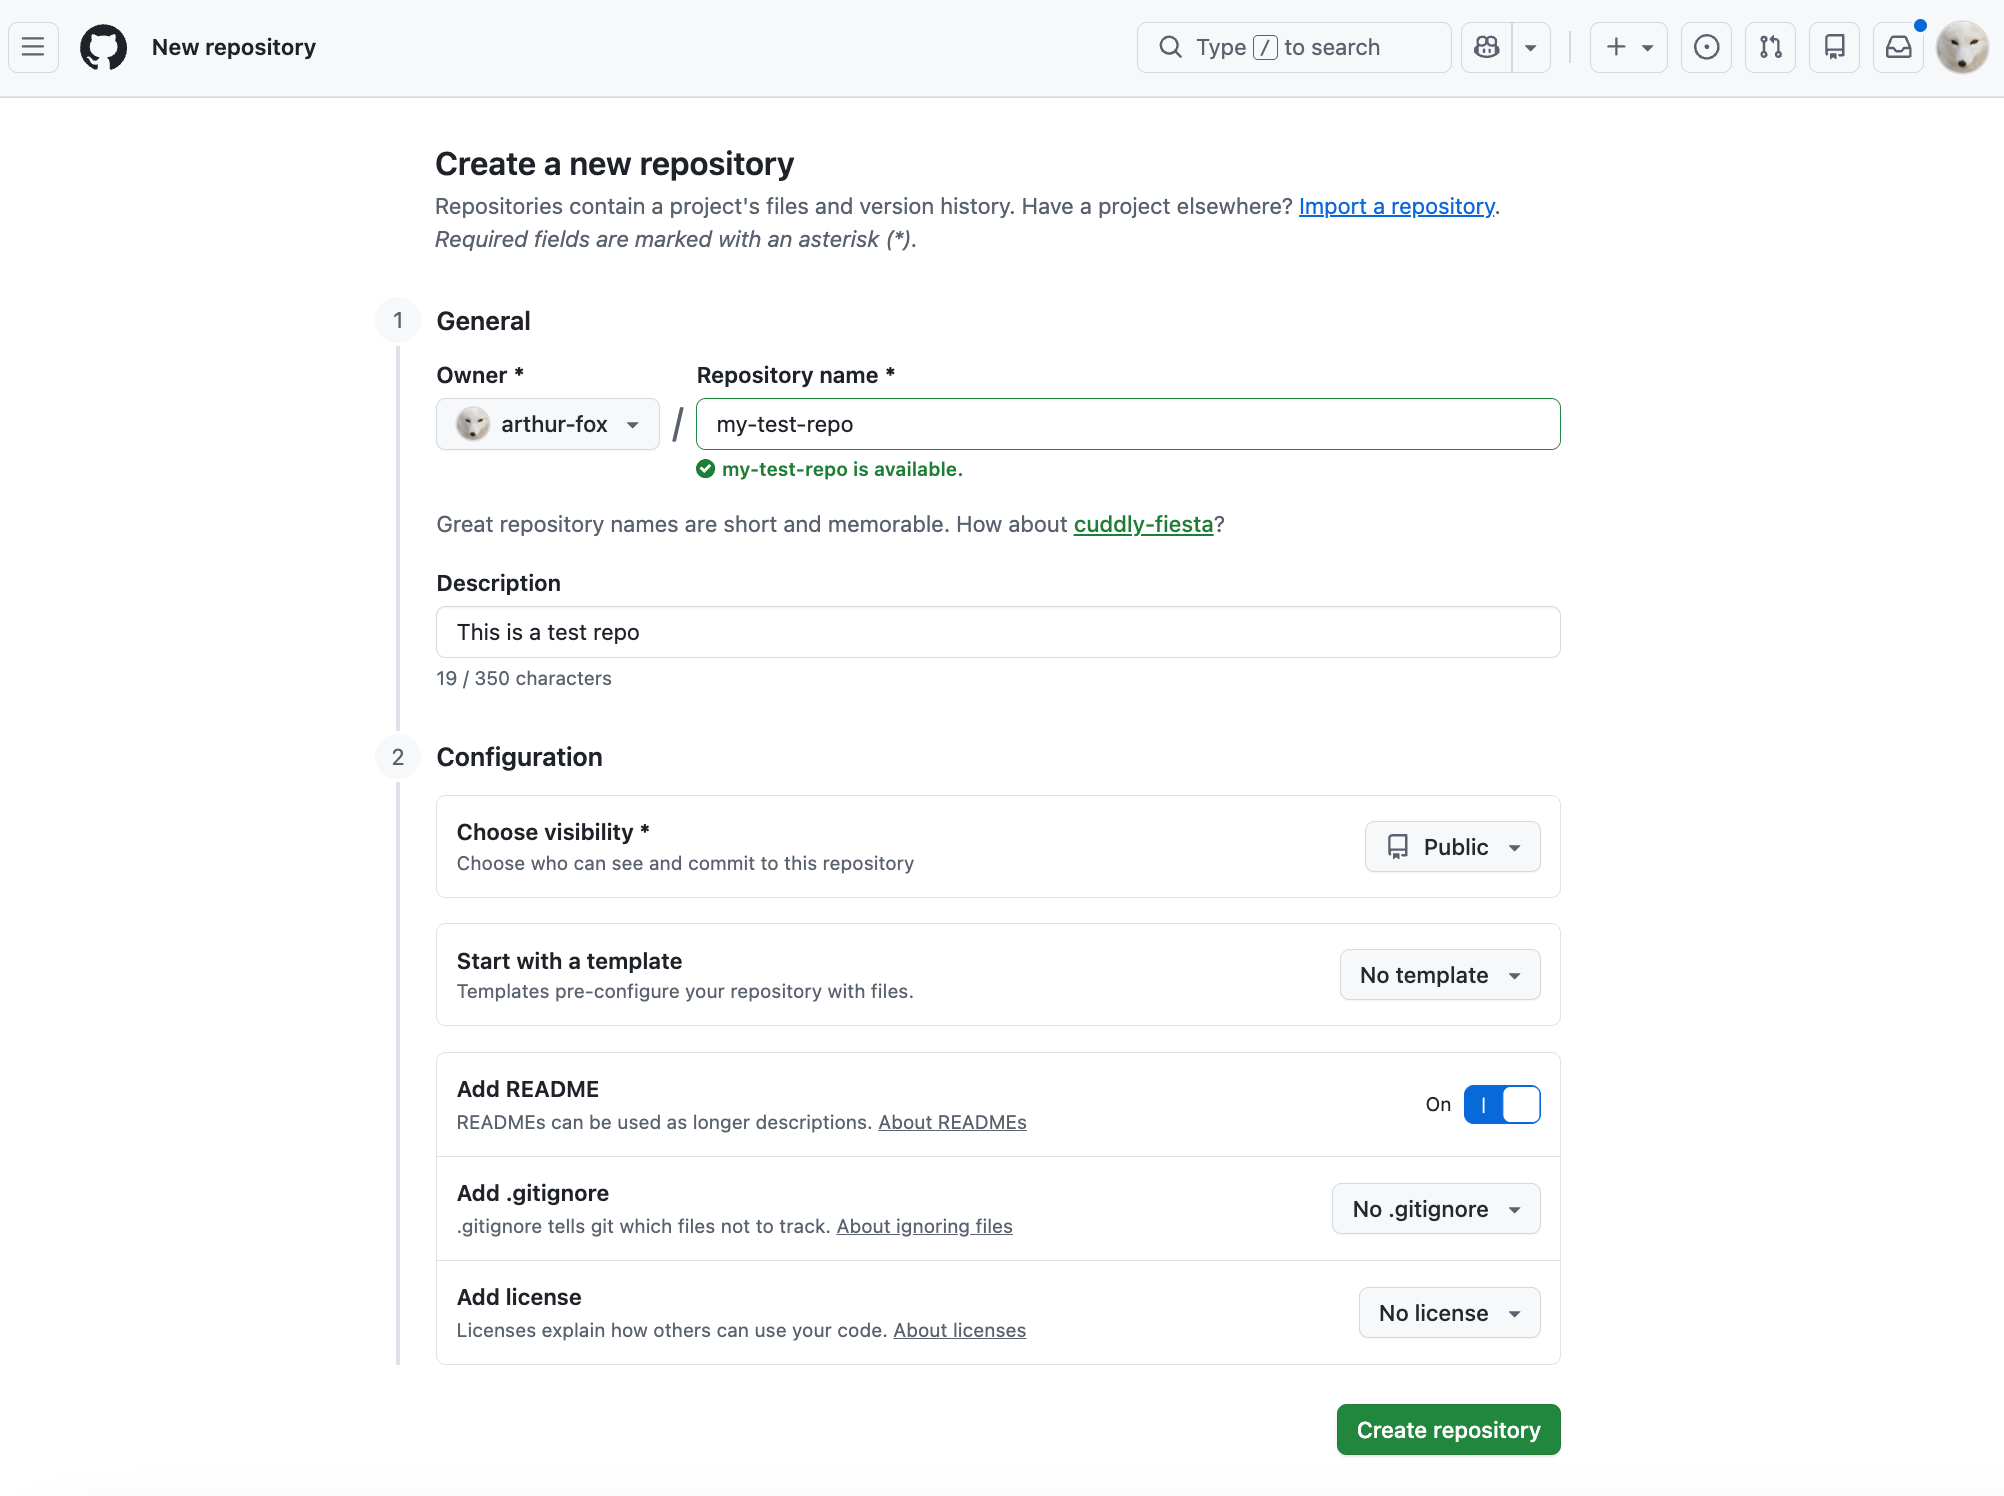
It’s worth noting that most people keep their repo’s public as it allows for other people to collaborate openly with them online, and in practice most people are unlikely to ever even find your repo unless it takes off. Meanwhile private repos are mainly used by companies that are protecting their enterprise code.
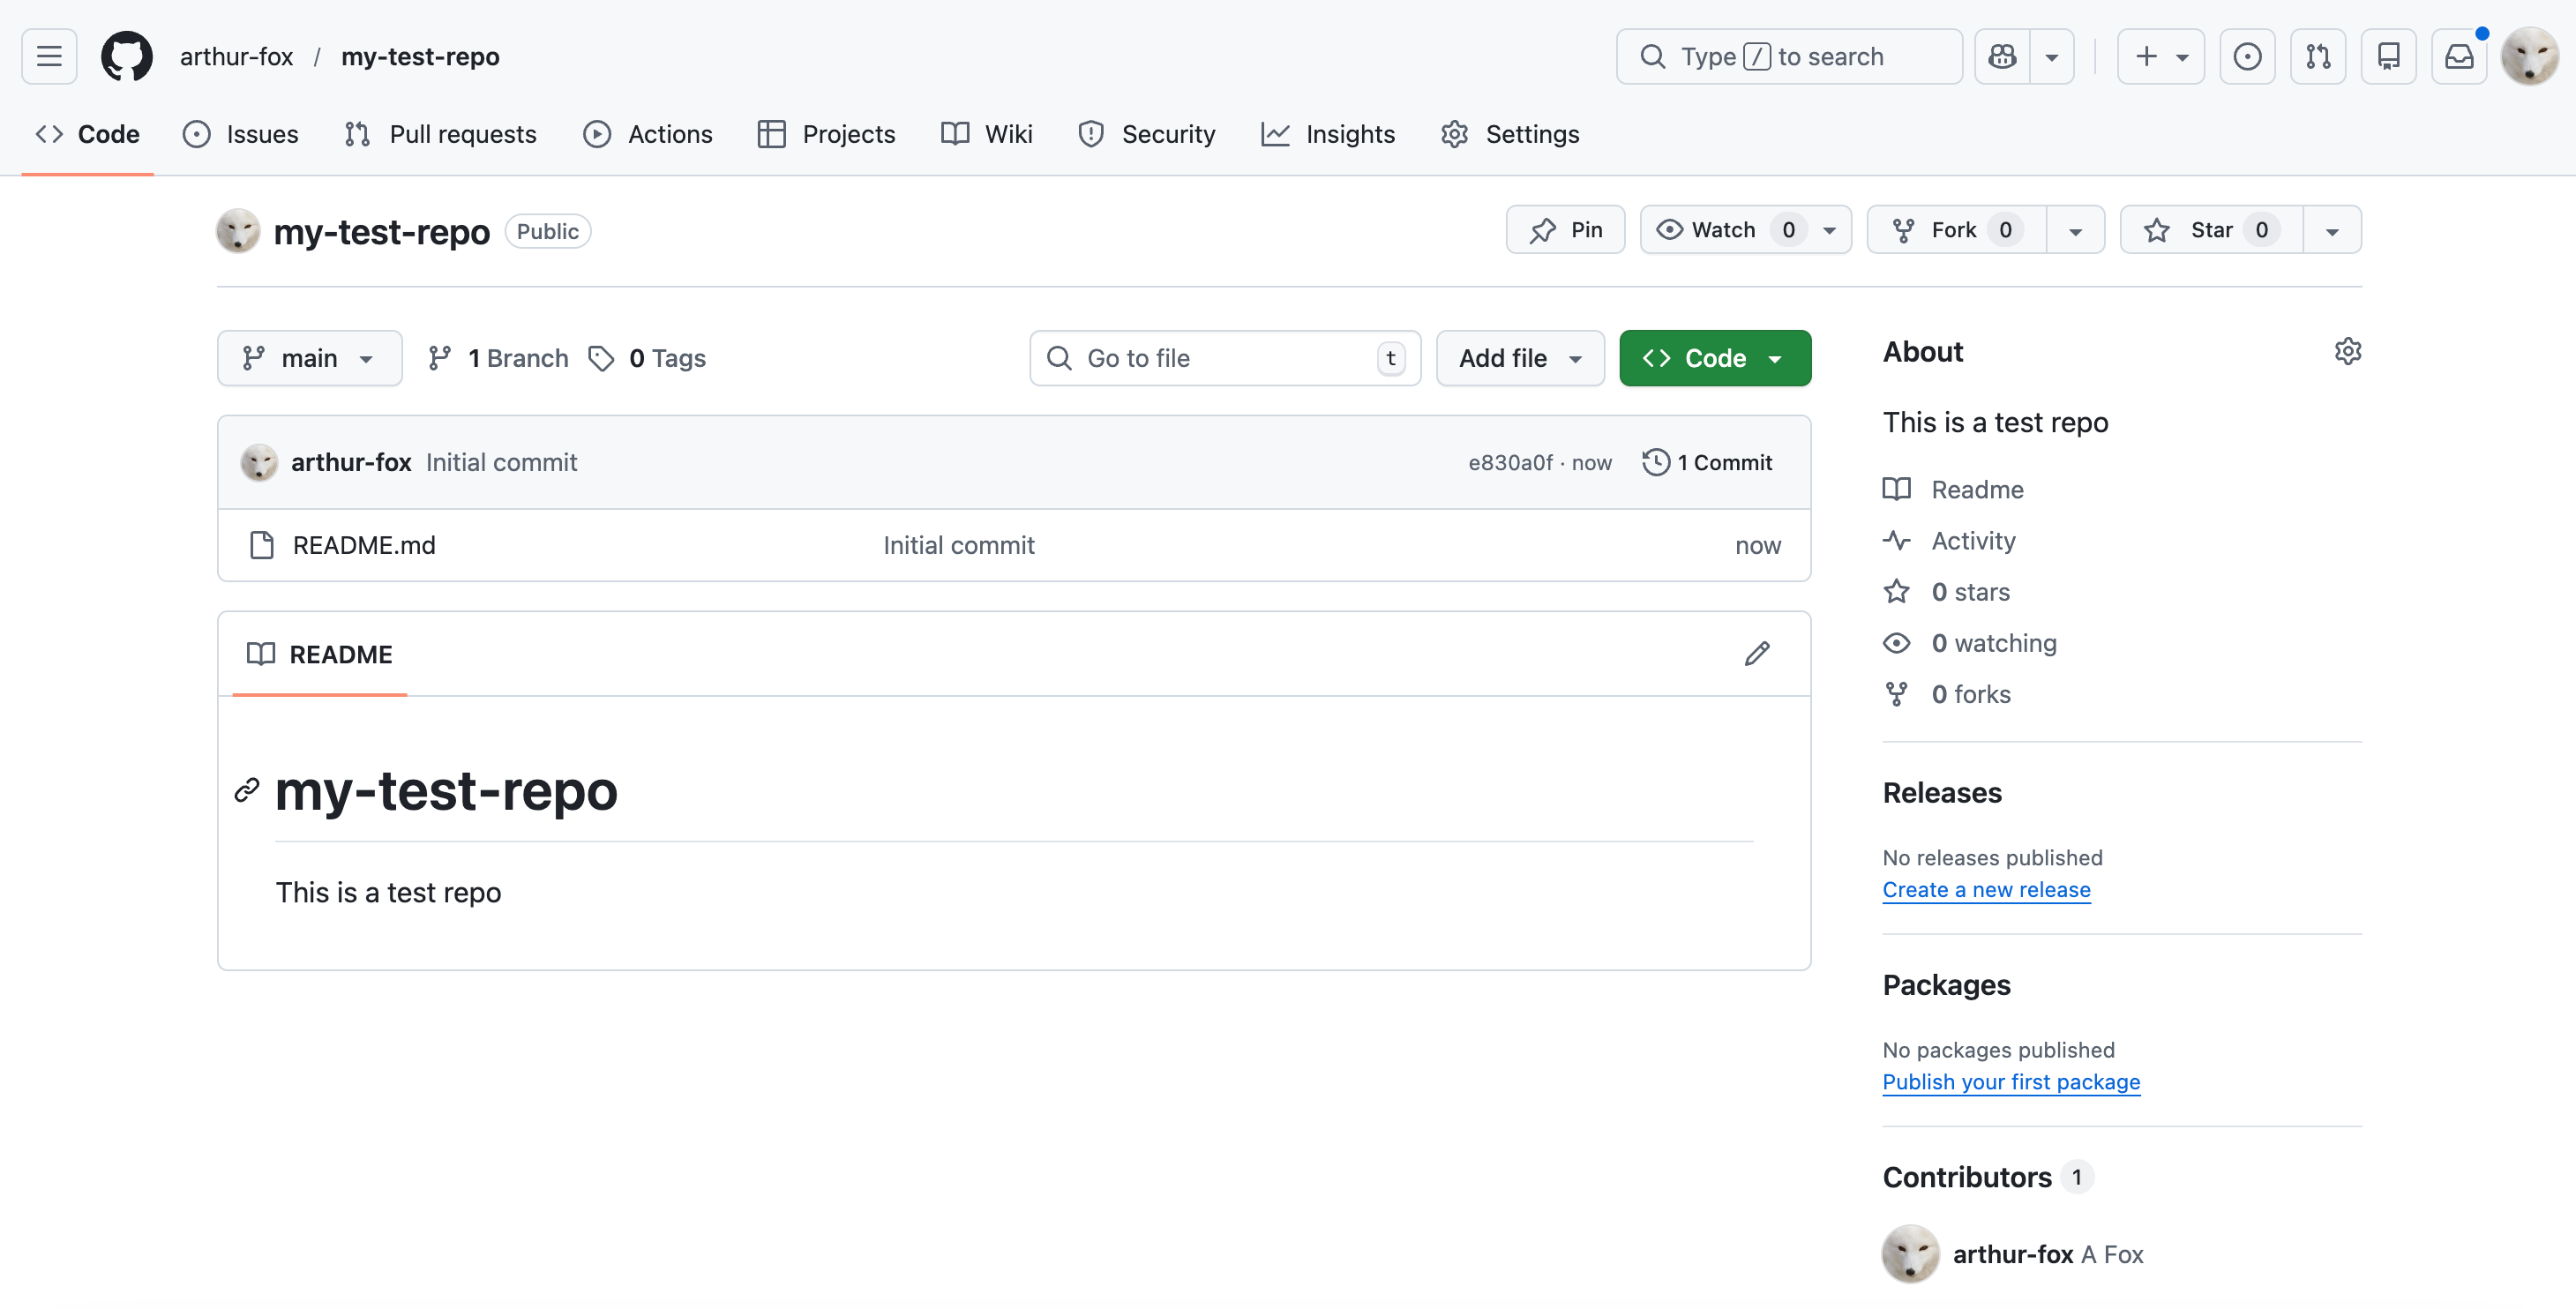
With your new repository created you’ll now find it within your list of repositories and if you select it you’ll see something like this below.
Now let’s clone this new repo to our computer by selecting the green “code” button and copying the URL for this repo.
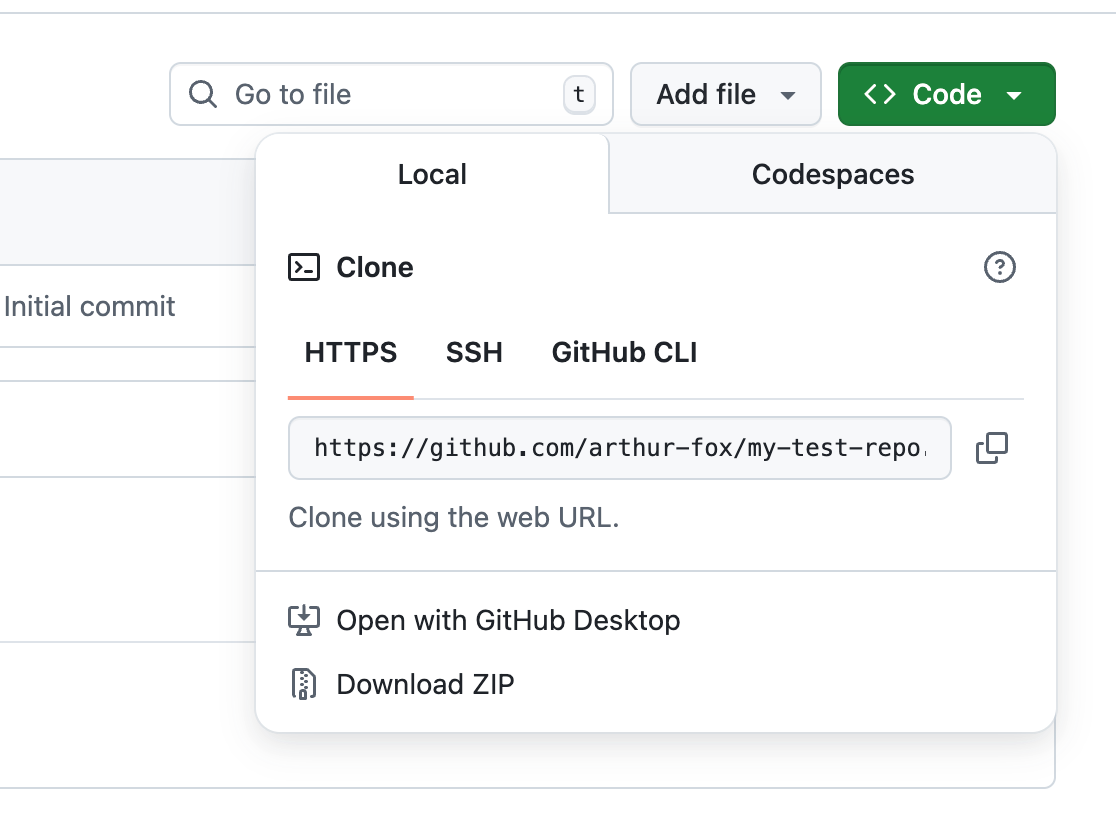
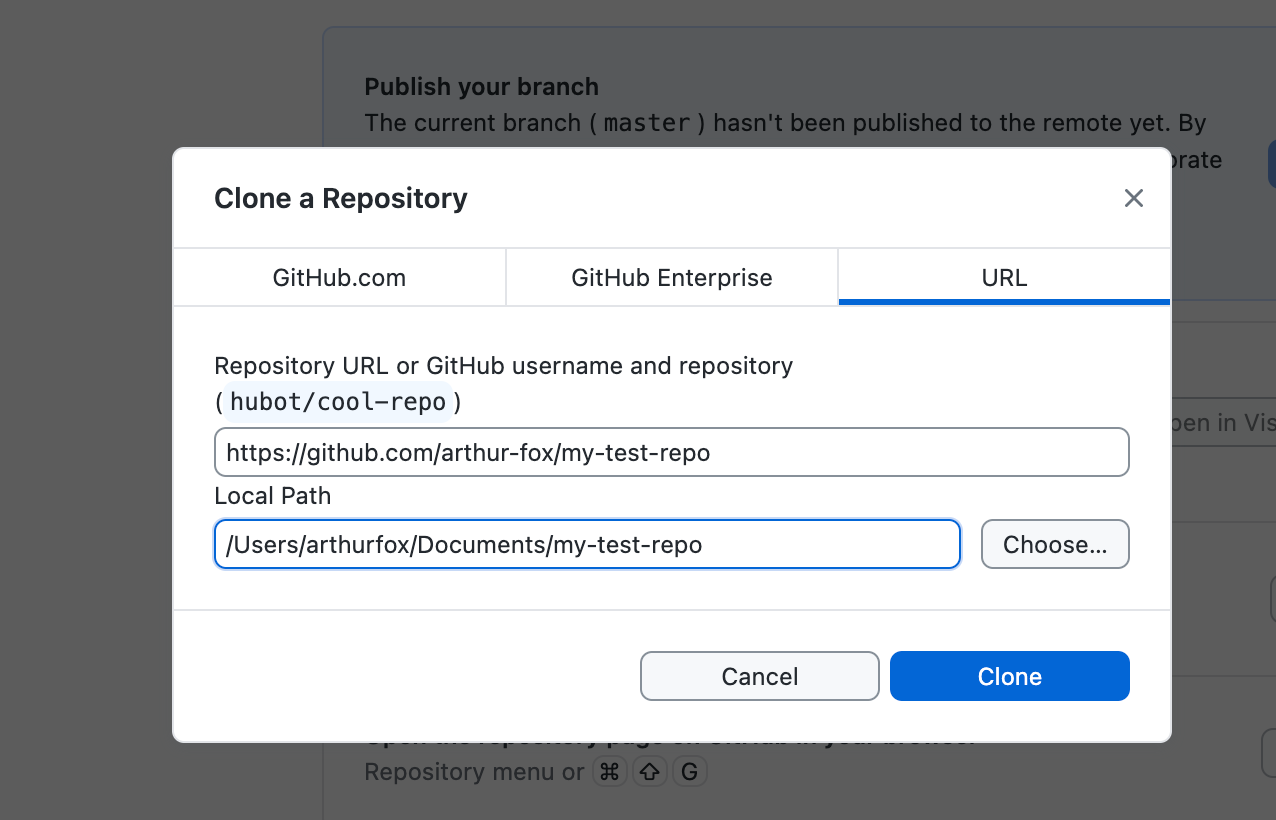
Then selecting the “clone repository” button on GitHub Desktop and pasting the URL above.
Great, we’ve now created our first repo and cloned it onto our machine, next we want to save a new file into it and upload it to GitHub.
Modifying a repo
We’re going to assume that you have no code so far for this repository, so let’s copy the following text into a new file called “index.html” within the folder that got created when cloning the repo.
<!DOCTYPE html>
<html>
<head>
  <title>My GitHub Page</title>
</head>
<body style=”font-family: sans-serif; text-align: center; padding: 100px; background: #0a0a0a; color: white;”>
  <h1>🚀 Hello from GitHub Pages!</h1>
  <p>This page is hosted for free, straight from a GitHub repository.</p>
</body>
</html>
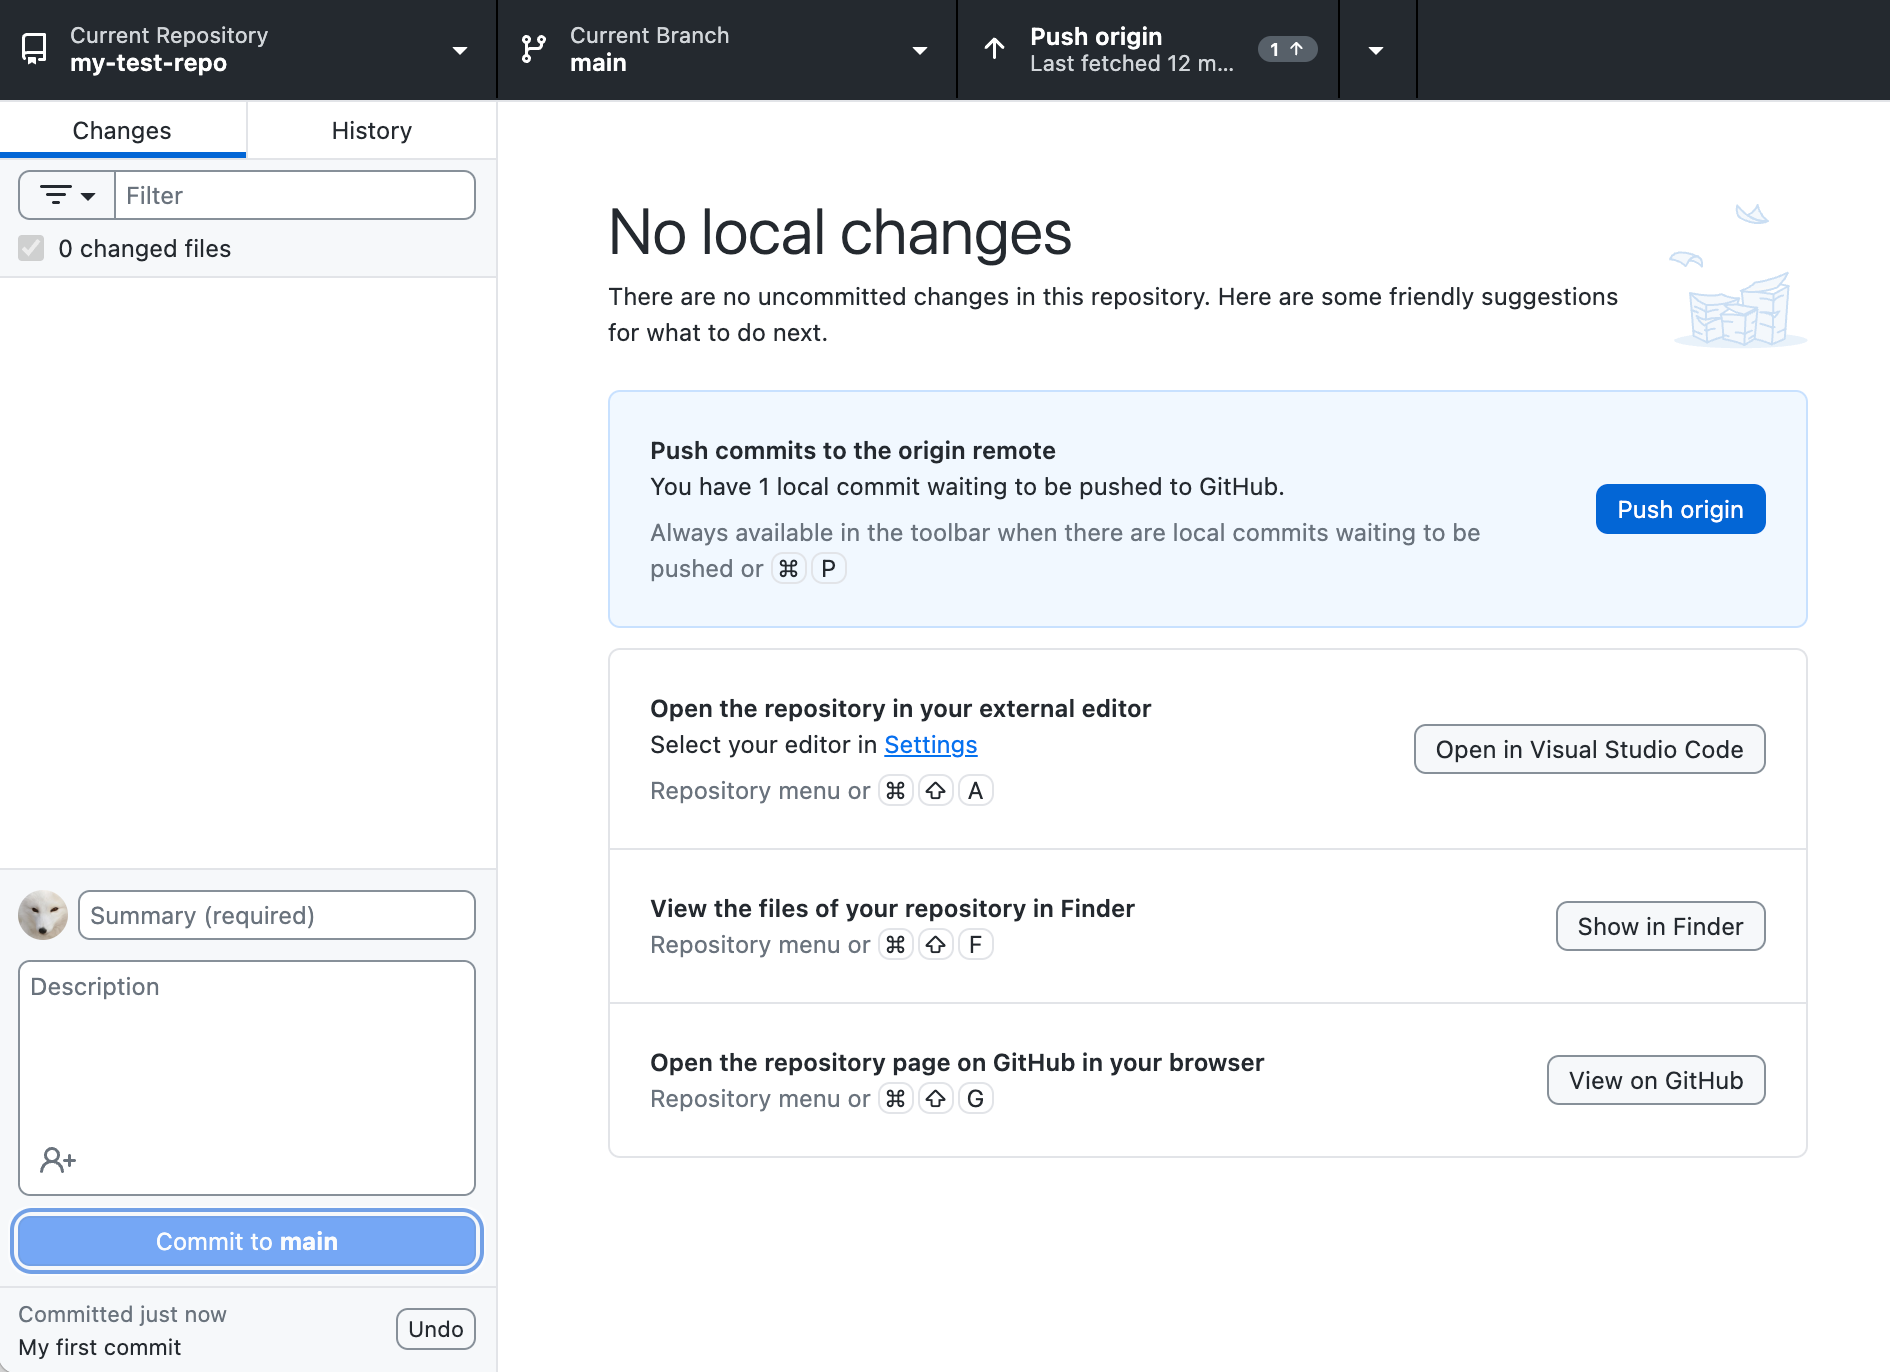
Next let’s open up GitHub Desktop with your repo selected and you should see something like this.

This view in GitHub Desktop will show all the files that have been modified and facilitate the uploading of files to your repo.
At this point it’s important to understand that uploading in Git has a couple of steps, the first is where you “commit” the code, and the second is where you “push”.
Committing is a local action that saves the updated version of the code onto your machine giving this latest version a name and description, then pushing is where you save it into the centralised repository on GitHub.
In the example above you see that I’ve given this commit the title “My first commit” and description “Created an index page”. So first select the “commit to main” button then secondly select “push origin” and the code will be saved on GitHub!
As a solo developer vibecoding at home this is pretty much all you need to understand, but as projects become large with a lot of collaborators a lot more functionality becomes relevant.
Collaboration
The power of version control really lies in its collaborative elements. GitHub makes it possible for projects to have 100s of developers building at the same time without saving over each other’s work and merging changes intelligently.
For vibe coders this is less important as most are building solo, but I’ll give a quick run-down of how this collaboration is possible with a few key concepts.
Branches - The “main” branch has the most up to date core version of a project, but if a developer wants to build a separate feature they may make a new branch to write their code without it getting saved directly to main. Then later when they’ve finished and tested the code they can merge the changes back into main without having stepped on other work in other branches that may have happened. In bigger projects it’s common to have many branches at any moment with several different people working on them.
Forks - If you find a public project on GitHub that you like then you can fork it, essentially copying it into a whole new repo that you now own. This can either act a bit like a separate branch with you updating the code and sending a pull-request to the original project’s owner, or you can just go off and take that code and build on top of it under a totally separate project name and with new owners.
Pull Requests - When people are working either in a branch or a fork and they want to merge their changes back into the original, they open a “pull request” or PR. This is common both between branches within the same repo and from a fork back to the original project. When a PR is opened, whoever’s responsible for the project will review it first and either request changes or accept it and merge it in to update the code.
These are just a few of the key collaboration features and terminology in GitHub, if we were to cover everything it could take a while.
Open-source code thrives on these collaborative elements, as one developer can build something that’s helpful and interesting for them, then another person online can also find it useful and fork it themselves, make additional changes, then create a PR for the original developer to add into the core project - Bitcoin for example was built like this!
I’ll keep things simple for today and skip over how to create forks and branches for now, but maybe I’ll run through these different features another day.
Getting your project online
The final piece of the puzzle for today is using GitHub Pages and GitHub Actions to get our project running online directly through GitHub.
GitHub Actions effectively allow you to introduce automations into your repository that can be used for all sorts of things. As an example every time you push a commit into your repo with Actions you can have it rebuild the code and get it running online for you, let’s do that right now!
First select Settings on your repo, then Pages from the menu on the left, make sure the Source is set to “Deploy from a branch” then select “main” as the branch and hit save.
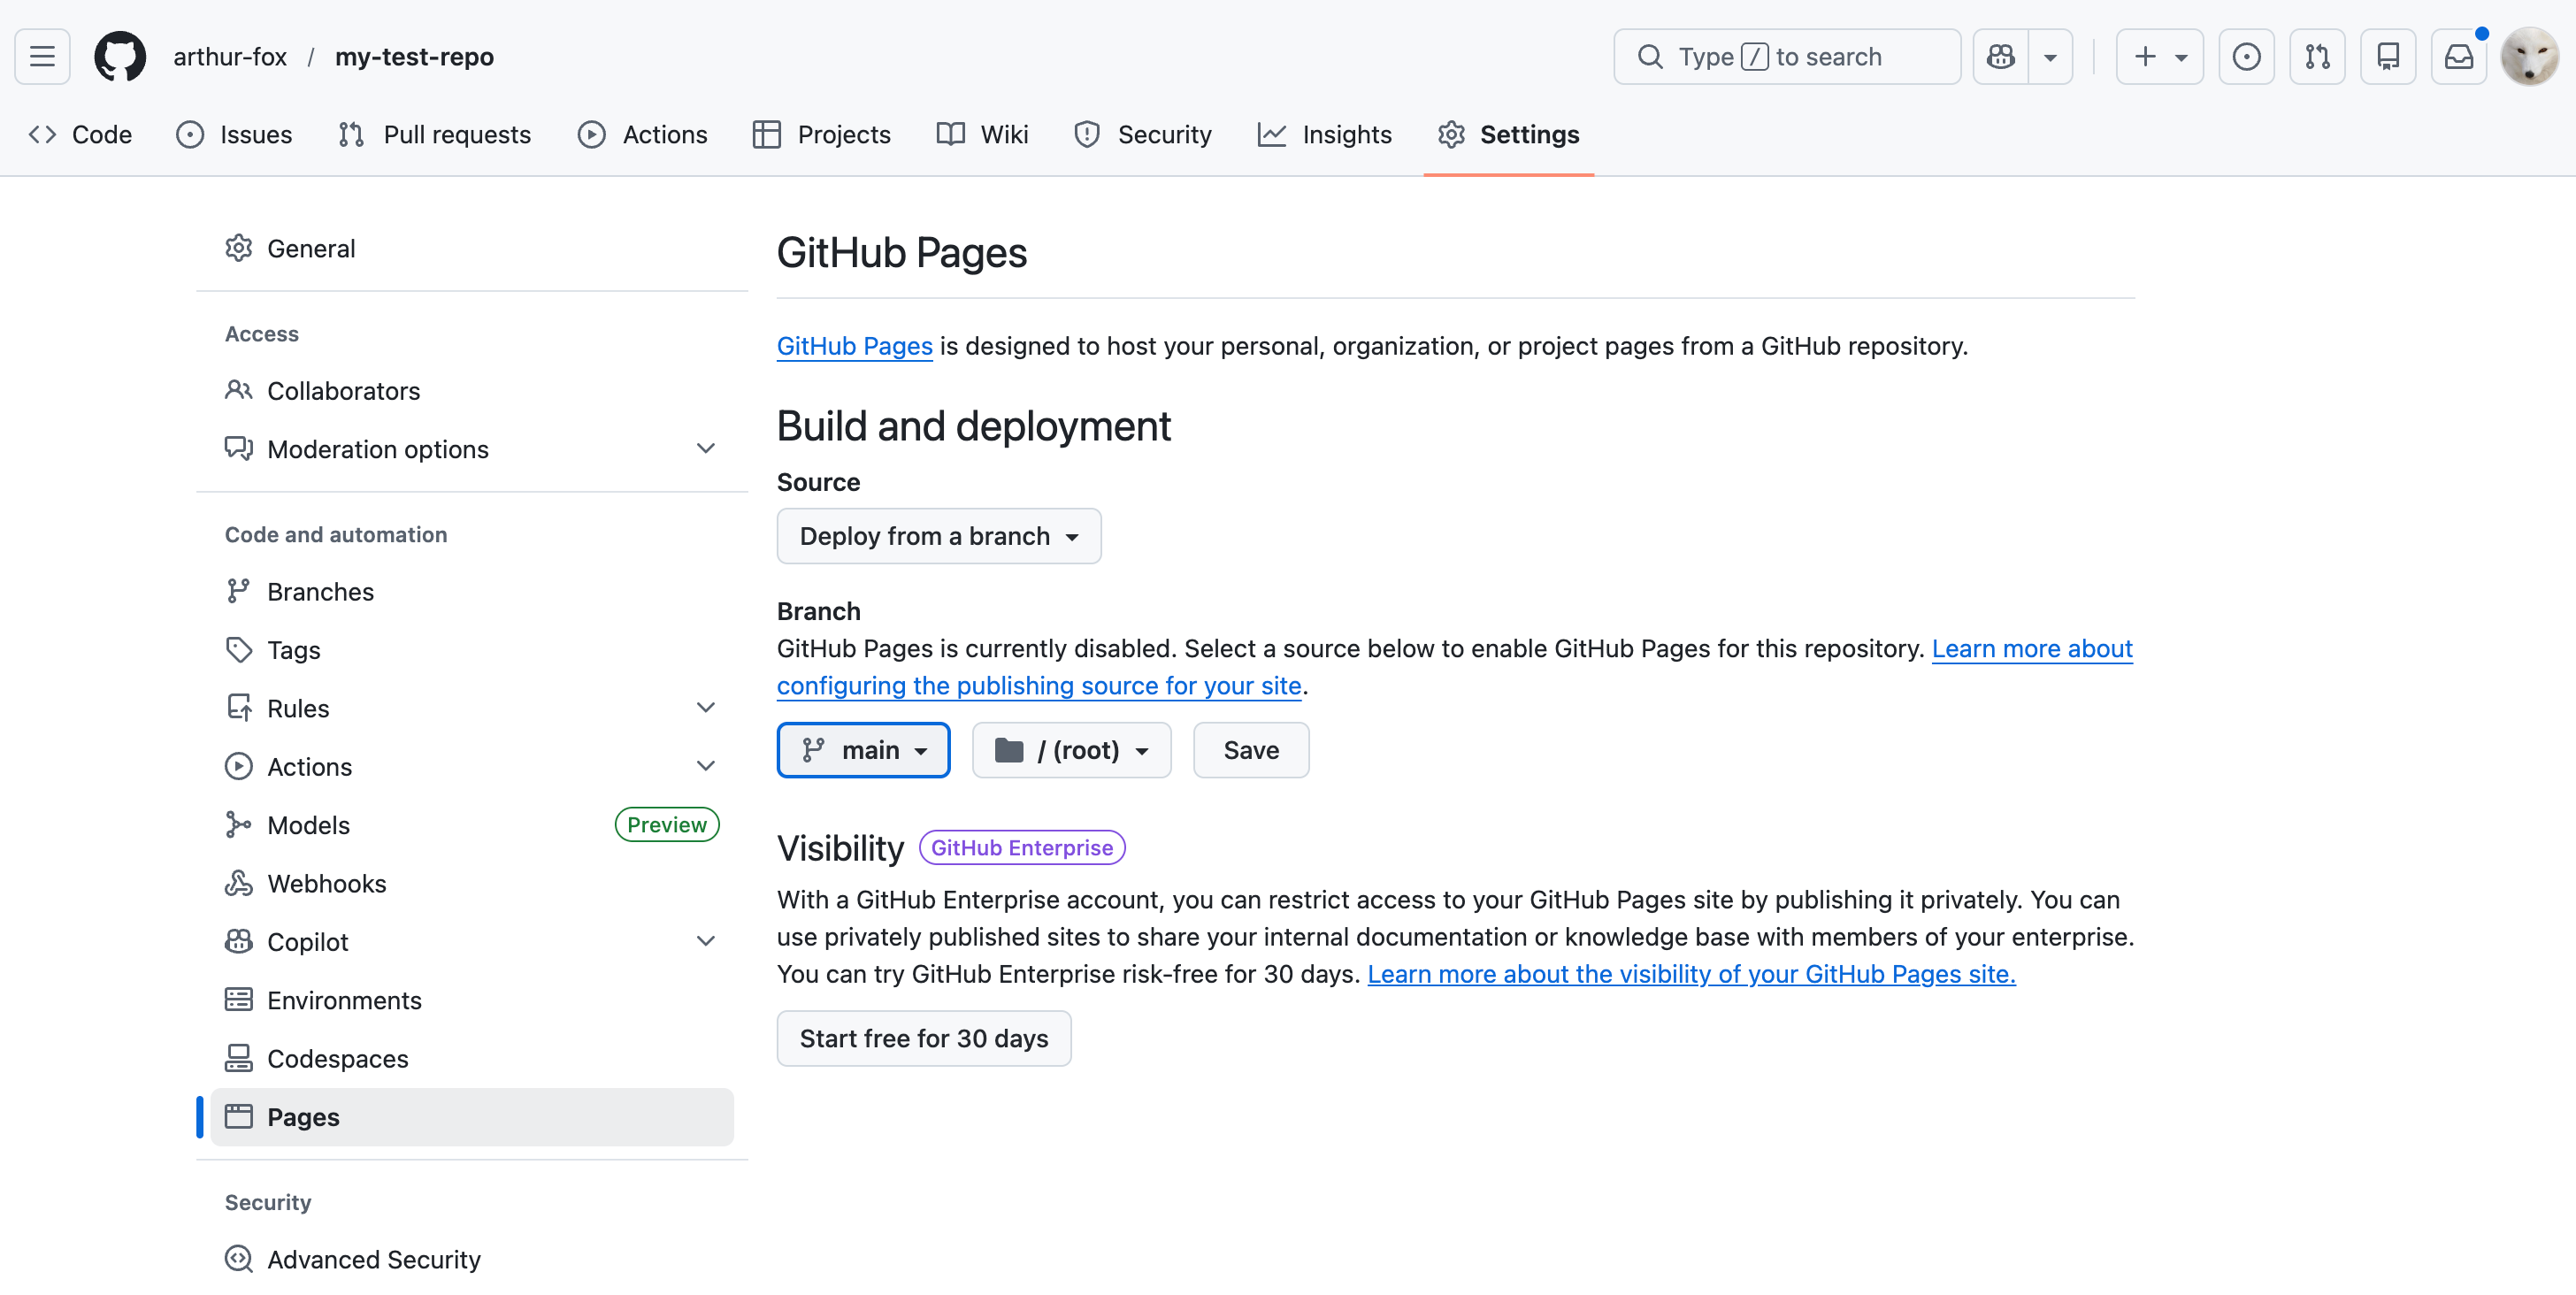
Simple!
Now your page will automatically be hosted for free through GitHub and if you used the code for index.html above then it will show something like this.
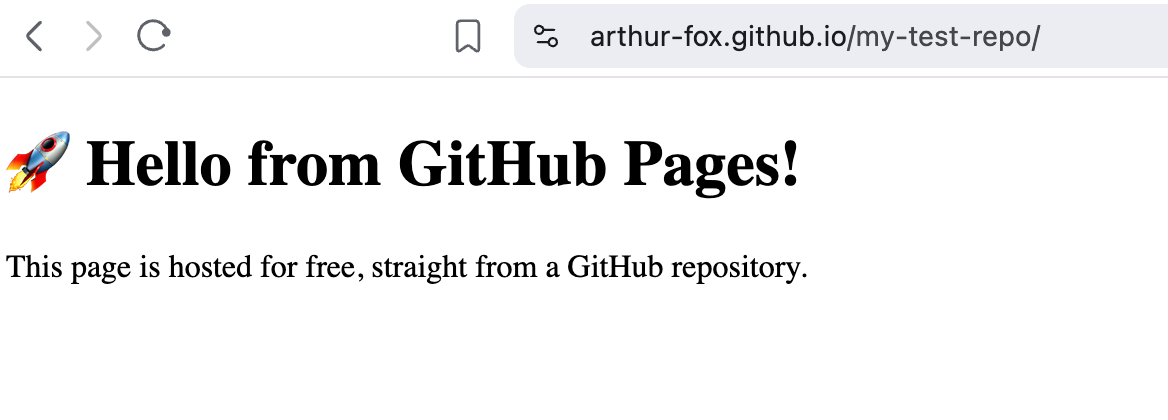
With Pages Your URL will be structured like this:
https://*github-username*.github.io/*repository-name*
In the background GitHub Actions is performing a form of “Continuous Integration” for you, which basically means that every time new code is uploaded to your repo’s main branch it will re-build it and make the changes to the website online.
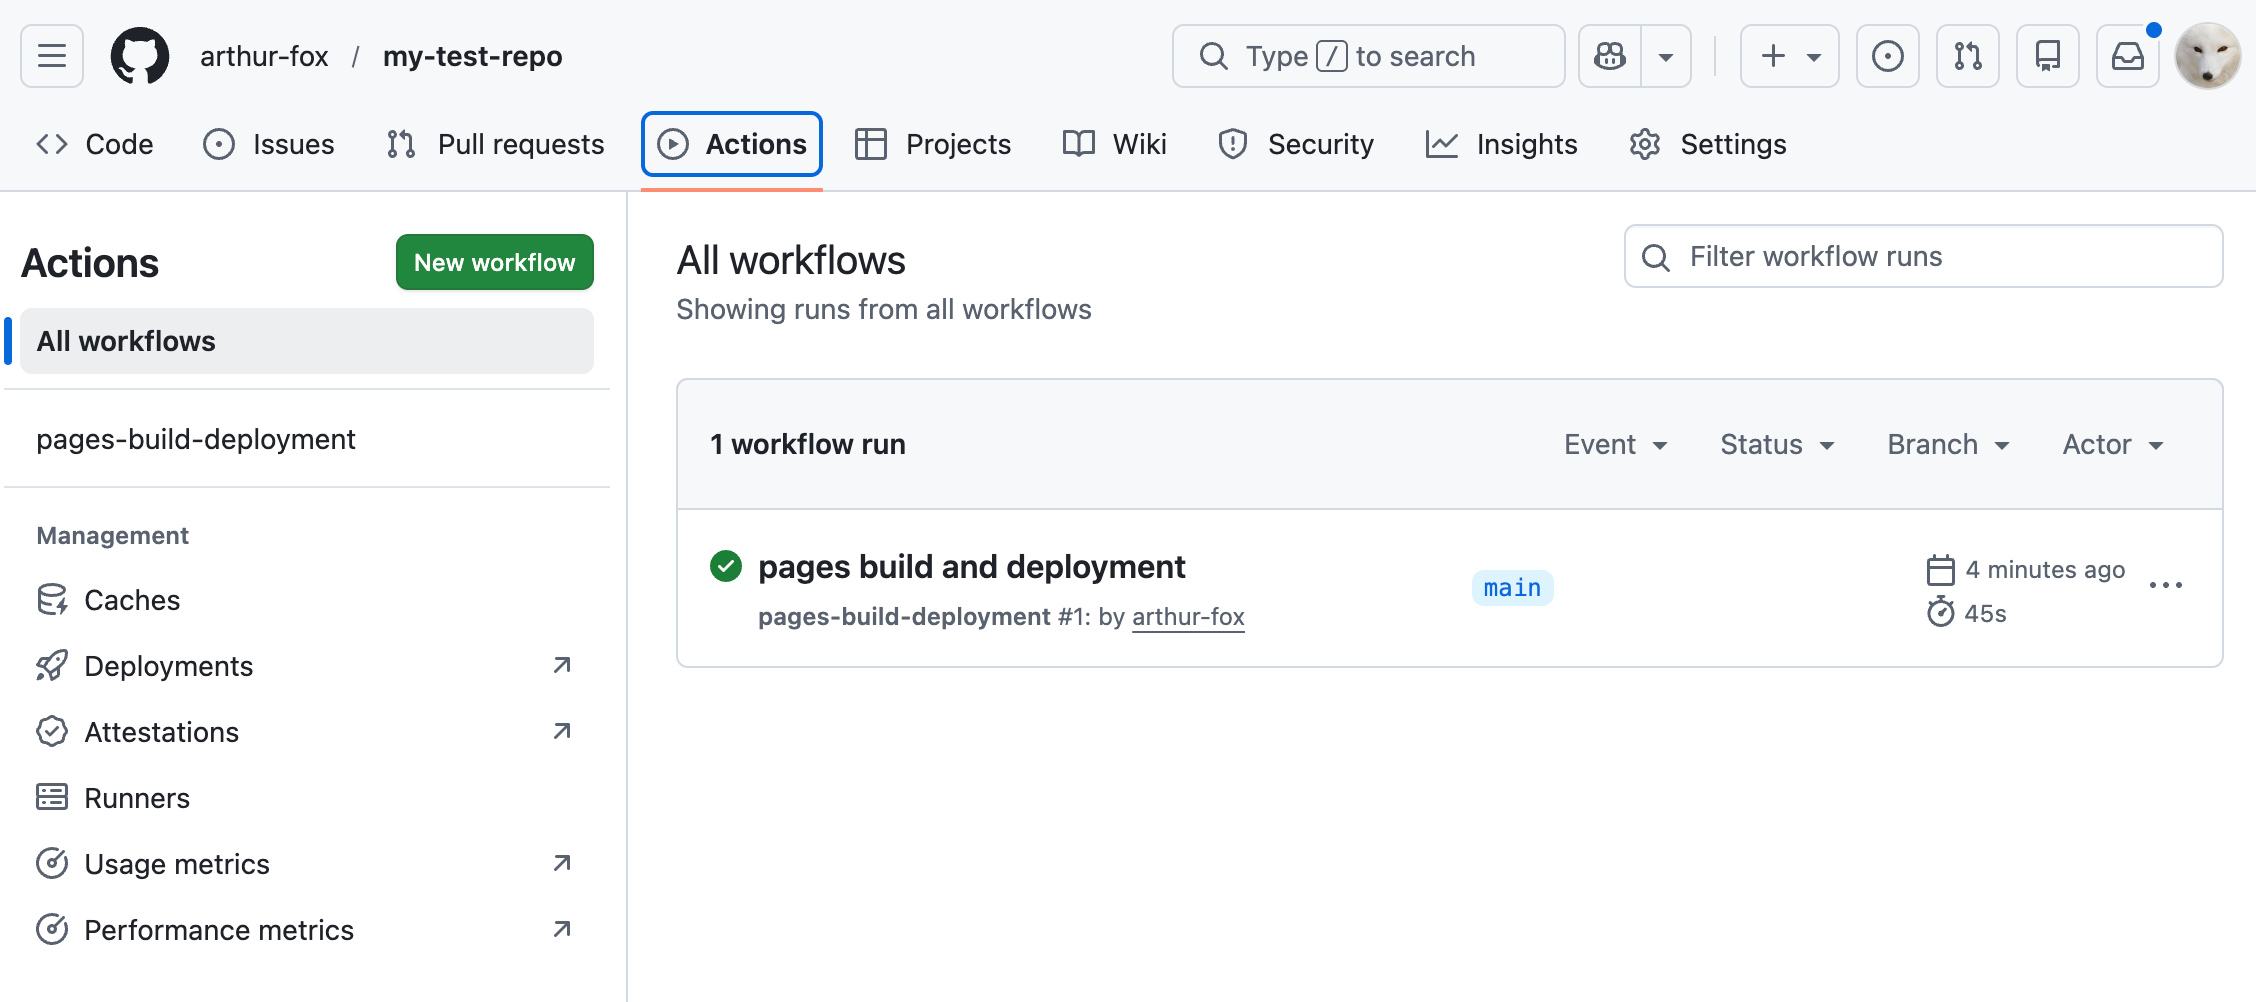
If you look at the GitHub Actions tab you can see that a workflow was created to run the build and in my example it has ran 1 time so far and updated 4 minutes ago.
Now every time you commit and push new code into the repo that workflow that was created for you will run and rebuild the new code and the website living on your given URL will get updated!
There’s a lot more to it
We’ve just gone through the real basics of GitHub today. We didn’t get into using any of its collaborative tools, we didn’t navigate its millions of repos and users, nor did we explore the CLI at all.
However, this is more than enough to get you effectively protecting your code as you vibecode away.
Using version control is not really an optional thing when you build software. Version control is essential to ensure that you don’t accidentally write over or lose important code and potentially lose days, weeks or even months of work, so if you’re vibecoding then you really must use it.
The more and more you use it the more you’ll find all the other great features available, and you’ll probably make good use of the CLI especially since your AI will be able to do it all for you.
The key thing from today though is that you now know the fundamentals and are able to visually understand what’s happening before you offload all the work to your AI of choice.
So go have fun vibecoding away while keep your code protected with GitHub!

Whenever you’re ready, these are the main ways I can help you:
Want high returns? Earn up to 14% APY with Yieldseeker!
Love Web3 & AI insights? Follow @afoxinweb3 on X!
New to crypto? Join our beginners community to master crypto fast!
Building a Web3 app? Get our expert product development support!