Bridge & Swap any EVM token with Jumper
Use Li.Fi's "Jumper Exchange" cross-chain DEX between 15+ EVM compatible chains!
TLDR:
Jumper Exchange is a web UI for Li.Fi’s bridge & DEX aggregation protocol.
Jumper offers routes to swap between different EVM tokens and chains.
Users are handheld through each individual transaction on a chosen route.
Jumper does not take custody of your funds, so the risks are very low!
I recently covered several foundational concepts such as CEXs vs DEXs, AMMs, and bridges, and last week I brought them all together when looking at Thorswap which is both a DEX and a bridge all wrapped up in one!
Thorswap is a very powerful DEX in that it allows liquidity to swap between 7 very different blockchains including Bitcoin, Dogecoin, Ethereum and more.
Today I want to carry on with cross-chain DEXs and look at one of my favourite ones for EVM compatible chains, namely Jumper Exchange by Li.Fi. In this post I’ll explain a little bit about Jumper and run through a simple tutorial on how to use it.
Jumper Exchange
Jumper exchange is effectively a cross-chain DEX created by Li.Fi. The Li.Fi team describe themselves as “a bridge & DEX aggregation protocol that provides the best cross-chain swap across all liquidity pools and bridges”, and they built Jumper itself as a web UI to show off their protocol in action.
Jumper makes it trivial to bridge and swap between 15+ EVM compatible chains. I covered Thorswap last week that does something similar, yet for only 7 different chains. The big difference here though is that Thorswap works with chains that are in no way interoperable, while Jumper works only with EVM compatible ones.
It gives users different routes to swap any EVM token to another token on a different chain, and then handholds them through the chosen route step-by-step without ever taking custody of user funds. Currently it creates routes across 17 chains by aggregating across 13 bridges and 34 DEXs!
So if you want to convert for example a stablecoin like DAI from Ethereum over to the a different token and chain like MATIC on Polygon then Jumper will give you several options of how to do this and run you through your chosen one.
Below you’ll see this in action as I go over the 5 main steps on how to use Jumper.
As a side note I personally have a lot of respect for Li.Fi because I remember them building the original version back in 2021 at an ETH Global hackathon that I participated in, and now they’ve become a large and growing protocol.
Open & Connect
Start by opening up Jumper and connect a Web3 wallet like Metamask with the top right connect button.
Select the “Exchange” button at the top and a UI will pop up allowing you to choose the exact chain and token you want to swap to and from.
There are two other options at the top too.
The “Gas” option will automatically set the receiving chain to be its native token, eg. ETH on Ethereum, AVAX on Avalanche, MATIC on Polygon, and so on.
While “Buy” is Jumper’s integration with Onramper.com that allows people to buy crypto with fiat through the likes of Moonpay or Topper. Note that this service only on-ramps to ETH, to swap for other tokens and chains you’ll need to use Jumper itself.
Select Swap
Next you can select the exact token and chain you want to swap to and from!
By just clicking on the “from” box you can see there’s a long list of options available, and you can even search through for specific tokens or write their contract address. Be aware though that for very obscure tokens there may not be any route available.
For this tutorial I chose to swap $30 worth of DAI from ETH over to MATIC on Polygon.
Note also that by default you’ll receive your tokens to the same address you sent them from. If you want to change the receiving address then select the little wallet button on the bottom-right and you can input a new one.
Select Route
After selecting the tokens, Jumper will give you a list of routes to choose from.
You can scroll through the list of options available, although they will usually recommend you the most favourable one at the top.
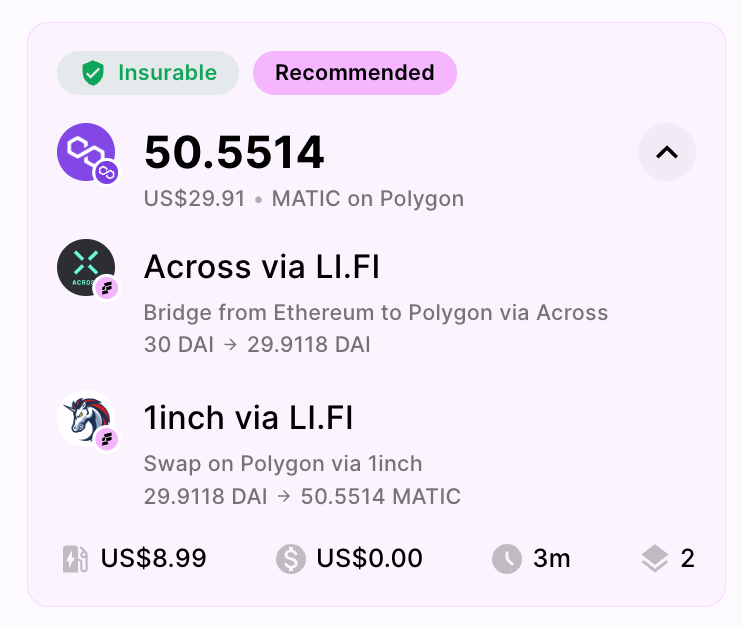
By clicking the arrow on the top-right of a route it will open up to show the exact path the liquidity will be routed through.
In this case you can see that this option will make use of the across bridge to bridge into Polygon, and then use 1inch on Polygon to swap the DAI to MATIC.
You can also see that it’ll cost approximately $8.99 in Gas, take 3m, and require 2 main steps to complete, in this case a bridge and a swap!
Review Route
Once you’ve picked the liquidity route you want to take, you will see it again more explicitly in the review screen.
You may notice here that there’s also an interesting option to provide “insurance” for your transfer with the help of InsurAce!
InsurAce will cover exploits such as hacks when your money was in transit and wasn’t received, or if some huge slippage event occurs that wasn’t accounted for and you receive a lot less money than you were promised.
Having the option to add insurance to your transfers is brilliant and definitely worth it when larger amounts of money are involved, although if you do claim expect a bunch of paperwork to fill in!
Bridge & Swap
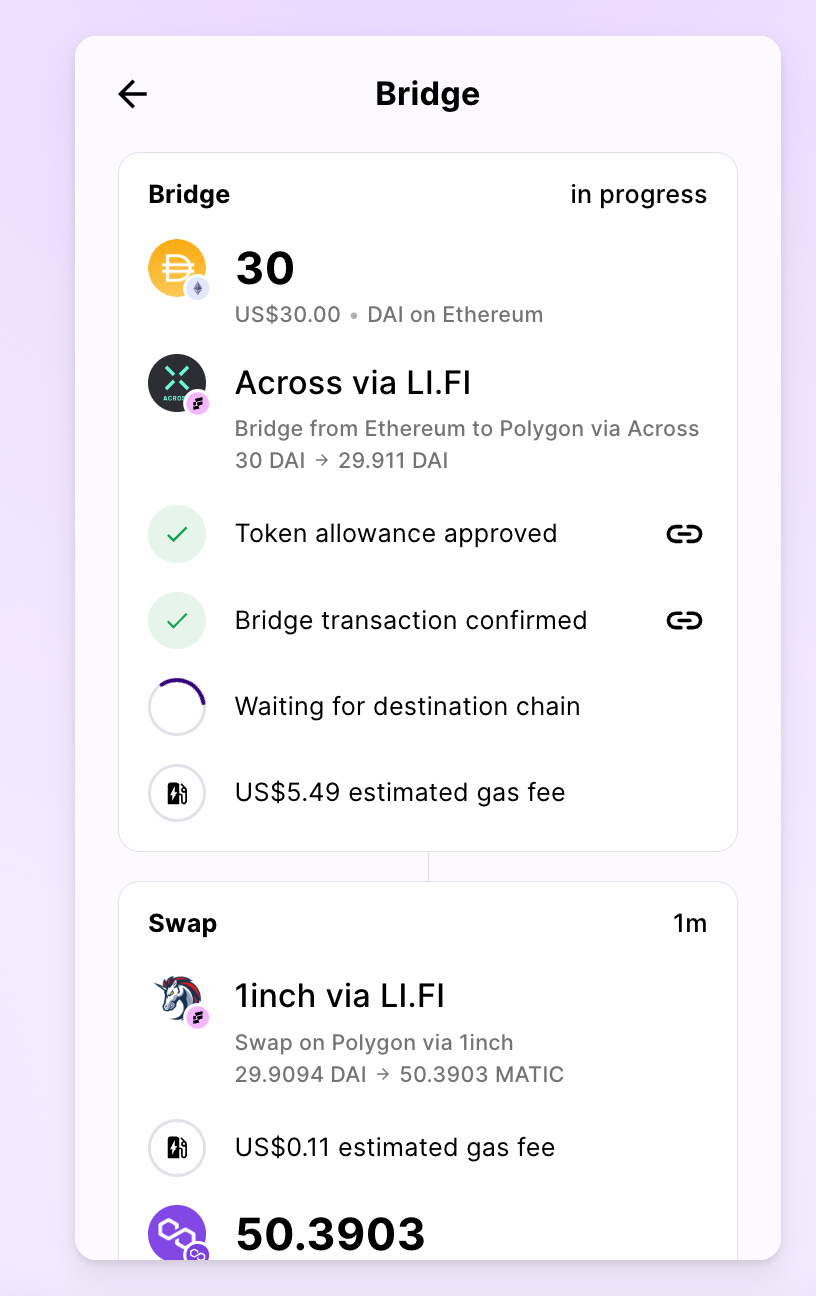
Kick off the bridging by selecting “Start Bridging” and you’ll be asked to sign a series of transactions. You can imagine that Jumper is holding your hand as it takes you through each step along the chosen route to swap between these tokens and chains.
In my case I first had to approve the spending of DAI by the across bridge and then send the DAI over.
Once the DAI was received on Polygon, it asked me to swap over to the Polygon mainnet in Metamask, and then had me approve the spending of DAI on 1inch and then trade DAI for MATIC through it!
Swaps tend to be fast and you need to be actively involved, but before you know it you’ll be finished and have your tokens on the new chain!
Congrats!
You’ve now swapped two separate tokens between entirely different chains!
As you can see Jumper is a really great tool for anyone navigating the EVM world. The way it hand-holds you through each swap is something really special because it means you never actively lose custody of your tokens or rely on a centralised party.
Plus most importantly you don’t have to figure out the best route for transferring tokens because Jumper takes away all the guess work for you. Imagine if you had to manually scour through the 13 bridges and 34 DEXs it currently supports?
So next time you want to swap between a couple of different tokens on EVM chains, you now know where to go!


